Getting Started
Introduction
Retrospect brings you specialized client backup software, namely Retrospect Host Server, to provide a comprehensive backup solution for your MS SQL Server. The MS SQL Server module of Retrospect Host Server provides you with a set of tools to protect your MS SQL Server, whether in VSS backup mode or ODBC backup mode.
Requirements
You are strongly recommended to configure or check all the requirements below before you proceed with the MS SQL server backup and restoration
Hardware Requirement
Refer to the following article for the list of hardware requirements for Retrospect Host Server:
Software Requirement
Refer to the following article for the list of compatible operating systems and application versions:
Retrospect Host Server Installation
Make sure the latest version of Retrospect Host Server has been installed directly on the MS SQL server.
Retrospect Host Server Add-On Module Configuration
Make sure the Microsoft SQL Server feature has been enabled as an add-on module in your Retrospect Host Server user account. Contact your backup service provider for more details.
Backup Quota Requirement
Make sure that your Retrospect Host Server user account has sufficient storage quota assigned to accommodate the storage of MS SQL Server backup set and retention policy.
Java Heap Size
The default Java heap size setting on Retrospect Host Server is 2048MB. For MS SQL Server backup it is highly recommended to increase the Java heap size setting to be at least 4096MB to improve backup and restore performance. The actual heap size is dependent on the amount of free memory available on your MS SQL server.
MS SQL Server Registry
Make sure the MS SQL entry is present in the registry key "HKEY_LOCAL_MACHINE\SOFTWARE\Microsoft\Microsoft SQL Server\Instance Names\SQL".
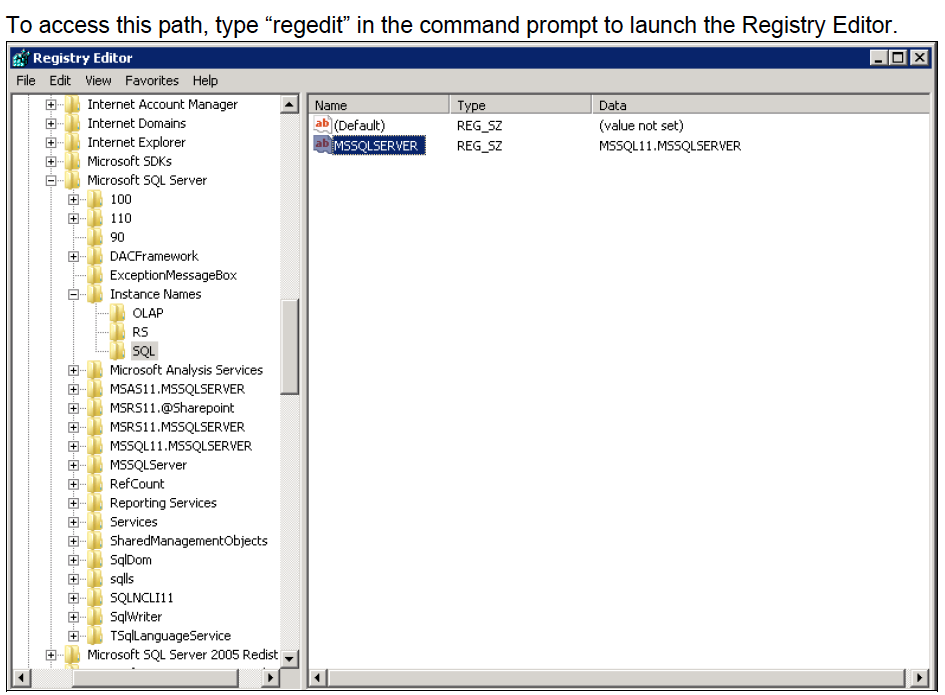
Note: Pay extra attention when you are checking configuration in Registry Editor. Any unauthorized changes could cause interruption to the Windows operation.
SQL Server Services
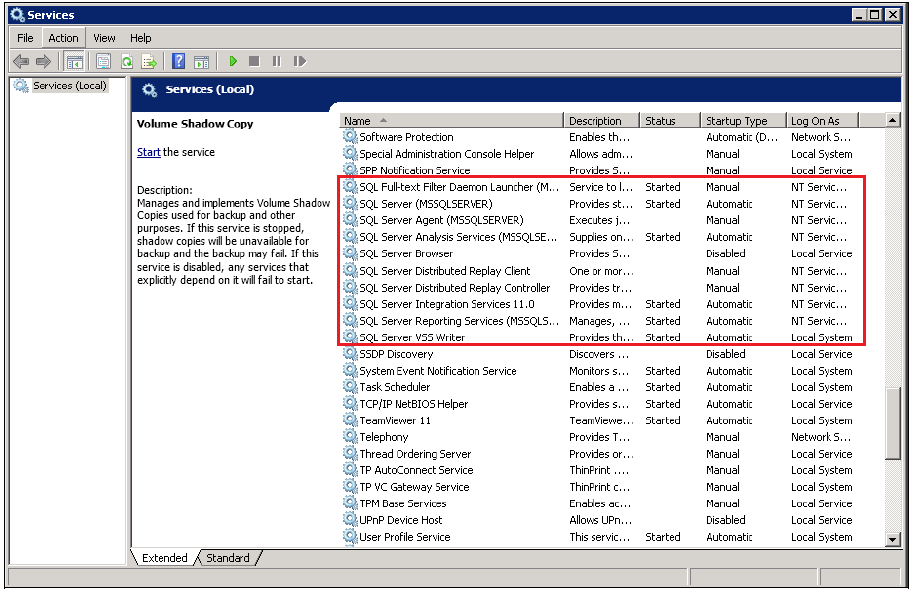
Ensure that the following SQL Server Services have been enabled in the Windows Services menu.
Launch Services in Windows by clicking Start then typing “Services” in the search box. All MS SQL server related services should be started by default. If in case it is not, turn it on by right clicking the item then selecting Start.
Transport Layer Security (TLS)
For MS SQL Server 2005, 2008, 2012, and 2014 VSS and ODBC backup modes, TLS version 1.0 must be enabled as only TLS version 1.0 is supported.
To check if TLS 1.0 is enabled on the MS SQL machine, launch the registry editor and locate the following path:
“HKEY_LOCAL_MACHINE\SYSTEM\CurrentControlSet\Control\SecurityProviders\SCHANNEL\Protocols\TLS 1.0\Client”
The value of registry key should be “1” to indicate that TLS 1.0 is enabled.
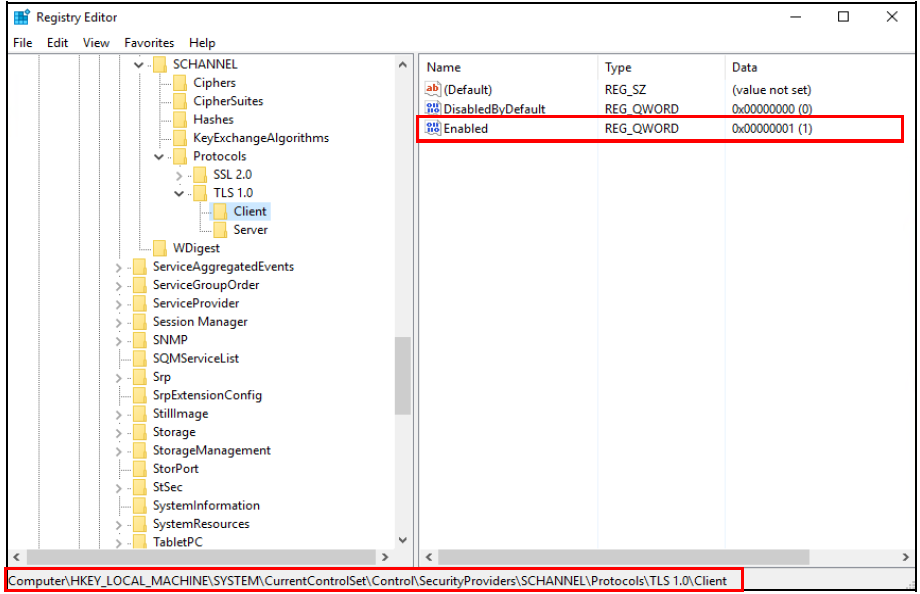
Meanwhile, for MS SQL Server 2016, 2017 and 2019 VSS and ODBC backup modes, TLS version 1.2 must be enabled as only TLS version 1.2 is supported.
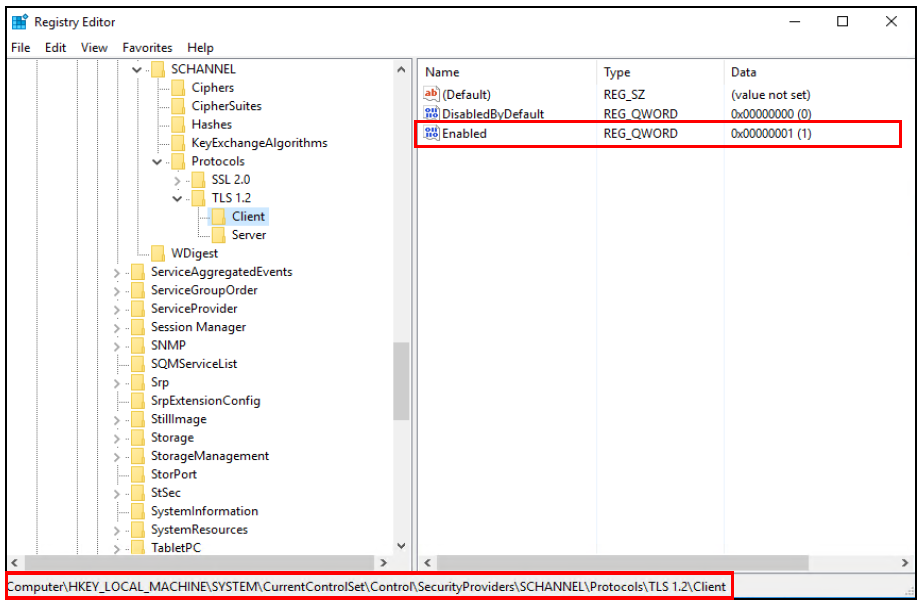
To check if TLS 1.2 is enabled on the MS SQL machine, launch the registry editor and locate the following path:
“HKEY_LOCAL_MACHINE\SYSTEM\CurrentControlSet\Control\SecurityProviders\SCHANNEL\Protocols\TLS 1.2\Client”
The value of registry key should be “1” to indicate that TLS 1.2 is enabled.
Upgrade VMware Tools Requirement
To avoid unexpected java crash, if the Windows machine is a guest VM hosted on a VMware Host then it is highly recommended that the VMware tools version installed on the guest VM must be 10.0.5 or above. Below is the warning message that will be displayed if the version of the VMware Tools is less than 10.0.5.
Retrospect Host Server supports two (2) backup modes when creating a backup set for MS SQL server: VSS mode and ODBC mode.
VSS Backup Mode
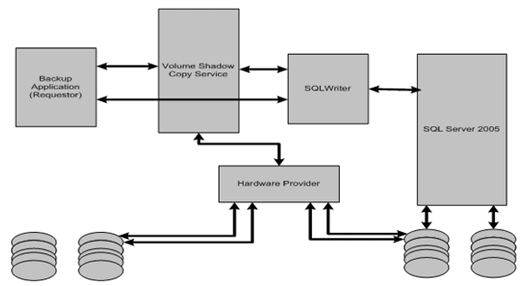
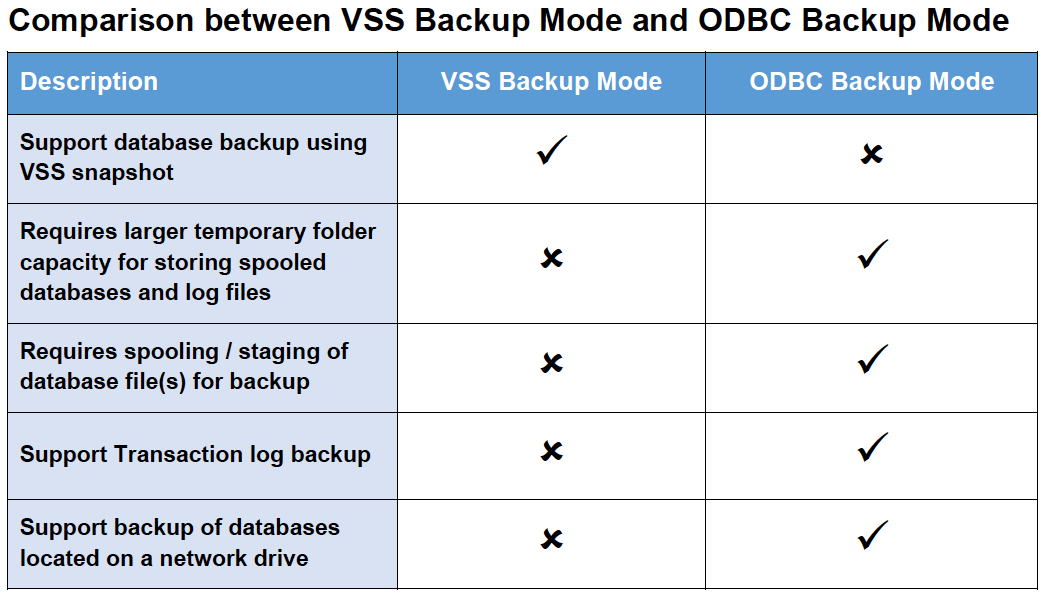
The VSS-based backup utilizing the Microsoft SQL Server VSS Writer to obtain a consistent snapshot of the MS SQL databases, no spooling / staging of database file(s) is required during the backup process.
User Account Privileges
Make sure the operating system account that performs the backup and restore has sufficient permission to access both SQL server and VSS.
Temporary Directory Folder
- The temporary directory folder is used by Retrospect Host Server for storing backup set index files and incremental/differential delta files. To ensure optimal backup/restoration performance, it is recommended that the temporary directory folder to be set to a local drive. The temporary folder should not be located on Windows system partition or the database partition to minimize any potential performance impact on Windows or database.
- It is recommended that the temporary directory folder should have at least free disk space of 50% of the total database size because the default Delta ratio is 50%. The actual free disk space required depends on various factors including the size of the database, number of backup destinations, backup frequency, in-file delta settings etc.
- The SQL Windows service must have read and write permission to the temporary directory.
SQL Server VSS Writer
Make sure the SqlServerWriter has been installed and running on the SQL server, and the writer state is Stable. This can be verified by running the “vssadmin list writers” command in the Windows Command Prompt.
MS SQL Server Volumes
MS SQL Server volumes must use a file system which supports the use of VSS snapshot, for example NTFS.
Windows Services
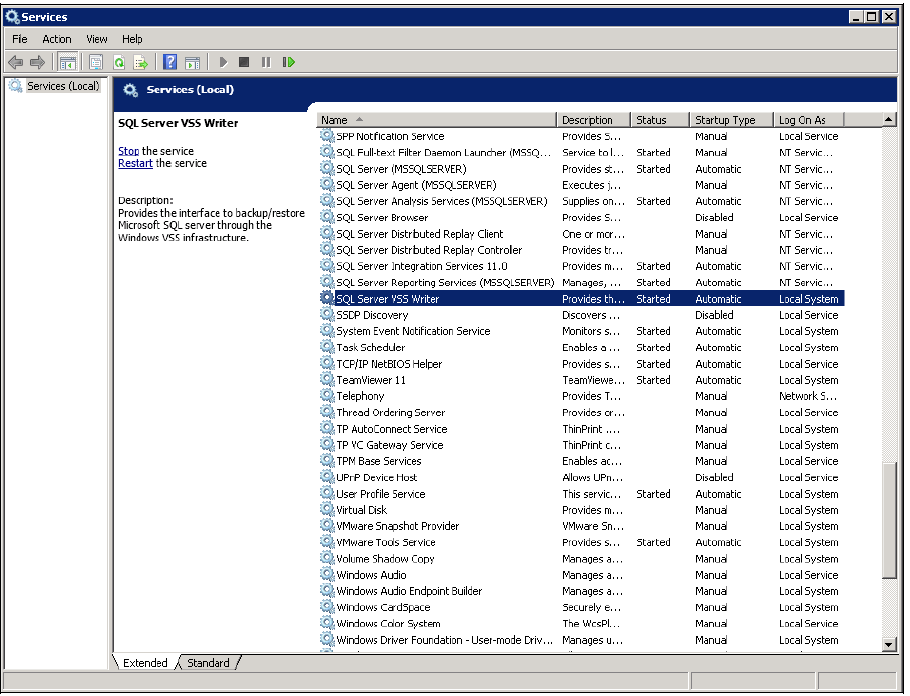
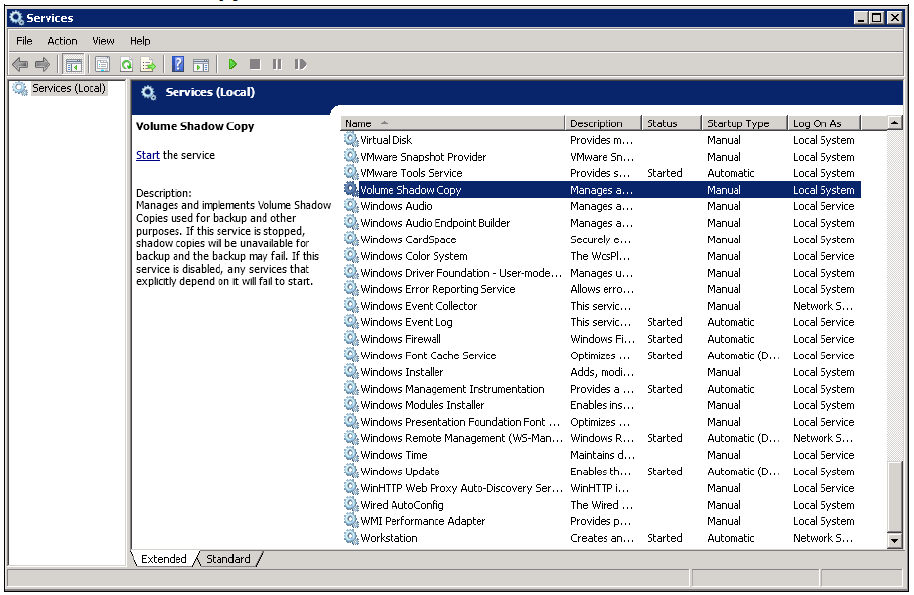
Ensure that the following services have been enabled in the Windows Services menu.
Launch Services in Windows by clicking Start then typing “Services” in the search box. All MS SQL server related services should be started by default, in case if it is not, turn it on by right clicking the item then selecting Start.
1. SQL Server VSS Writer
2. Volume Shadow Copy
MS SQL Recovery Model
VSS backup mode does not support backup of transaction log files, but for databases configured in either Full or Bulk-logging recovery model, this may eventually result in transaction logs filling up the available disk space on the volume of the MS SQL Server.
https://technet.microsoft.com/en-us/library/cc966520.aspx
To prevent this from occurring, you can modify the recovery model of database selected for backup to Simple.
Alternatively, to truncate the transaction log files, you can perform a transaction log backup manually (with the instruction provided in Appendix B), or create an additional MS SQL database backup set in ODBC backup mode to perform a transaction log backup.
Please refer to ODBC Backup Mode for further details.
ODBC Backup Mode
Temporary Directory Folder
- The temporary directory folder is used by Retrospect Host Server for storing the database files, incremental/differential delta files and backup set index files. To ensure optimal backup/restoration performance, it is recommended that the temporary directory folder is set to a local drive.
- The temporary folder should not be located on Windows system partition or the database partition to minimize any potential performance impact on Windows or database. If the temporary directory folder is located on a network drive, make sure the login account has sufficient permission to access the network resources.
- Please refer to the following URL for more details:
https://technet.microsoft.com/en-us/library/cc966520.aspx
- It is recommended that the temporary directory folder should have at least free disk space of 150% of the total database size. The actual free disk space required depends on various factors including the size of the database, number of backup destinations, backup frequency, in-file delta settings etc.
- The SQL Windows service must have read and write permission to the temporary directory.
Maximum Worker Thread
For SQL instance with large number of database (more than 500 databases), consider increasing the “Maximum Worker Thread” setting. Refer to the article below for further details.
https://docs.microsoft.com/en-us/sql/database-engine/configure-windows/configure-the-max-worker-threads-server-configuration-option
MS SQL Recovery Model
ODBC backup mode supports transaction log backup for database with Full recovery model.
- For database with Simple recovery mode, only full database and differential database backups can be performed.
https://docs.microsoft.com/en-us/sql/relational-databases/backup-restore/recovery-models-sql-server
- To perform a transaction log backup, please change the recovery model of corresponding databases from Simple to Full.
Best Practice and Recommendation
Considerations for Backing up and Restore of System Databases
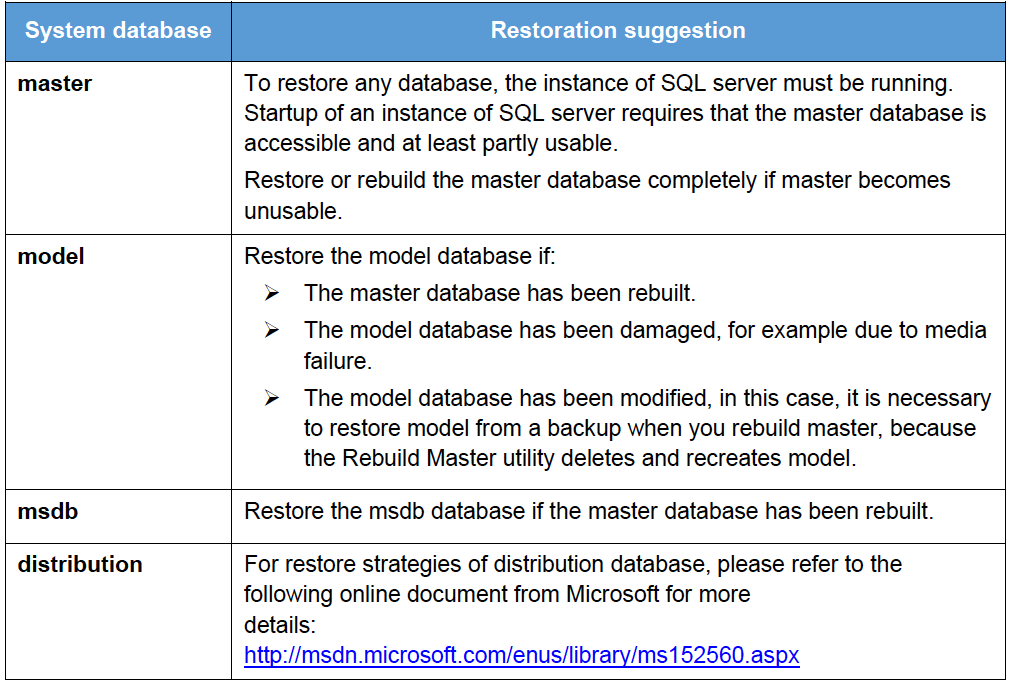
Refer to the following tables for considerations for backup and restoration of system databases.
For backup of system databases
SQL server maintains a set of system level database which are essential for the operation of the server instance.
Several of the system databases must be backed up after every significant update, they include:
1. master
2. model
3. msdb
4. distribution (for SQL database with replication enabled only)
This table summarizes all of the system databases.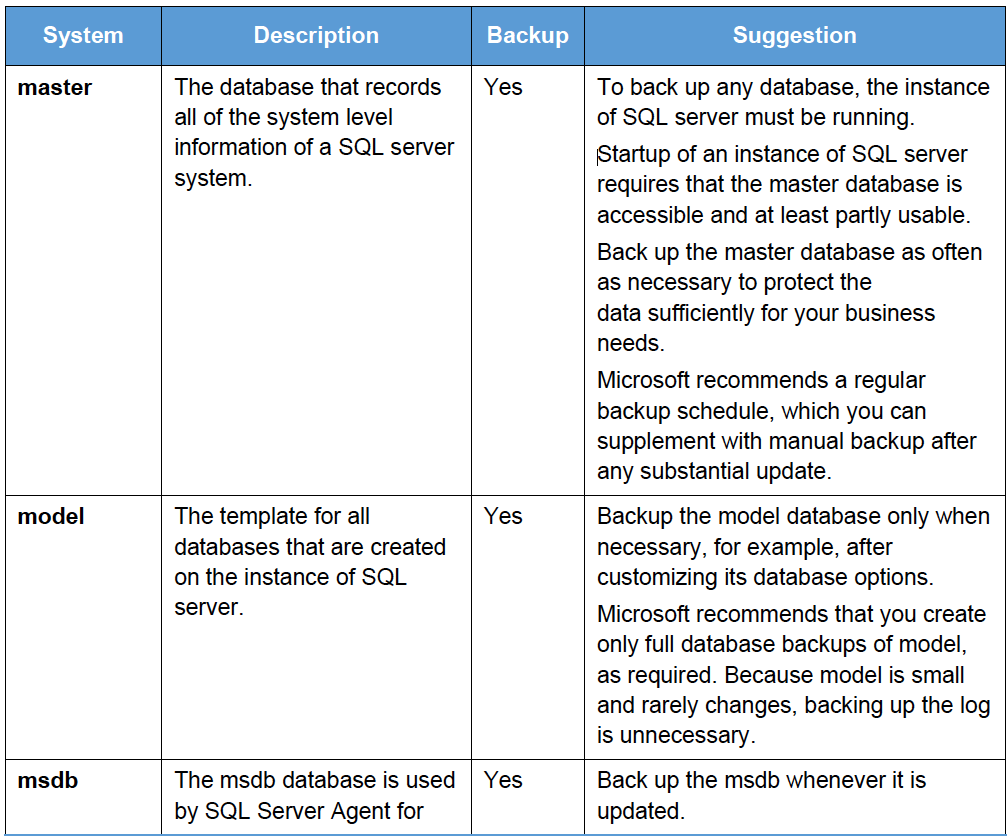
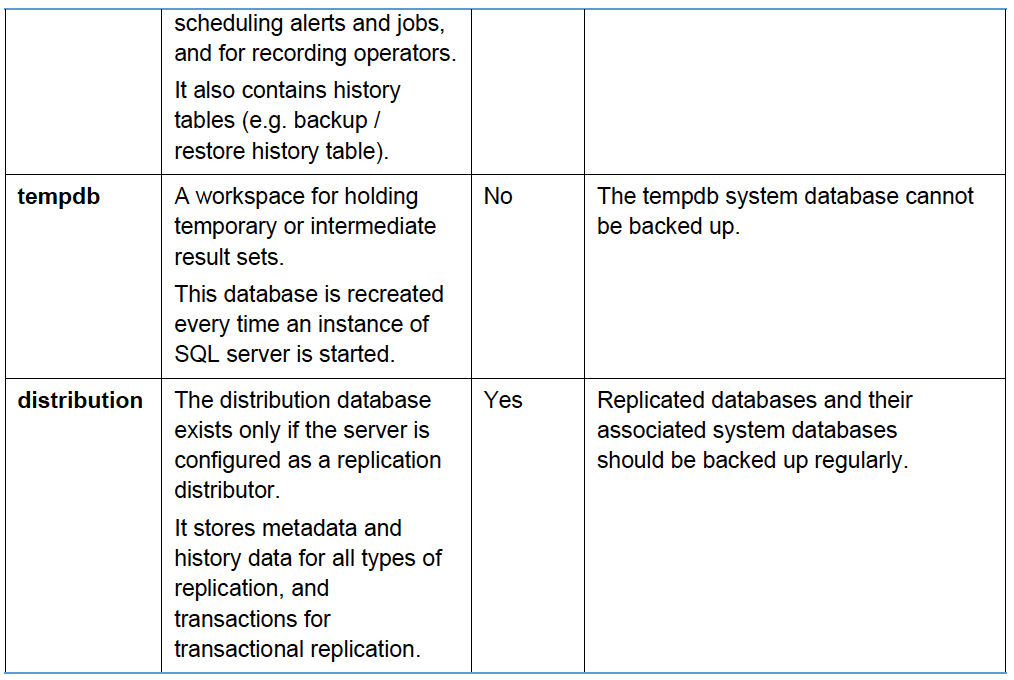
3.1.2 For restore of system databases
Best Practices and Recommendations
The following are some best practices and recommendations we strongly recommend you follow before you start any MS SQL Server backup and restore.
1. For VSS backup mode, it is suggested to set the backup schedule to a time when system activity is low to achieve the best possible performance.
2. It is recommended to use ODBC backup mode for backup of database with a high volume of transaction, since such setup may require frequent backups. Transaction log backup (which is only supported by ODBC backup mode) can be performed periodically and is less resource intensive than VSS based backup.
3. For maximum data protection and restore options, it is recommended to configure:
i. At least one offsite or cloud destination
ii. At least one local destination for fast recovery
4. Perform test restores periodically to ensure your backup is set up and performed properly. Performing recovery test can also help identify potential issues or gaps in your recovery plan. It is important that you do not try to make the test easier, as the objective of a successful test is not to demonstrate that everything is flawless. There might be flaws identified in the plan throughout the test and it is important to identify those flaws.
5. The Restore Raw File option is for advanced MS SQL Server administrator and should only be used if you have in-depth knowledge and understanding of your MS SQL Server, otherwise, it is not recommended to use this option as there are additional MS SQL techniques required to perform the manual restore.
6. To ensure an optimal backup/restoration performance, it is highly recommended to set the temporary directory folder to a location with sufficient free disk space. It must be on another location other than Drive C: (e.g. Drive E:).
7. The periodic backup schedule should be reviewed regularly to ensure that the interval is sufficient to handle the data volume on the machine. Over time, data usage pattern may change on a production server, i.e. the number of new files created, the number of files which are updated/deleted, and new users may be added etc.
Consider the following key points to efficiently handle backup sets with periodic backup schedule.
Hardware – to achieve optimal performance, compatible hardware requirements is a must. Ensure you have the backup machine’s appropriate hardware specifications to accommodate frequency of backups,
- _so that the data is always backed up within the periodic backup interval
- _so that the backup frequency does not affect the performance of the production server
- Network – make sure to have enough network bandwidth to accommodate the volume of data within the backup interval.
Retention Policy - also make sure to consider the retention policy settings and retention area storage management which can grow because of the changes in the backup data for each backup job.
Limitation
Standalone Environment Only
Retrospect Host Server does not support backup of MS SQL server in cluster environment, only standalone environment is supported.
VSS Backup Mode
1. Only support backup of database on local drive. Database on network drive is not supported. For backup of database on a network drive, it is recommended to use ODBC backup mode instead.
2. VSS backup mode does not support transaction log backup, therefore, transaction log backup will have to be done manually. Or you can choose ODBC backup mode for transaction log backup.
3. In order to truncate transaction logs, you have to perform a manual log truncation, which could be time consuming.
File System for Database Snapshot
You cannot create database snapshots on FAT32 file system or RAW partitions. The sparse files used by database snapshots are provided by the NTFS file system.
SQL Server Version
1. Automated Restore Option If you have chosen the automated restoration to the Original SQL server or Alternate SQL server of your selection, the restoration can only be done in a SQL server version that is the same as the one used for performing the backup.
2. Manual Raw file Restore Option If you have chosen to restore the raw file, the raw database file(s) can be manually restored to the same or newer SQL server version that you used to perform the backup.
Restoration to another SQL Server
1. If you would like to restore database to an alternate SQL server, you can only choose to restore one database to restore at a time.
2. If you would like to restore database to an alternate SQL server, make sure you choose to restore raw file by enabling the checkbox Restore raw file.
Remote Machine Backup
MS SQL server databases backup running on a remote machine is not supported. Ensure that the latest version of Retrospect Host Server is installed directly on the MS SQL server.
Backup Mode
You can choose from one of the two backup modes when creating a backup set for MS SQL server. The information below provides you with more details on each backup mode.
VSS Mode
*Introduction
*
VSS-based backup utilizing the Microsoft SQL Server VSS Writer to obtain a consistent snapshot of the MS SQL databases, no spooling / staging of database file(s) is required during the backup process.
Temporary Folder Requirement
[.underline]#Location for temporary folder
#The temporary directory folder is used by Retrospect Virtual’s Host Agent for storing backup set index files and incremental/differential delta files. To ensure optimal backup/restoration performance, it is recommended that the temporary directory folder is set to a local drive. The temporary folder should not be located on Windows system partition or the database partition to minimize any potential performance impact on Windows and or database.
[.underline]#Temporary folder capacity
#With VSS-based backup, the disk space of the temporary folder required for storing the VSS image is significantly smaller than using the ODBC spooling backup method. As the extra space is not required to hold the full database.
It is recommended that the temporary directory should have at least free disk space of 50% of the total database size. The rationale behind this recommended free disk space is the default in-file delta ratio settings is 50%, therefore Retrospect Virtual’s Host Agent could generate incremental or differential delta file(s) of up to 50% of the total database size. The actual free disk space required depends on various factors including the size of the database, number of backup destinations, backup frequency, in-file delta settings etc.
Pros
[.underline]#Fast and minimal interruption
#The database snapshot capture process is fast and can take place on a running server, as you may continue to work when the snapshot capturing is taking place, there may be another process that holds your input in some memory section until the snapshot capture is completed. That said, the whole snapshot capture is fast, so there is no need for you to stop working and it causes minimal interruption to your business operation.
[.underline]#Significantly lesser disk burden
#VSS Snapshot typically requires much less additional disk space than clones which is the traditional backup method by spooling database into the temporary folder. Oftentimes, the capacity of the database to back up is huge and therefore the temporary folder would overload with the equal or even larger disk space if traditional backup method is used. By utilizing the VSS technology, it helps your system greatly reduce disk capacity burden and promote optimized performance.
Cons
[.underline]#No Transaction Log Backup
#MS SQL does not support transaction log backup when VSS is used, therefore, transaction log backup will have to be done manually.
[.underline]#Workaround is time consuming
#In order to truncate the transaction logs, you have to either change the Recovery model to Simple or perform a manual log truncation, which could be time consuming.
Transaction Log Handling
VSS based backup no longer requires backup of the transaction log files, however for databases configured in either full or bulk-logging recovery model, this may eventually result in transaction logs filling up the available disk space on the volume of the MS SQL Server.
https://technet.microsoft.com/en-us/library/cc966520.aspx
To prevent this from occurring, it is recommended to change the recovery model of database selected for backup to simple recovery model.
Refer to the following steps for details:
- In SQL Server Management Studio, expand Databases, select a user database, or expand System Databases and select a system database.
- Right-click the corresponding database, then click Properties to open the Database Properties dialog box.
- In the Select a page pane, click Options.
- The current recovery model is displayed in the Recovery model list box. Modify the recovery model by selecting Simple from the model list.
Important: Only modify the recovery model of a live database during low activities hour. It is also recommended to perform a full backup before changing the recovery model.
For MS SQL Server setups where you cannot modify the recovery model of the database, please refer to Appendix B for details on how to truncate transaction log (e.g. perform a transaction log backup manually).
ODBC Mode
Introduction
By using the ODBC mode for MS SQL backup, database files are spooled to a temporary directory before being uploaded to the backup destination.
Temporary Folder Requirement
[.underline]#Location for temporary folder
#The temporary directory folder is used by Retrospect Virtual’s Host Agent for storing; the database files, incremental/differential delta files, and backup set index files. To ensure optimal backup/restoration performance, it is recommended that the temporary directory folder is set to a local drive. The temporary folder should not be located on Windows system partition or the database partition to minimize any potential performance impact on Windows and or database.
[.underline]#Temporary folder capacity
#ODBC backup requires a significantly larger disk space of temporary folder as it need to store the database files spooled during the backup process. It is recommended that the temporary directory have disk space of at least 150% of the total database size. For each database backup, Retrospect Virtual’s Host Agent will spool the database files to the temporary directory before they are uploaded to the backup destination. Also, additional space is required for in-file delta generation the default in-file delta ratio settings is 50%, therefore Retrospect Virtual’s Host Agent could generate incremental or differential delta file(s) of up to 50% of the total database size. The actual disk space required depends on various factors, including the size of the database, number of backup destinations, backup frequency, in-file delta settings etc.
Pros
[.underline]#Support Automated Transaction Logs Backup
#Schedule backup of transaction log can be configured so that the transaction logs can be backed up periodically and the transaction logs are truncated automatically after each backup job.
[.underline]#Support Point in Time Recovery
#The ability to restore to a point in time for all of your transaction log backups.
[.underline]#Support Backup of High Transaction Databases
#For databases which supports a high number of transaction which may require frequent backups. Transaction log backups at regular intervals are more suitable and less resource intensive than VSS based backups, i.e. transaction log backup every 60 minutes, 30 minutes, 15 minutes etc depending on the database transaction volume.
Cons
[.underline]#Large disk space required
#Since the database files will be spooled to a temporary folder before uploading to backup destination, investment on hard disk could be high if your MS SQL database size is large.
[.underline]#Slower backup process
#By utilizing the conventional spooling method, it could take a long time to back up the database and the speed is subject to various factors, including database size, network transfer speed, backup frequency, etc.
Detailed Process of Periodic Data Integrity Check (PDIC)
Starting Retrospect Host Server
Login to Retrospect Host Server
- Click the Backup Sets icon on the main interface of Retrospect Host Server.
- Enter the login name and password of your Retrospect Host Server account provided by your backup service provider, then click OK to login.
Performing Backup for Microsoft SQL Server
Creating Backup Set for Microsoft SQL Server
After successful login, the Host Server Console will appear.
- Click the Backup Sets icon on the main interface of Retrospect Host Server.
2. Create a new backup set by clicking the “+” icon next to Add new backup set.
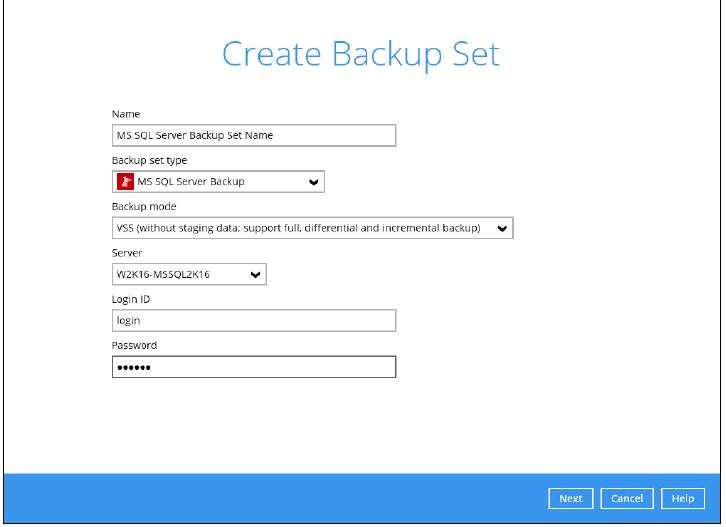
3. Select the Backup set type as MS SQL Server Backup.
Name – enter a meaningful backup set name
Backup mode – choose between VSS mode and ODBC mode. Refer to the Backup Mode section for details on the differences between the two modes.
Server - Retrospect Host Server supports backup of multiple SQL instance in one backup set. In this Server drop-down menu, you can choose to back up multiple SQL instances or a specific instance of your choice.
Login - Enter the login ID for the chosen instance.
Password – Enter the password for the chosen instance.
Click Next to proceed when you are done with the settings.
- 4. In the Backup Source menu, select the database you would like to back up, then click Next to proceed.
If you have chosen to back up multiple SQL instances in the previous step, databases in all the chosen instances will be shown here.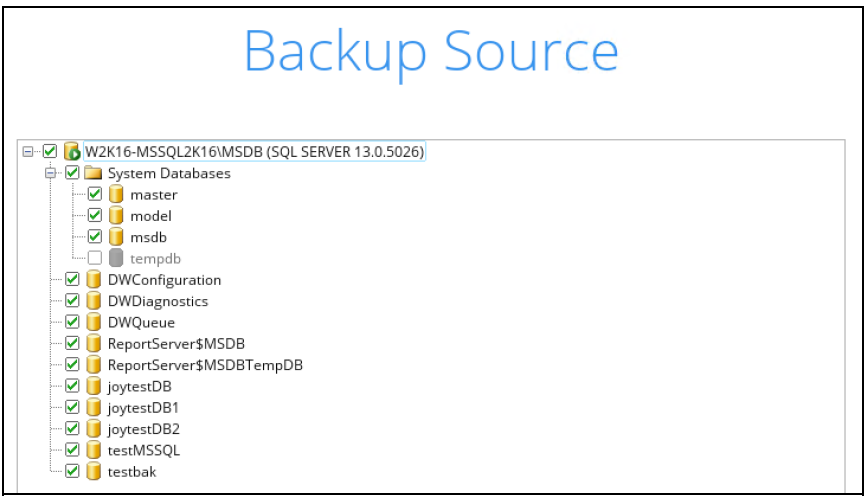
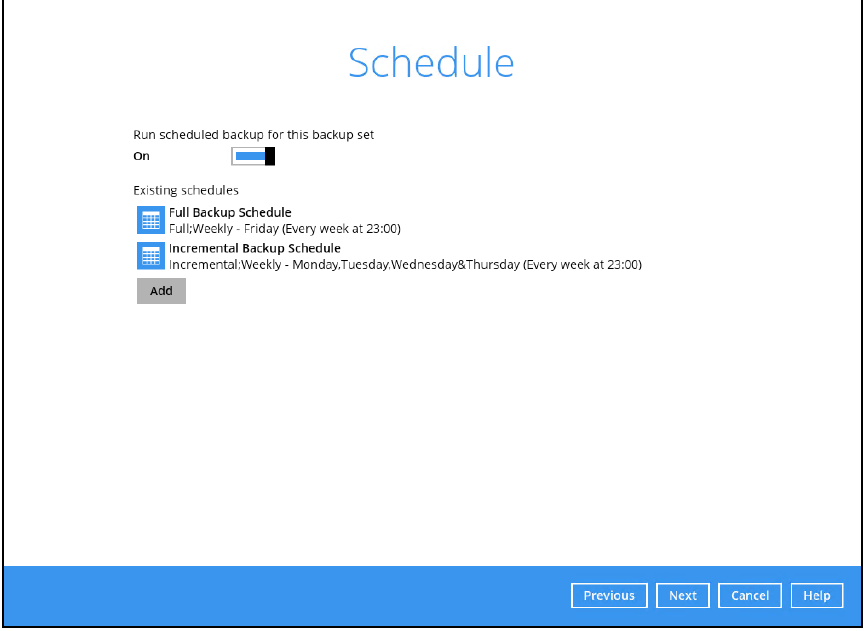
5. In the Schedule menu, you can configure a backup schedule for backup job to run automatically at your specified time interval. Click Add to add a new schedule, then click Next to proceed when you are done with the settings.
6. In the Destination menu, select a backup destination where the backup database will be stored. Click the “+” icon next to Add new storage destination / destination pool.
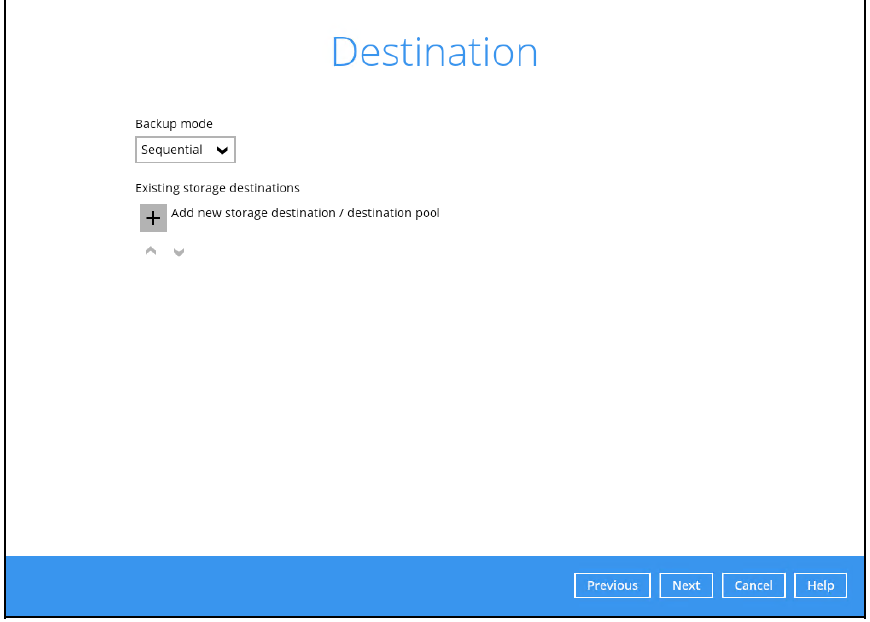
7. Select the destination storage, then click OK to proceed.
8. Click Next on the Destination menu page to proceed.
9. In the Encryption window, the default Encrypt Backup Data option is enabled with an encryption key preset by the system which provides the most secure protection.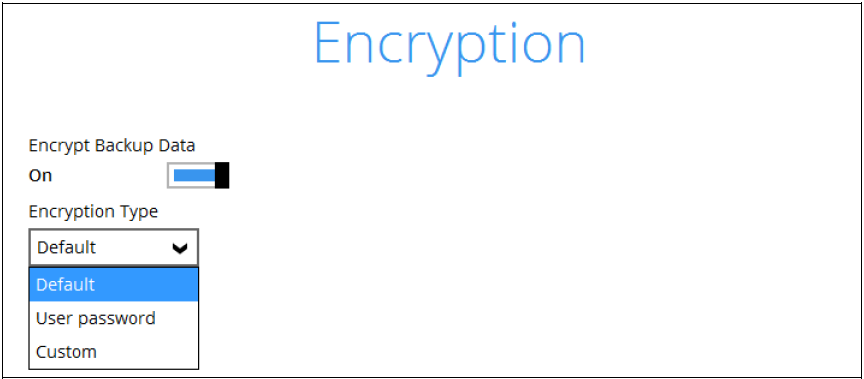
You can choose from one of the following three Encryption Type options:
➢ Default – an encryption key with 44 alpha numeric characters will be randomly generated by the system
➢ User password – the encryption key will be the same as the login password of your Retrospect Host Server at the time when this backup is created. Please be reminded that if you change the Retrospect Host Server login password later, the encryption keys of the backup sets previously created with this encryption type will remain unchanged.
➢ Custom – you can customize your encryption key, where you can set your own algorithm, encryption key, method and key length.
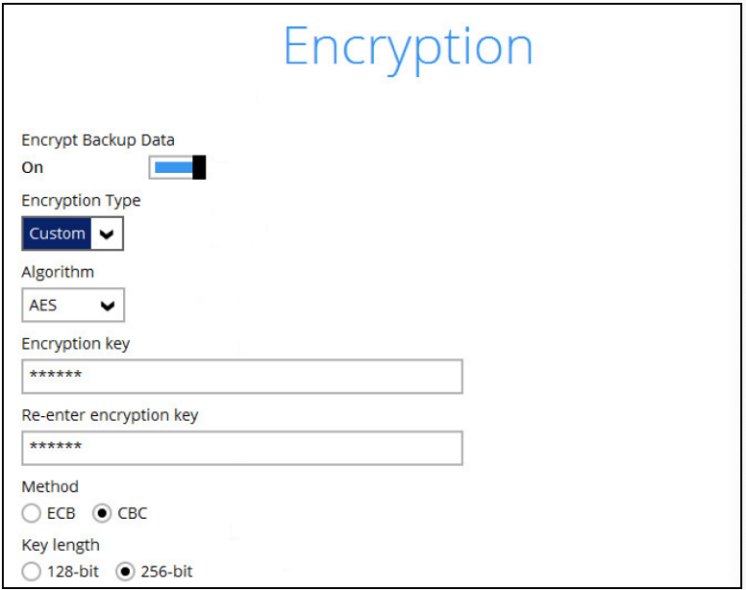
Click Next when you are done setting.
The pop-up window has the following three options to choose from:
➢ Unmask encryption key – The encryption key is masked by default. Click this option to show the encryption key.
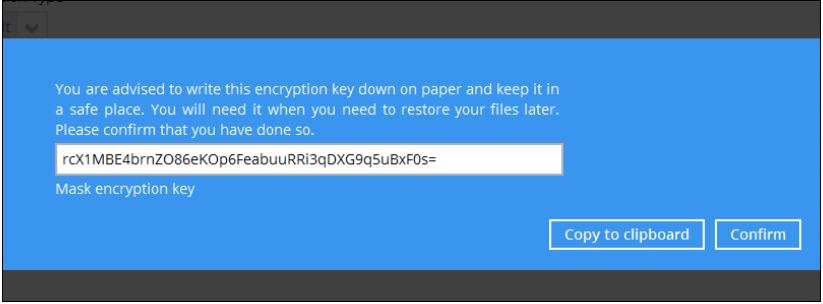
➢ Copy to clipboard – Click to copy the encryption key, then you can paste it in another location of your choice.
➢ Confirm – Click to exit this pop-up window and proceed to the next step.
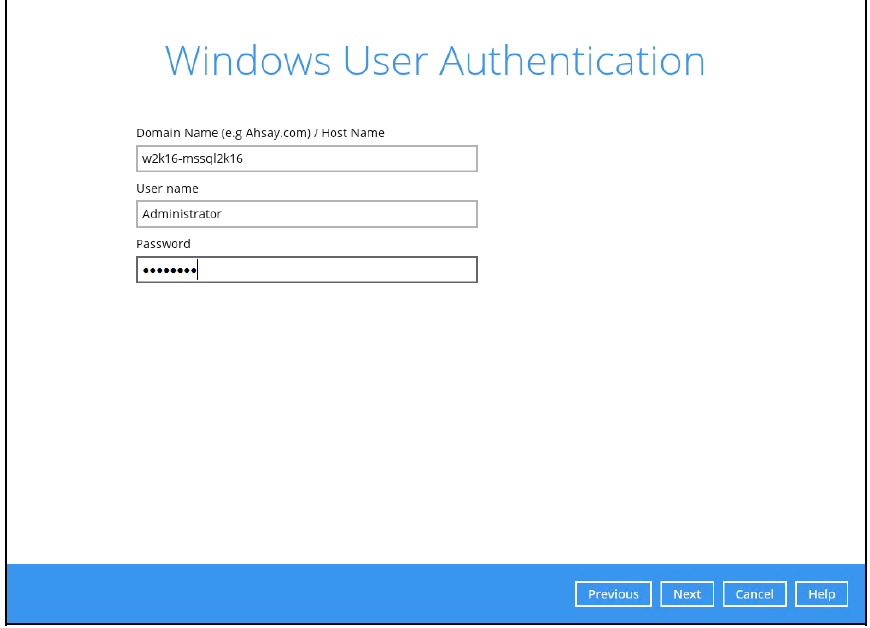
11. Enter the Windows login credentials for user authentication. Click Next to proceed.
Note: The Windows User Authentication screen shows only if you have configured scheduled backup.
12. The following screen shows when the new backup set is created successfully.
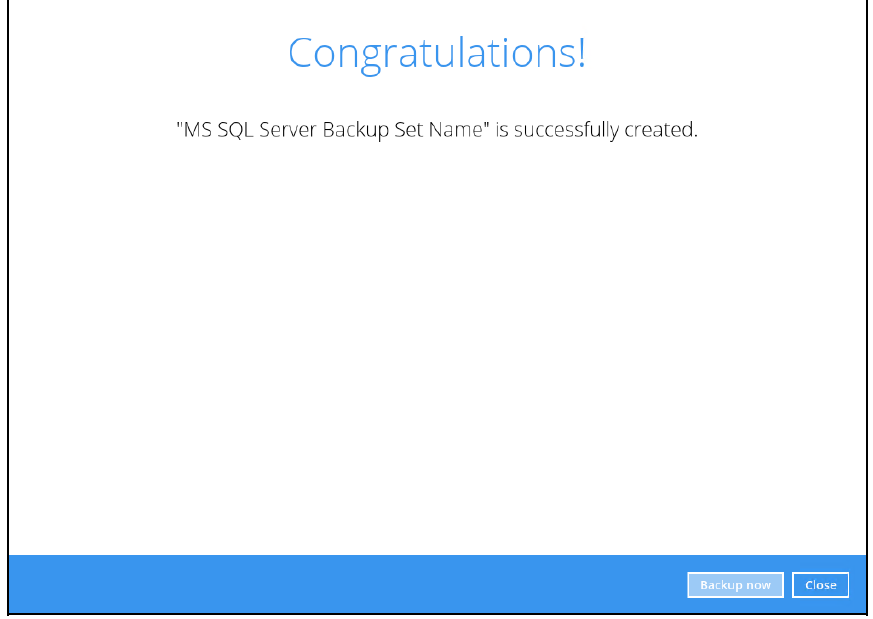
13. Click Backup now to start a backup immediately, or you can run a backup job later by following the instructions in Running Backup Job for Microsoft SQL Server.
14. Based on the Best Practices and Recommendations, it is highly recommended to set the temporary directory to another location other than Drive C: (e.g. Drive E:). To do this, go to Backup Sets > Others > Temporary Directory and click the Change button to browse for another location.

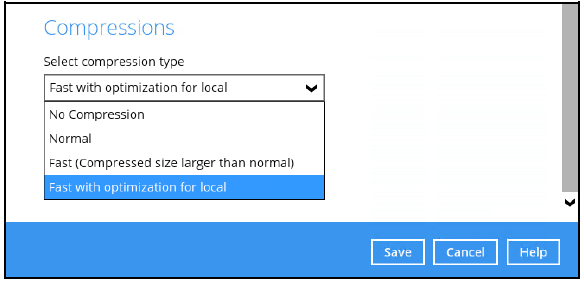
15. Optional: Select your preferred Compression type. By default, the compression type is Fast with optimization for local.
Go to Others > Compressions, then select from the following:
- No Compression
- Normal
- Fast (Compressed size larger than normal)
- Fast with optimization for local
Running Backup Job for Microsoft SQL Server
1. Log in to Retrospect Host Server.
2. Click the Backup icon on the main interface of Retrospect Host Server.
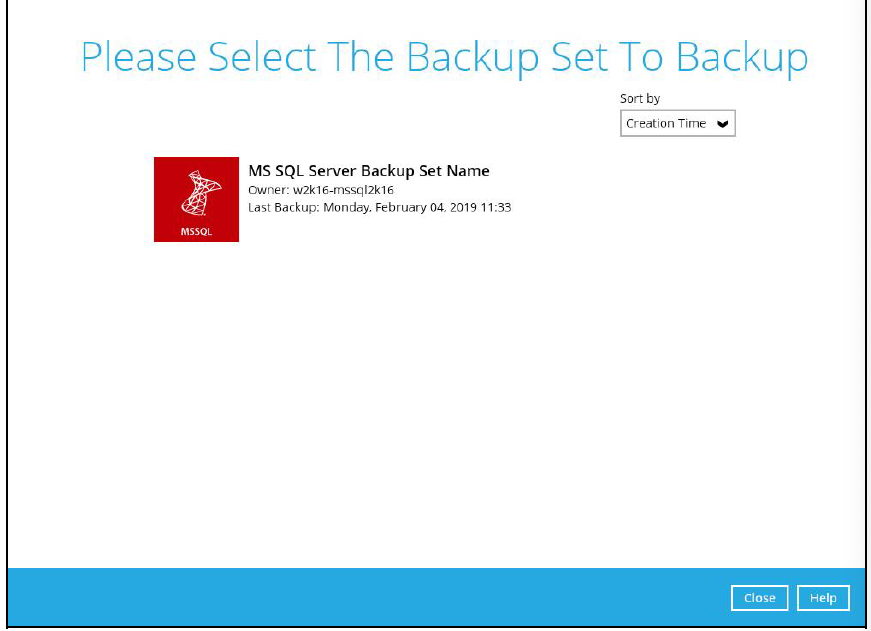
3. Select the backup set which you would like to start a backup for.
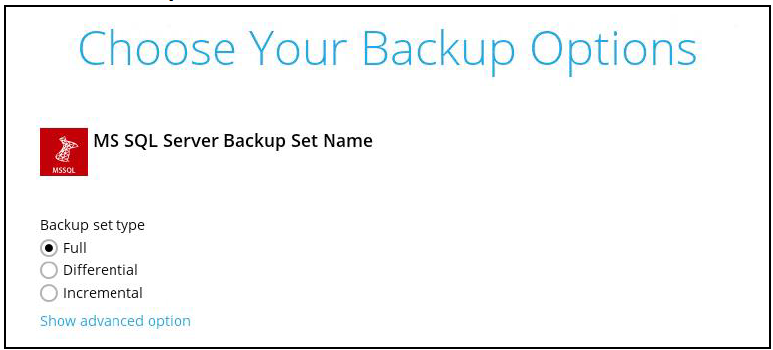
4. Select the Backup set type. For more details regarding the Backup set type & Infile delta type, refer to Appendix A Backup Set Type.
For VSS Backup Mode
For ODBC Backup Mode.
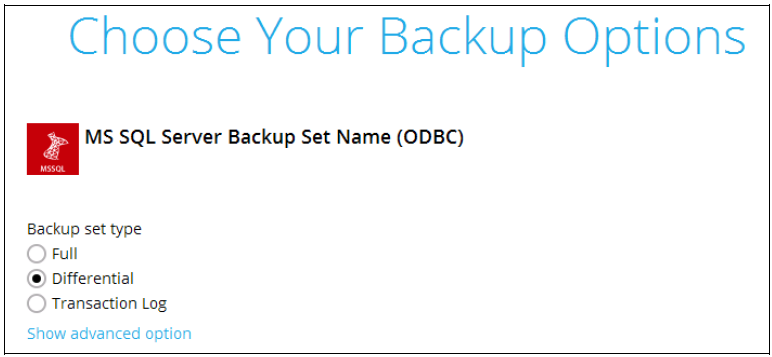
As the disk space required for running a full backup set may significantly be larger than running a transaction log backup, make sure the backup destination has enough quota to accommodate the full backup.
If you would like to modify the In-File Delta type (for Full backup set type only), Destinations and Retention Policy settings, click Show advanced option.
5. Click Backup to start the backup job.
Configuring Backup Schedule for Automated Backup
- Click the Backup Sets icon on the Retrospect Host Server main interface.
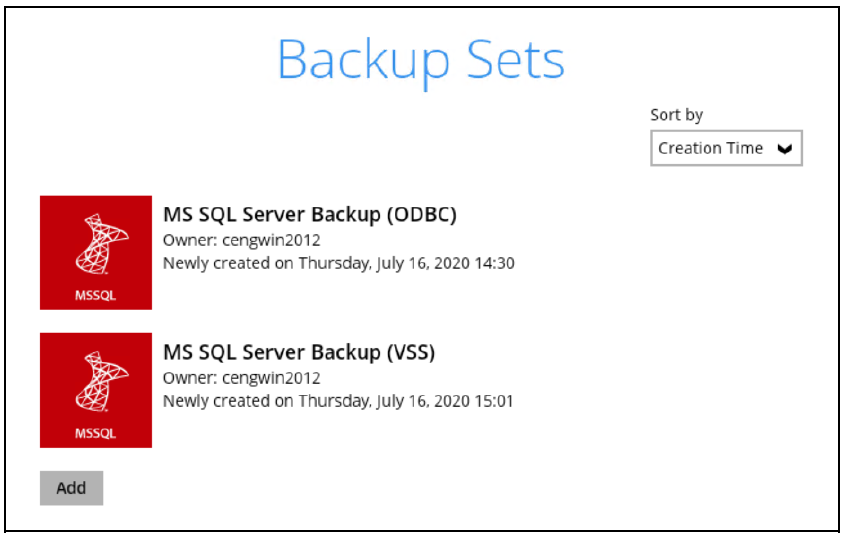
- Select the backup set which you would like to create a backup schedule for.
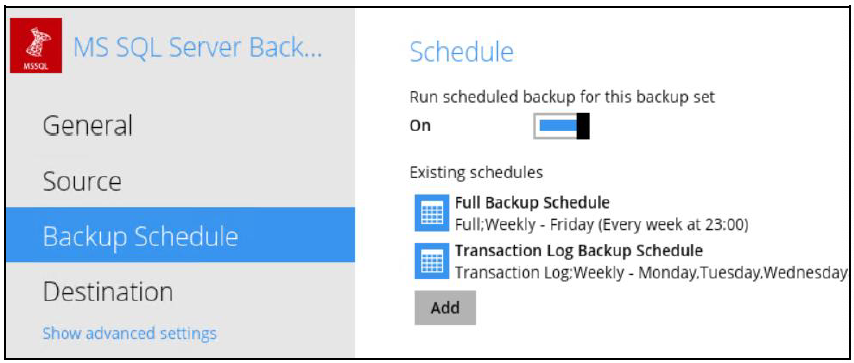
3. Go to the Backup Schedule tab. If the Run scheduled backup for this backup set option is off, switch it On. Existing schedules will be listed by default.
For VSS Backup Mode: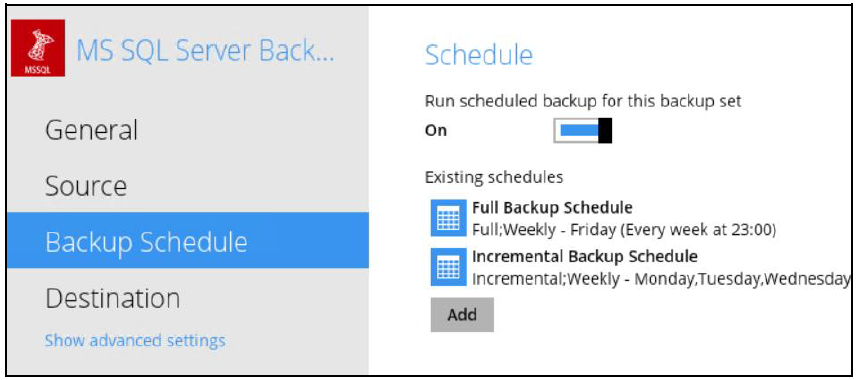
For ODBC Backup Mode:
4. Click the Add button to add a new backup schedule. The New Backup Schedule window will appear.
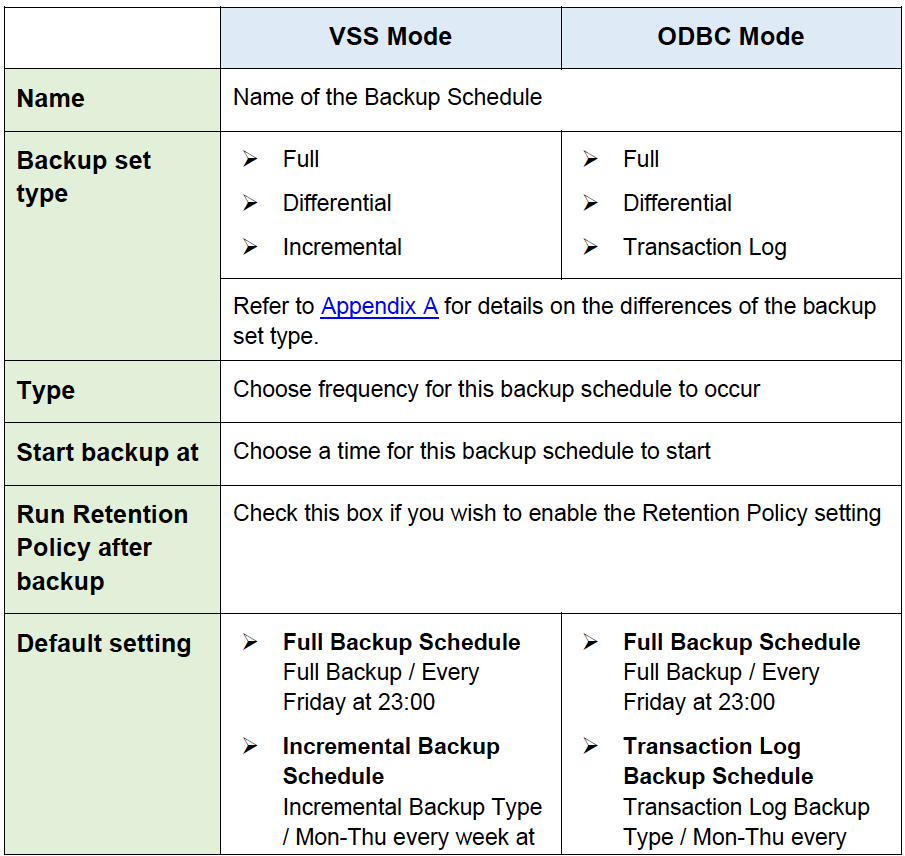
5. In the New Backup Schedule window, configure the following backup schedule settings.
Name – the name of the backup schedule.
Backup set type – the type of backup set. VSS and ODBC backup modes have different backup set types:
VSS Backup Mode – has Full, Differential and Incremental backup set types
ODBC Back Mode – has Full, Differential and Transaction Log backup set types
Type – the type of backup schedule. There are four (4) different types of backup schedule: Daily, Weekly, Monthly and Custom.
For more information, refer to Appendix A Backup Set Type.
Type – the type of backup schedule. There are four (4) different types of backup schedule: Daily, Weekly, Monthly and Custom.
- Daily – the time of the day or interval in minutes/hours which the backup job will run.
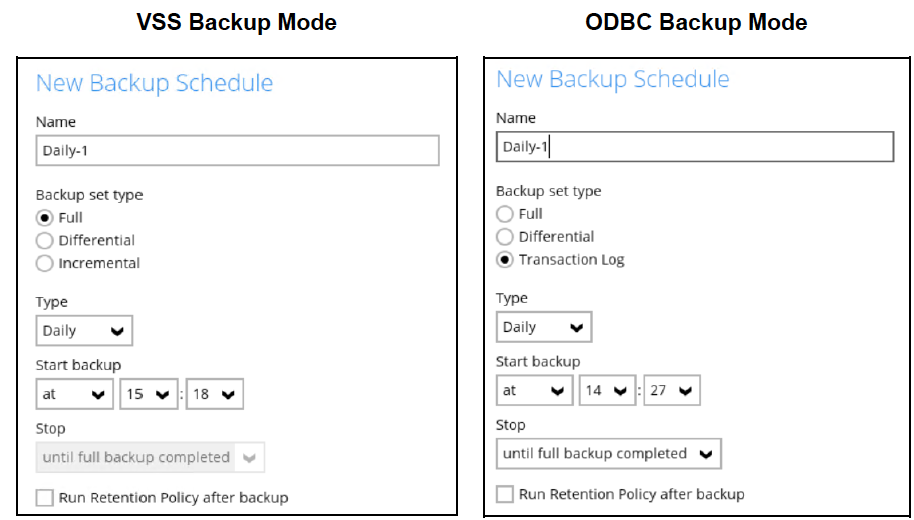
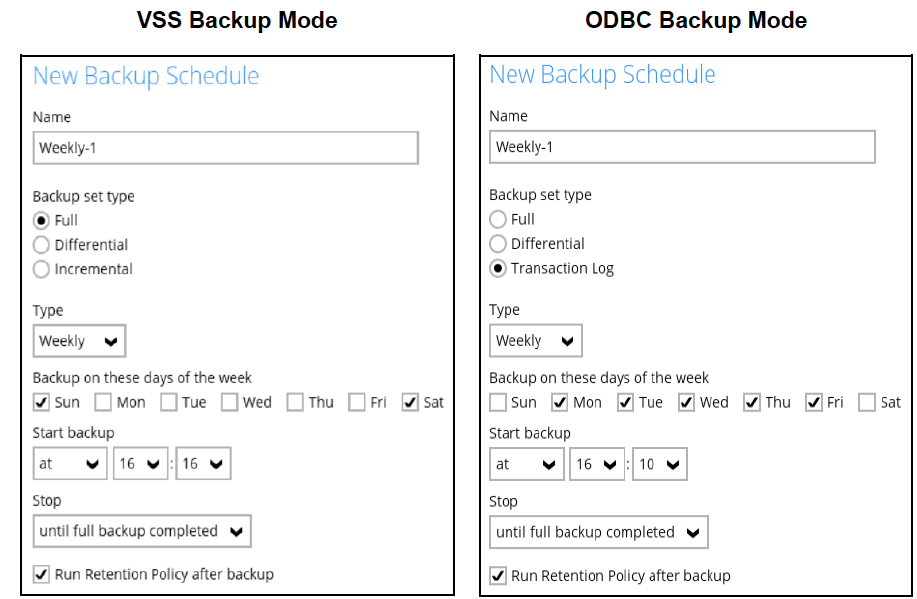
- Weekly – the day of the week and the time of the day or interval in minutes/hours which the backup job will run.
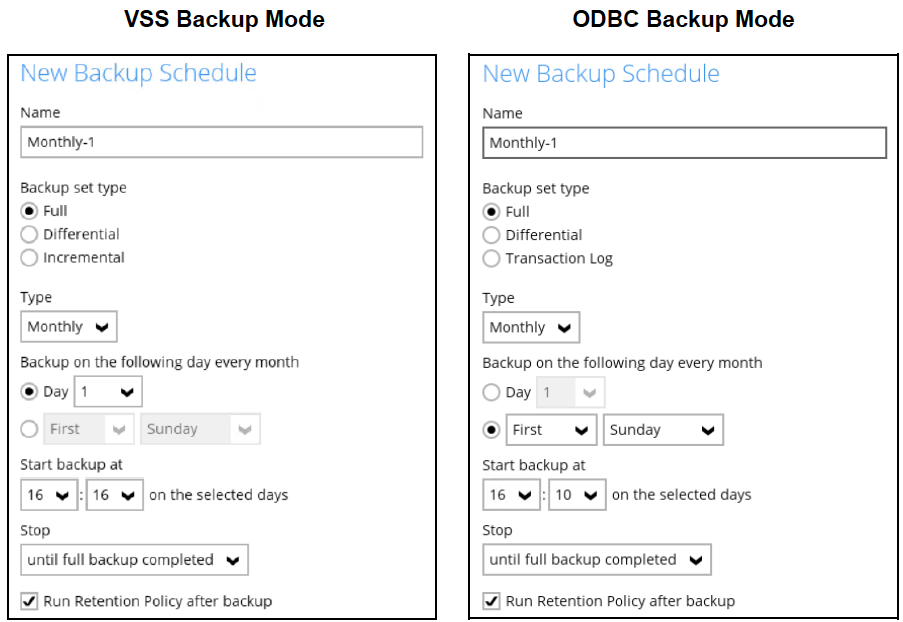
- Monthly – the day of the month and the time of that day which the backup job will run.
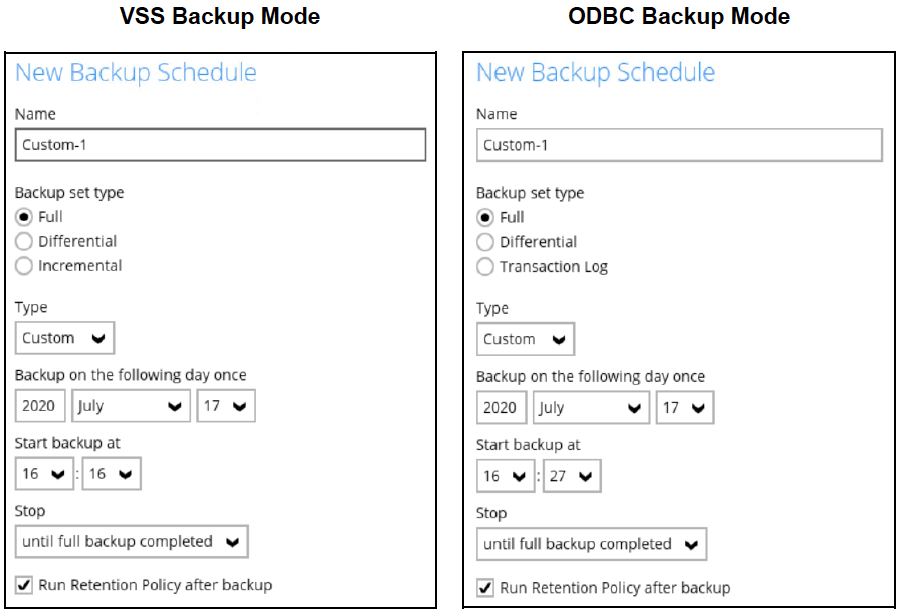
- Custom – a specific date and the time of that date which the backup job will run.
Start backup – the start time of the backup job.
- at – this option will start a backup job at a specific time.
- every – this option will start a backup job in intervals of minutes or hours.
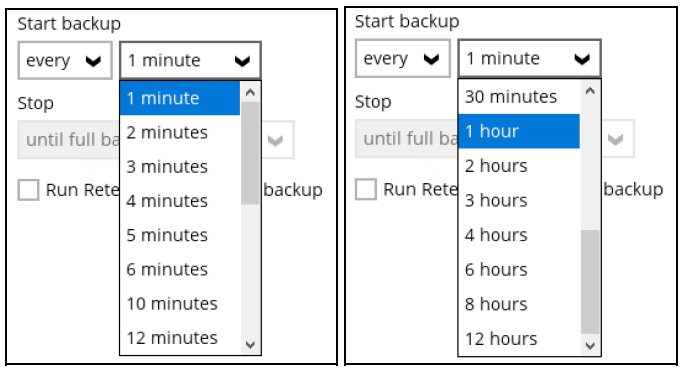
Here is an example of a backup set that has a periodic and normal backup schedule.
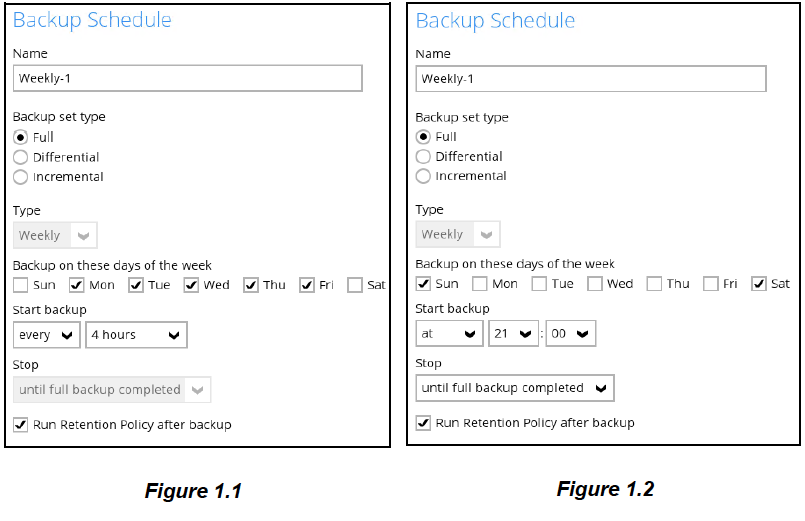
- + Figure 1.1* – Periodic backup schedule runs every 4 hours from Monday – Friday during business hours
- + Figure 1.2* – Normal backup schedule runs at 21:00 or 9:00 PM on Saturday and Sunday on weekend non-business hours
Stop – the stop time of the backup job. This only applies to schedules with start backup “at” and is not supported for periodic backup schedule (start backup “every”)
- until full backup completed – this option will stop a backup job once it is complete. This is the configured stop time of the backup job by default.
- after (defined no. of hrs.) – this option will stop a backup job after a certain number of hours regardless of whether the backup job has completed or not. This can range from 1 to 24 hrs.
The number of hours must be enough to complete a backup of all files in the backup set. For small files in a backup, if the number of hours is not enough to back up all files, then the outstanding files will be backed up in the next backup job. However, if the backup set contains large files, this may result in partially backed up files.
For example, if a backup has 100GB file size which will take approximately 15 hours to complete on your environment, but you set the “stop” after 10 hours, the file will be partially backed up and cannot be restored. The next backup will upload the files from scratch again.
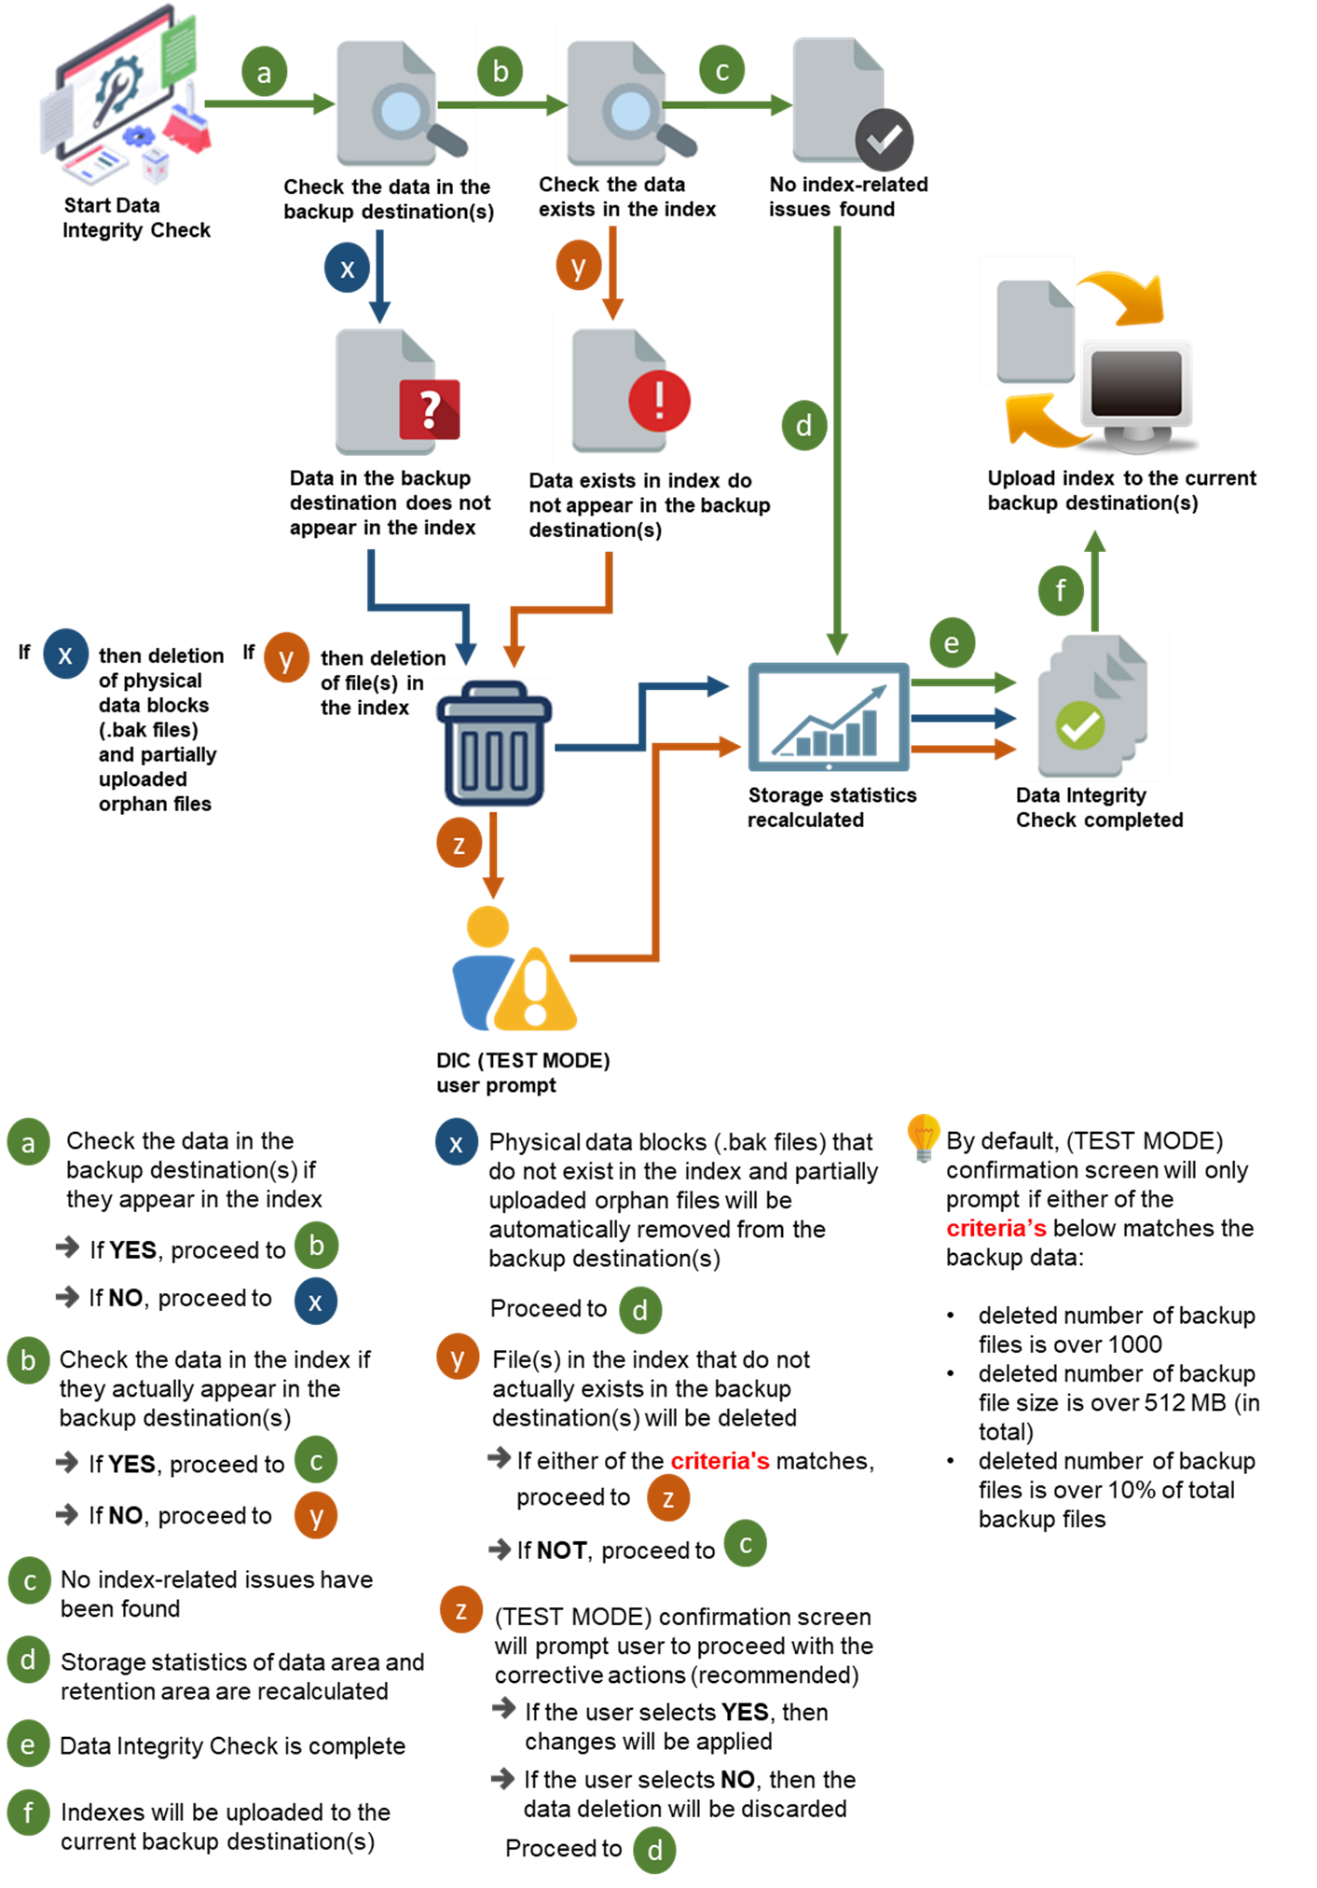
The partially backed up data will have to be removed by running the data integrity check.
As a general rule, it is recommended to review this setting regularly as the data size on the backup machine may grow over time.
Run Retention Policy after backup – if enabled, the Retrospect Host Server will run a retention policy job to remove files from the backup destination(s) which have exceeded the retention policy after performing a backup job. To save hard disk quote in the long run, it is recommended to enable this option.
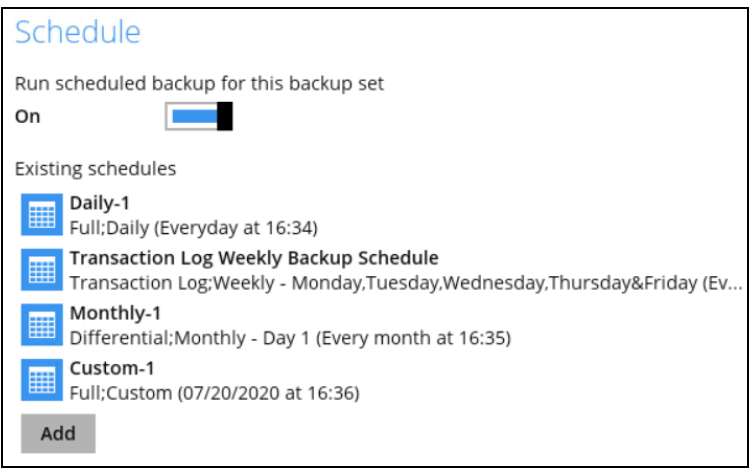
As an example, the four types of backup schedule (i.e. Daily, Weekly, Monthly and Custom) may look like the following:
6. Click Save to confirm your settings once done.
Restoring Backup for Microsoft SQL Server
Restoring Backup for Microsoft SQL Server
1. In the Retrospect Host Server main interface, click the Restore icon.
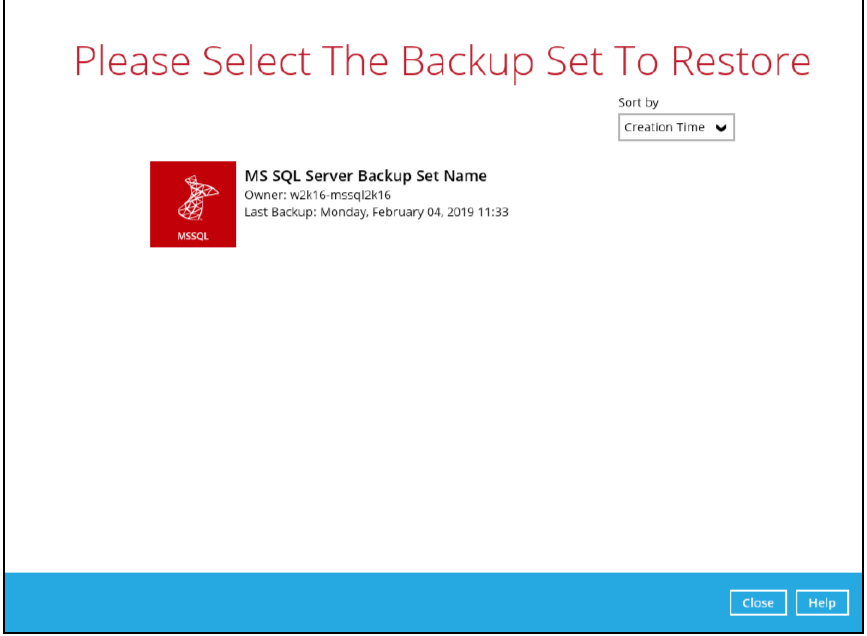
2. Select the backup set that you would like to restore.
3. Select the backup destination that you would like to restore data from.
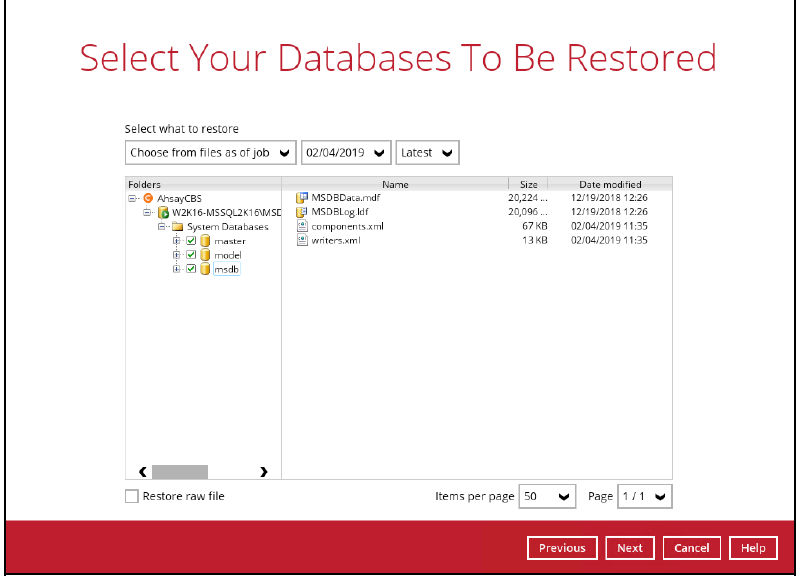
4. Select the database(s) or raw file(s) you would like to restore. You can also choose to restore backed up database or raw file from a specific backup job of your choice using the Select what to restore drop-down menu at the top. Click Next to proceed when you are done with the selection.
Restoring database - expand the menu tree to select which database to restore. Follow 5a below to select restoring to the original SQL server or an alternate SQL server.
Restoring raw file - you can select individual raw database file to restore by clicking the Restore raw file checkbox at the left bottom corner. Follow 5b below to select the path where you would like to restore the raw file(s) to.
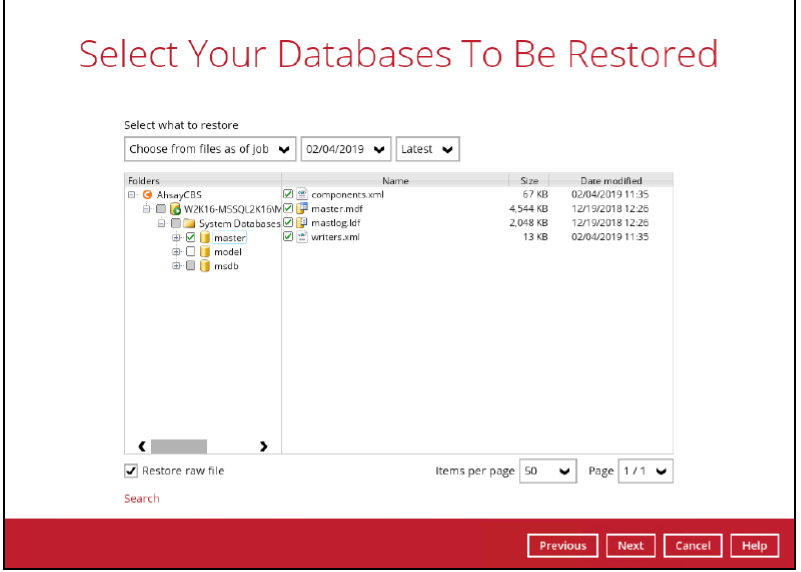
- + Limitations:*
➢ If you would like to restore database with the Alternate location option, you can only choose to restore one database at a time.
➢ If you would like to restore database to an alternate SQL server with the Restore raw file option, make sure you have checked the Restore raw file option.
5. Select the destination to restore. Refer to 5a or 5b below for steps to restore the database automatically (Restore database to Original/Alternate location) or manually (Restore raw file).
5a. Select to restore the database to its Original SQL server, or to an Alternate SQL server.
*
Restore to Original SQL server*
Select the Original location option, then press Next to proceed.

If you would like to modify the Verify checksum of in-file delta files during restore setting, click Show advanced option.
Restore to Alternate SQL server (only for restoring raw file)
i. Select the Alternate location option, then press Next.
If you would like to modify the In-File Delta type (for Full backup set type only), Destinations and Retention Policy settings, click Show advanced option.
ii. Click Browse to select the locations where you would like to restore the database and log files to. Name the new database, then.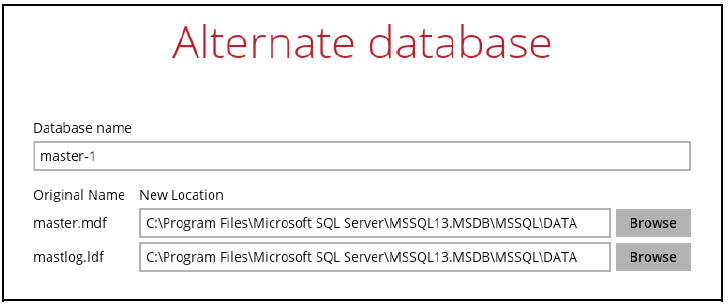
iii. Click Next to proceed when you are done with the settings.
5b. i) If you have chosen to restore raw file, choose the location path where you would like the raw file(s) to be restored to. Click Next to proceed.
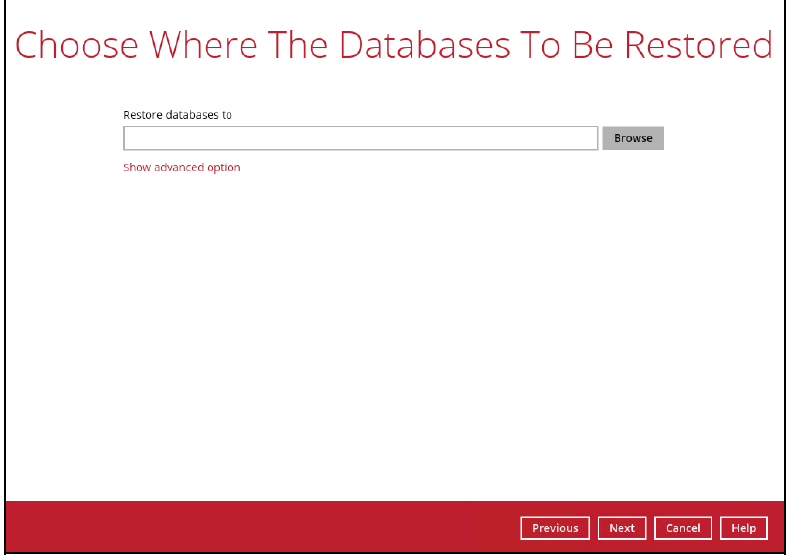
If you would like to modify the In-File Delta type (for Full backup set type only), Destinations and Retention Policy settings, click Show advanced option.
ii) Restore the database manually with the restored database file via the SQL Server Management Studio. Refer to the MS KB article below for instructions. https://technet.microsoft.com/en-us/library/ms177429%28v=sql.110%29.aspx
6. Select the temporary directory for storing temporary files, such as delta files when they are being merged, click Restore to start the restoration.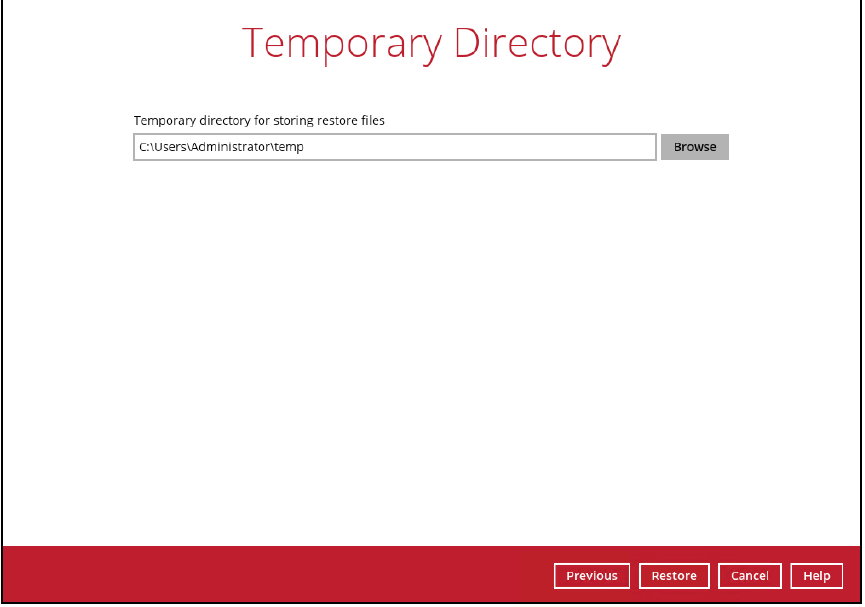
- The text Restore Completed Successfully shows when the restoration is completed.
Appendix
Appendix A: Backup Set Type
There are three kinds of backup set type to choose from, namely full backup, differential backup and incremental backup. The information below gives you an overall idea of what each backup set type is like.
Full backup (with configurable in-file delta type)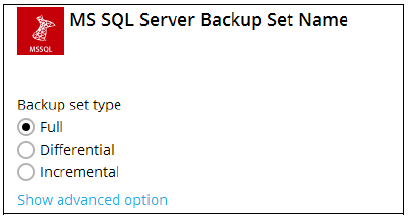
To perform a full backup, Retrospect Host Server requests the SQL server to generate a Volume Shadow Copy Service (VSS) snapshot of the database. Retrospect Host Server will back up the VSS snapshot generated by the SQL server directly. A full backup is required in order to run incremental or differential backups.
You can also decide how the full backup is run by selecting the desired in-file delta type (Full, Differential or Incremental).
For further details on this topic, refer to the URL below.
https://msdn.microsoft.com/en-us/library/ms175477.aspx
Differential backup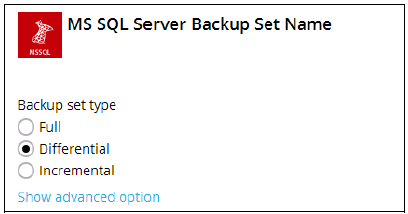
A differential backup of the SQL server saves changes to the database that have occurred since the last full backup. To perform a differential backup, Retrospect Host Server requests the SQL server to generate a differential backup file of the database since the last full backup. At the back end, the SQL server performs the following:
1. Generate a VSS snapshot of the database of the current state.
2. Compare the VSS snapshot just generated by the SQL server with the one generated from the last full backup in order to produce a differential backup file.
3. The differential backup file being sent to Retrospect Host Server for backup.
Using a differential backup file to recover a database requires the restoration of only two data sets - the last full backup and the most recent differential backup.
The disadvantage of using differential backups is that it duplicates the backed up data in each backup until a full backup is performed. If there are many differential backups taken between full backups, the storage space required can greatly exceed that required by the same number of incremental backups.
The SQL server does not allow a differential backup to occur when there has been no previous full backup to establish the starting point.
For further details on this topic, refer to the URL below.
https://msdn.microsoft.com/en-us/library/ms186289.aspx
Incremental backup
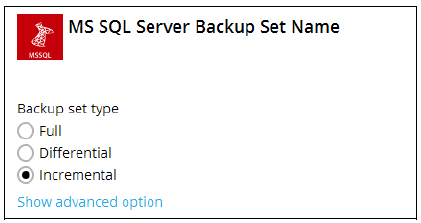
An incremental backup of the SQL server saves changes to the database that have occurred since the last full or incremental backup. To perform an incremental backup, Retrospect Host Server requests the SQL server to generate a differential backup file of the database since the last full backup. At the back end, the SQL server performs the following:
1. Generate a VSS snapshot of the database of the current state.
2. Compare the VSS snapshot just generated with the one generated from the last full backup in order to produce a differential backup file.
3. The differential backup file being sent to Retrospect Host Server.
4. Retrospect Host Server performs an in-file delta check between the differential backup file just received from the SQL server and the one from the last backup.
5. Retrospect Host Server will then be able to generate an incremental delta file which contains changes of the database files since last differential backup. Only this incremental delta file will be backed up.
Using an incremental backup to recover a database requires the restoration of at least two data sets - the last full backup and every incremental backup taken after the last Full backup. The benefit of using incremental backups is that the individual backups are much smaller than a full backup and individual incremental backups are frequently smaller than differential backups.
The disadvantage of using incremental backups is that if there are many incremental backups made between full backups, recovering the storage group may involve recovering many incremental backups. The SQL server does not allow an incremental backup to occur when there has been no previous full backup to establish the starting point.
Transaction log
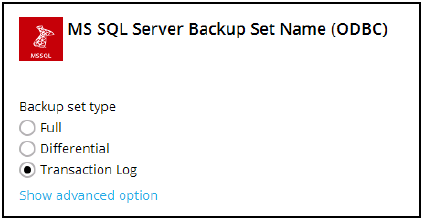
Every SQL Server database has a transaction log that records all transactions and the database modifications made by each transaction. The transaction log is a critical component of the database. If there is a system failure, you will need that log to bring your database back to a consistent state.
If you have chosen to back up in ODBC mode, you can configure schedule backup to back up the transaction log regularly at a time interval of your choice.
Appendix B: Truncating Transaction Log
The instructions below only apply for database with full recovery model.
Since Retrospect Host Server 2020 utilizes VSS-based backup, which does not support log backup (https://technet.microsoft.com/en-us/library/cc966520.aspx) transaction log of database in full / bulklogging recovery model may eventually fill up all disk space available on the volume
Below are steps to perform a log backup in the SQL Server Management Studio. For further details on this topic, refer to the URL below.
https://msdn.microsoft.com/en-us/library/ms179478.aspx
- Launch SQL Server Management Studio in Windows.
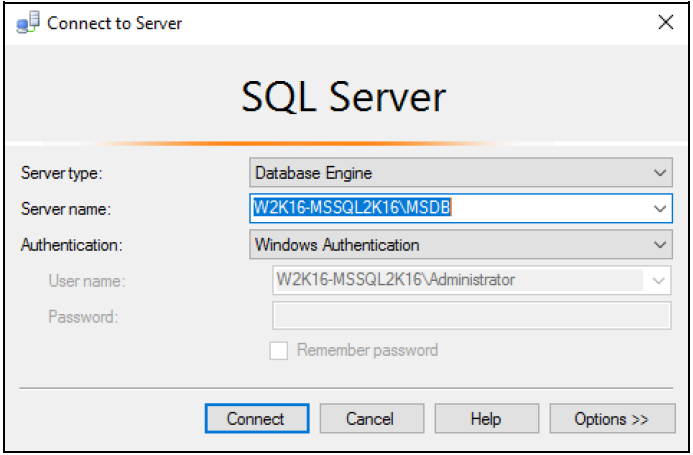
- Select the SQL server you would like to connect to, and the corresponding authentication method, then click Connect to proceed.
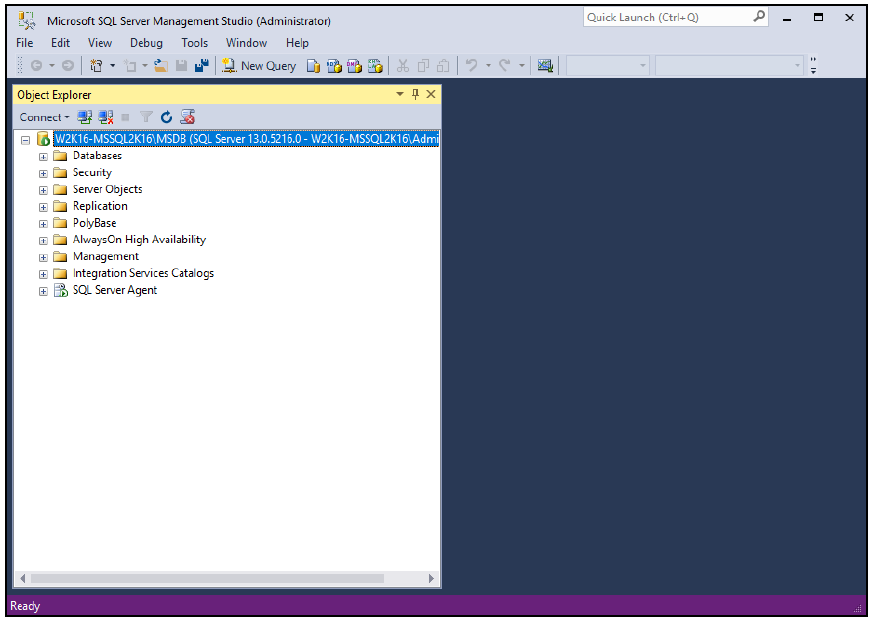
- Expand the menu tree and select the desired database you would like to back up.
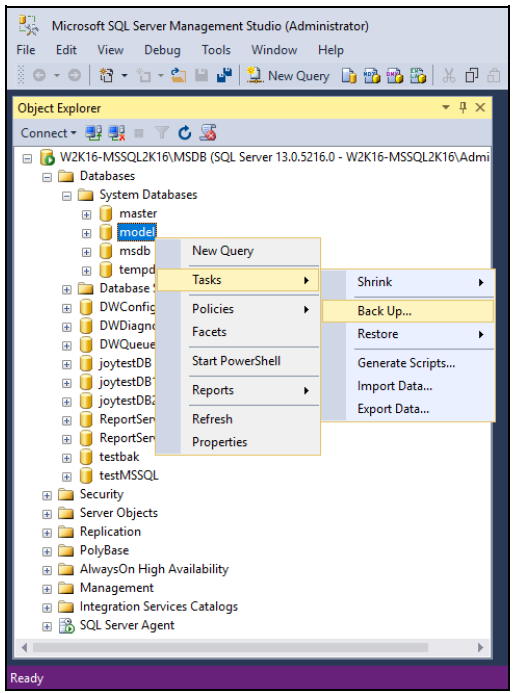
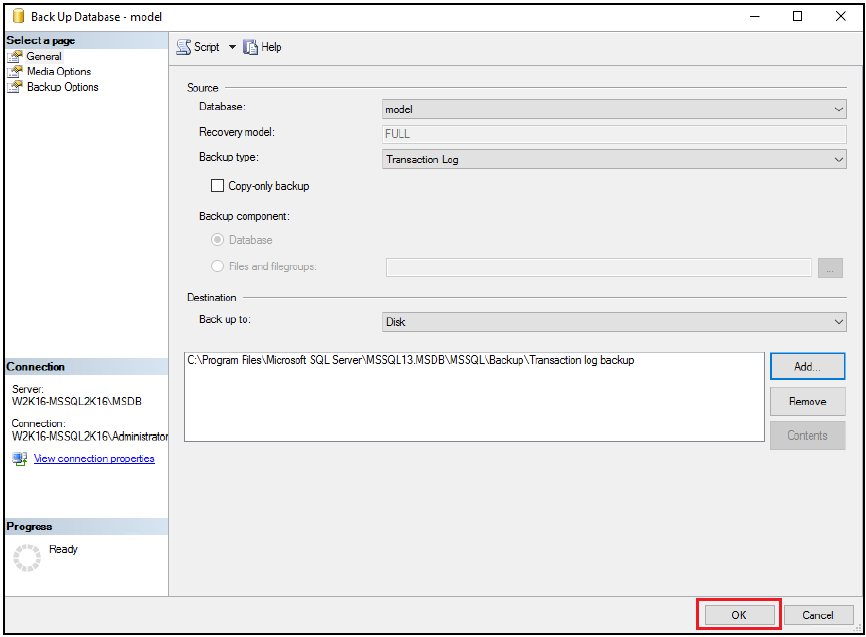
- Right click the database name, then go to Tasks > Back Up. The Back Up Database dialog box shows.
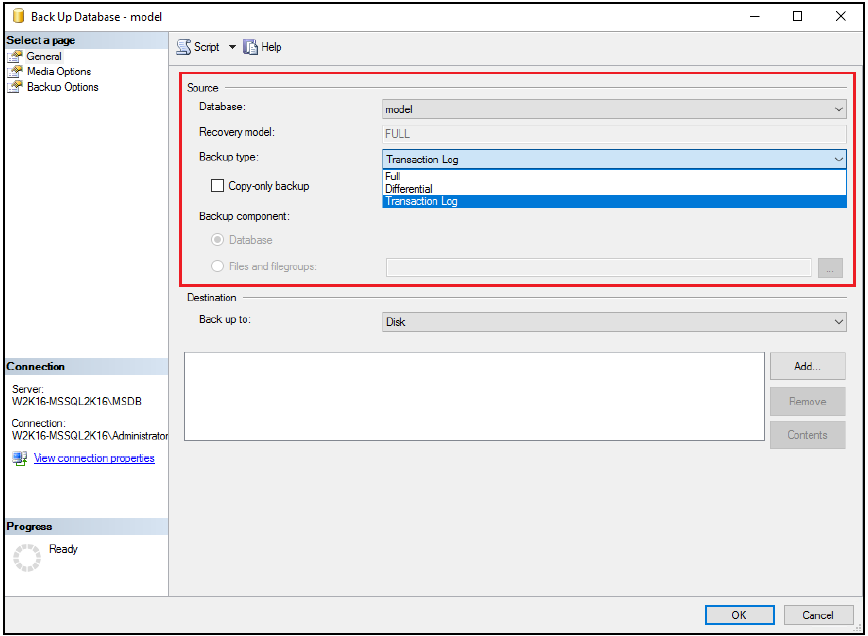
- In the Source section, confirm the database name, then select Transaction Log in the Backup type drop-down menu.
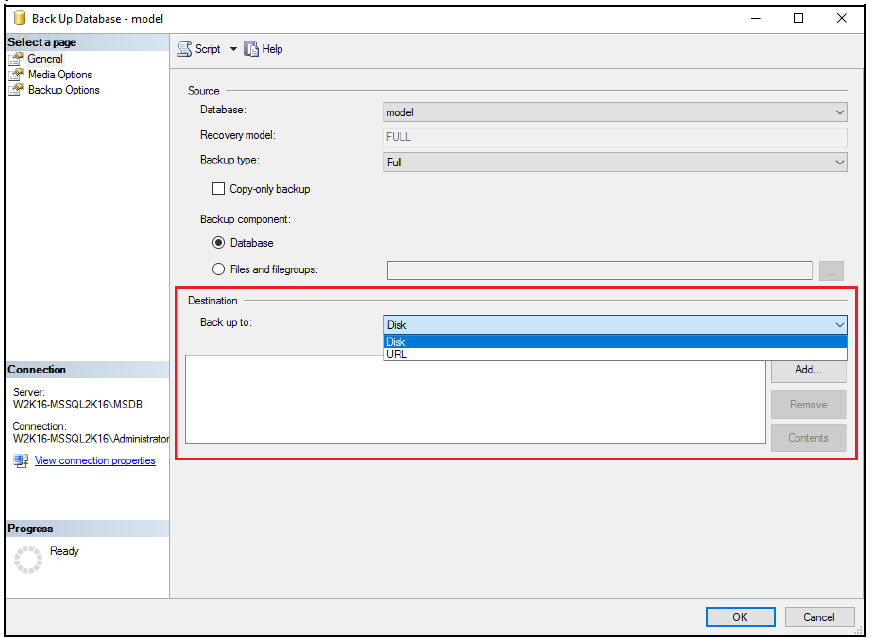
- Select Disk or URL as the destination of the backup, then click Add to select a destination path.
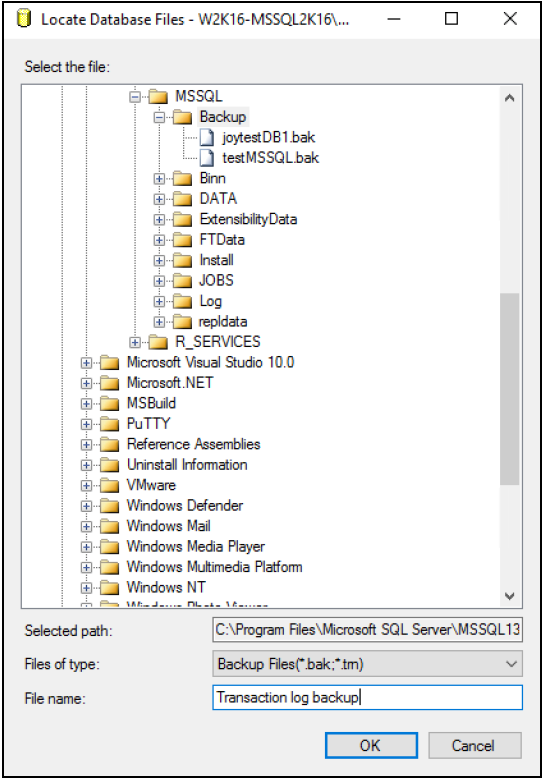
- After selecting the destination path, click OK twice to proceed.
- Go to the Backup Options, then in the Backup set section, name the backup set and enter a description of the backup set if needed.
Configure the Backup set to expire after a specified number of day or on a specified date. Set to 0 day if you do not want the backup set to expire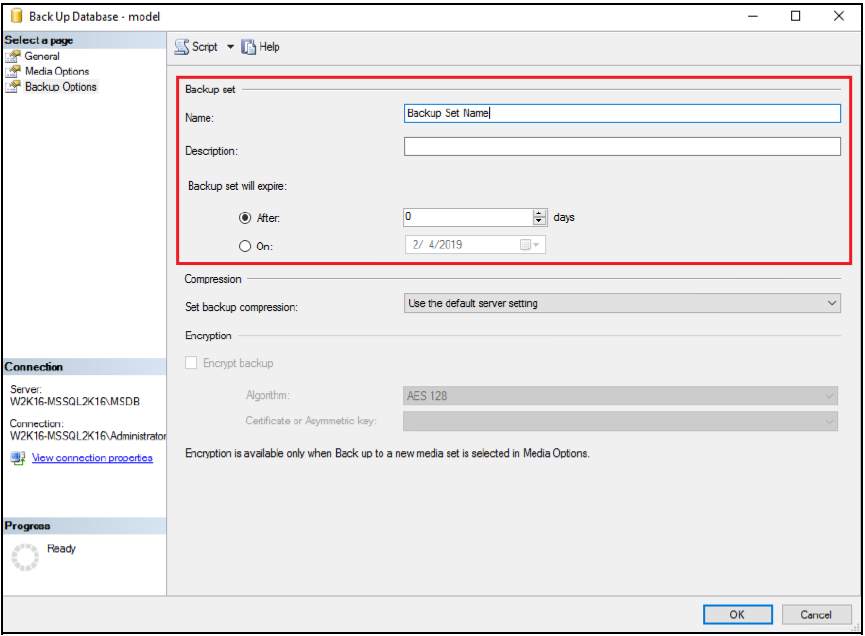
- Click OK to start the transaction log backup when you are done with all the necessary settings in the Back Up Database dialog box.
Appendix C: Cloud Storage as Backup Destination
For most cloud storage provider (e.g. Dropbox, Google Drive … etc.), you need to allow Retrospect Host Server to access the cloud destination. Click OK / Test, you will be prompted to log in to the corresponding cloud service.
Important: The authentication request will be opened in a new tab / window on the browser, ensure that the pop-up tab / window is not blocked (e.g. pop-up blocker in your browser).
Click Allow to permit Retrospect Host Server to access the cloud storage.
Enter the authentication code returned in Retrospect Host Server to complete the destination setup.
Note: A backup destination can be set to a supported cloud storage, backup server, FTP / SFTP server, network storage, or local / removable drive on your computer.
Multiple backup destinations can be configured for a single backup set. In fact, it is recommended for you to setup at least 2 backup destinations for your backup set.
