Requirements and Recommendations
Hardware and Software Requirement
Retrospect Virtual Host Server
- Retrospect Virtual Host Server is installed on the Hyper-V server. For Hyper-V Cluster environments Retrospect Virtual Host Server is installed on all Cluster nodes.
- The operating system account for setting up the Hyper-V / Hyper-V Cluster backup set must have administrator permission (e.g. administrative to access the cluster storage).
- Retrospect Virtual Host Server user account has sufficient Hyper-V add on modules or CPU sockets assigned. Hyper-V Cluster backup sets will require one Retrospect Virtual Host Server license per node. (Please contact your backup service provider for details)
- Retrospect Virtual Host Server user account has sufficient quota assigned to accommodate the storage of the guest virtual machines. (Please contact your backup service provider for details).
Hyper-V guest virtual machines contain three types of virtual disks: * Fixed Hard Disk * Dynamic Hard Disk * Differencing Hard Disk
+ When Retrospect Virtual Host Server backs up a Hyper-V guest virtual machines for an initial or subsequent full backup jobs:
- Using fixed Hard Disks it will back up the provisioned size, i.e. for a 500GB fixed virtual hard disk 500GB will be backed up to the storage designation.
- Using Dynamic Hard Disk or Differencing Hard Disk it will back up the used size, i.e. for a 500GB fixed virtual hard disk, 20GB will backed up to the storage designation if only 20GB are used.
- The default Java heap size setting on Retrospect Virtual Host Server is 768MB, for Hyper-V backups it is highly recommended to increase the Java heap size setting to improve backup and restore performance. (The actual heap size is dependent on amount of free memory available on your Hyper-V server).
Refer to the following link for details.
- The temporary folder is used by Retrospect Virtual Host Server for storing backup set index files and any incremental or differential delta files generated during a backup job. To ensure optimal backup/restore performance, it is recommended that is located on a local drive with plenty of free disk space.
- Retrospect Virtual Host Server UI must be running when a guest virtual machine is started using Run Direct Restore or when migration process is running.
- For local, mapped drive, or removable drive storage destinations with Run Direct enabled the compression type will always be set to No Compression and data encryption is disabled to ensure optimal backup and restore performance. The backup set compression type and data encryption settings will only be applied to Retrospect Virtual Console, SFTP/FTP, or Cloud storage destinations.
- For ease of restore it is recommended to back up the whole guest machine (all the virtual disks) rather than individual virtual disks.
- CBT Cluster Services (Retrospect Virtual Host Server) is installed and enabled upon installation.
Hyper-V Server Requirement
- The Hyper-V management tools are installed on the server. For Hyper-V Cluster environments Hyper-V management tools is installed on all Cluster nodes.
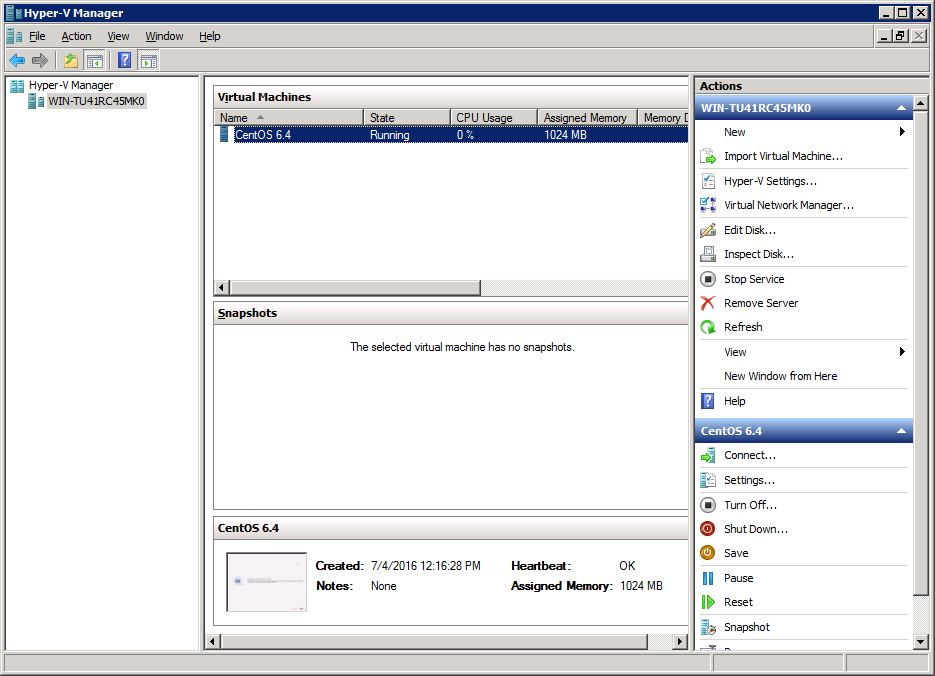
- The Hyper-V services are started on the server. For Hyper-V Cluster environments the Hyper-V services are started on all Cluster nodes.
- The Microsoft Hyper-V VSS Writer is installed and running on the Hyper-V server and the writer state is Stable. This can be verified by running the vssadmin list writers command.
Example:
C:\Users\Administrator>vssadmin list writers
vssadmin 1.1 - Volume Shadow Copy Service administrative command-line tool
\(C) Copyright 2001-2005 Microsoft Corp.
Writer name: 'Task Scheduler Writer'
Writer Id: \{d61d61c8-d73a-4eee-8cdd-f6f9786b7124}
Writer Instance Id: \{1bddd48e-5052-49db-9b07-b96f96727e6b}
State: [1] Stable
Last error: No error
Writer name: 'VSS Metadata Store Writer'
Writer Id: \{75dfb225-e2e4-4d39-9ac9-ffaff65ddf06}
Writer Instance Id: \{088e7a7d-09a8-4cc6-a609-ad90e75ddc93}
State: [1] Stable
Last error: No error
Writer name: 'Performance Counters Writer'
Writer Id: \{0bada1de-01a9-4625-8278-69e735f39dd2}
Writer Instance Id: \{f0086dda-9efc-47c5-8eb6-a944c3d09381}
State: [1] Stable
Last error: No error
Writer name: 'System Writer'
Writer Id: \{e8132975-6f93-4464-a53e-1050253ae220}
Writer Instance Id: \{8de7ed2b-8d69-43dd-beec-5bfb79b9691c}
State: [1] Stable
Last error: No error
Writer name: 'SqlServerWriter'
Writer Id: \{a65faa63-5ea8-4ebc-9dbd-a0c4db26912a}
Writer Instance Id: \{1f668bf9-38d6-48e8-81c4-2df60a3fab57}
State: [1] Stable
Last error: No error
Writer name: 'ASR Writer'
Writer Id: \{be000cbe-11fe-4426-9c58-531aa6355fc4}
Writer Instance Id: \{01499d55-61da-45bc-9a1e-76161065630f}
State: [1] Stable
Last error: No error
*Writer name: 'Microsoft Hyper-V VSS Writer'*
*Writer Id: \{66841cd4-6ded-4f4b-8f17-fd23f8ddc3de}*
*Writer Instance Id: \{a51919e3-0256-4ecf-8530-2f600de6ea68}*
*State: [1] Stable*
*Last error: No error*
Writer name: 'COM+ REGDB Writer'
Writer Id: \{542da469-d3e1-473c-9f4f-7847f01fc64f}
Writer Instance Id: \{7303813b-b22e-4967-87a3-4c6a42f861c4}
State: [1] Stable
Last error: No error
Writer name: 'Shadow Copy Optimization Writer'
Writer Id: \{4dc3bdd4-ab48-4d07-adb0-3bee2926fd7f}
Writer Instance Id: \{d3199397-ec58-4e57-ad04-e0df345b5e68}
State: [1] Stable
Last error: No error
Writer name: 'Registry Writer'
Writer Id: \{afbab4a2-367d-4d15-a586-71dbb18f8485}
Writer Instance Id: \{25428453-2ded-4204-800f-e87204f2508a}
State: [1] Stable
Last error: No error
Writer name: 'BITS Writer'
Writer Id: \{4969d978-be47-48b0-b100-f328f07ac1e0}
Writer Instance Id: \{78fa3f1e-d706-4982-a826-32523ec9a305}
State: [1] Stable
Last error: No error
Writer name: 'WMI Writer'
Writer Id: \{a6ad56c2-b509-4e6c-bb19-49d8f43532f0}
Writer Instance Id: \{3efcf721-d590-4e50-9a37-845939ca51e0}
State: [1] Stable
Last error: No error
- Check if CBTFilter is enabled. This can be verified by running the net start CBTFilter command
Example:
C:\Users\Administrator>net start CBTFilter
The requested service has already been started.
More help is available by typing NET HELPMSG 2182.
Note: For Windows Server 2008 R2, if the following error is displayed
C:\Users\Administrator>net start CBTFilter
System error 577 has occurred.
Windows cannot verify the digital signature for this file. A recent hardware or
software change might have installed a file that is signed incorrect or damaged,
or that might be malicious software from an unknown source.
The issue may be related to the availability of SHA-2 code signing support for Windows Server 2008 R2 (https://technet.microsoft.com/en-us/library/security/3033929). To resolve the issue, install the following patch from Microsoft
https://www.microsoft.com/en-us/download/confirmation.aspx?id=46083
Restart the affected server afterward for Retrospect Virtual Host Server to operate properly.
Example: Windows 7 Enterprise guest
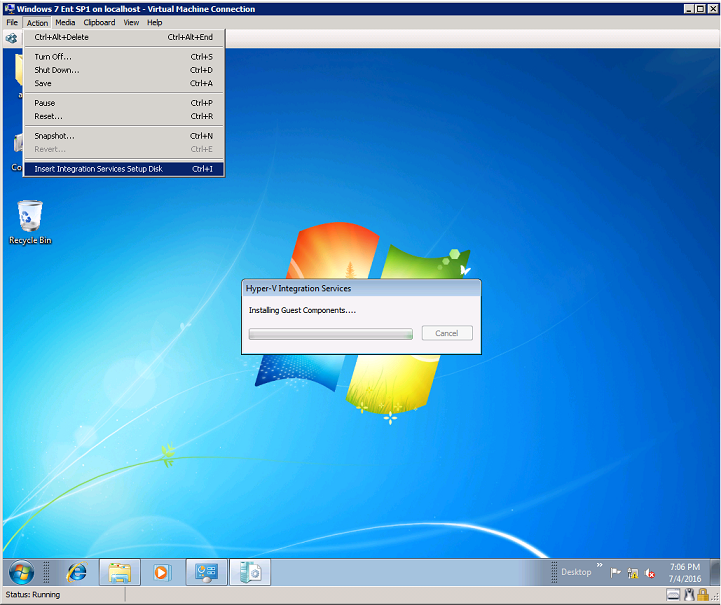
- If Integration services is not installed / updated on a guest virtual machine or the guest operating system is not supported by Integration Services, the corresponding virtual machine will be paused or go into a saved stated during the snapshot process for both backup and restore, and resume when the snapshot is completed. Furthermore, the corresponding virtual machine uptime will also be reset to 00:00:00 in the Hyper-V Manager.
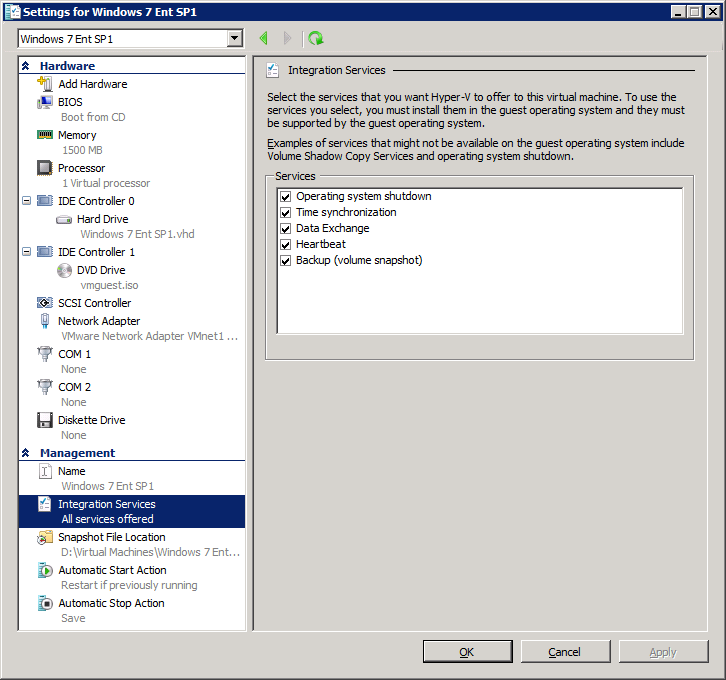
- Installing or updating Integration Services guest virtual machine(s) may require a restart of the guest virtual machine to complete the installation.
- To install Integration Services: In Hyper-V Manager connect to the guest virtual machine and select Action > Insert Integration Services disk
- If the guest operating system supports live virtual machine backup the Backup (volume checkpoint) is enabled.
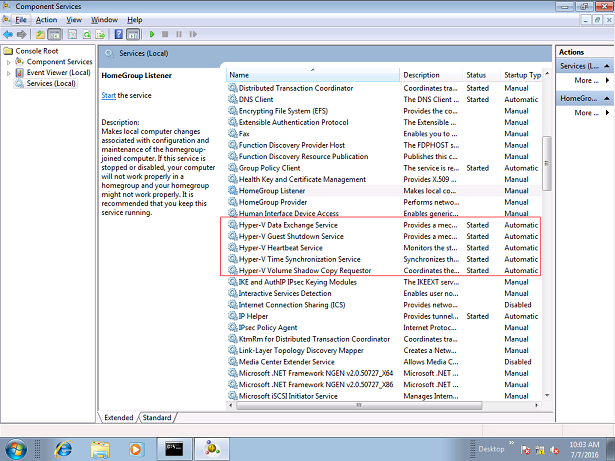
- The related Integration Services are running on the guest virtual machine:
- Considerations for backing up and restoring virtual machines: https://technet.microsoft.com/en-us/library/dn798286.aspx
Example: Windows 7 Enterprise guest
- Supported Windows Guest Operating Systems for Hyper-V in Windows Server 2012: https://technet.microsoft.com/en-us/library/dn792028(v=ws.11).aspx
- Supported Windows Guest Operating Systems for Hyper-V in Windows Server 2012 R2: https://technet.microsoft.com/en-us/library/dn792027(v=ws.11).aspx
- Managing Hyper-V Integration Services: https://msdn.microsoft.com/en-us/virtualization/hyperv_on_windows/user_guide/managing_ics
- For Hyper-V 2008 R2 server in order to use Run Direct restore feature the "Microsoft Security Advisory 3033929" security update must be installed.
Please refer to the following KB article from Microsoft for further details: https://support.microsoft.com/en-us/kb/3033929
- For Run Direct Hyper-V Cluster backup sets the storage destination must be accessible by all Hyper-V nodes.
- For Hyper-V Cluster backup sets the guest virtual machines must be created and managed by the Failover Cluster Manager.
Limitations
- Backup of guest machines located on a SMB 3.0 shares are not supported.
- Backup of virtual machine with pass through disk (directly attached physical disk) is not supported.
- For backup of individual virtual disk, the restored virtual machine does not support the reversion of previous snapshots, if the snapshot contains disks which are not previously backed up by Retrospect Virtual Host Server.
- A guest virtual machine can only be restored to the original Hyper-V server or Hyper-V Cluster environment. Restore to another Hyper-V server or Hyper-V Cluster environment is not supported.
- A guest virtual machine can only be restored to the Hyper-V server with the same version, i.e. backup of a guest on Hyper-V 2012 R2 server cannot be restored to Hyper-V 2008 R2 Server or vice versa.
- The guest virtual machine will not start up if the virtual disk containing the guest operating system is not restored.
- Restore of individual virtual disks is only supported using the Restore raw file option for a virtual disk with no snapshots.
Note: This will require modification of Hyper-V guest configuration files, and this only should be done if you have in-depth knowledge and understanding of Hyper-V, otherwise the guest virtual machine may not startup properly.
- Restore to an Alternate location you can only be performed on one guest virtual machine at a time.
- Restored guest virtual machines using Run Direct containing a saved state will not automatically power on. The saved state must be manually deleted in Hyper-V Manager and the guest must be powered on manually.
- For Run Direct enabled backup sets the storage destination is restricted to Local, Mapped Drive, or Removable Drive.
- When a guest virtual machine is started in a Run Direct instance is stopped any changes made within the guest environment will be lost, if the guest virtual is not migrated to the Hyper-V Server using the “Auto migrate after Run Direct is running” option.
- When a guest virtual machine is started using Run Direct Restore all backup jobs (manual, scheduled, and continuous) for the related backup set will be skipped.
- When a guest virtual machine is started using Run Direct Restore the following features are not available for the backup set; Data Integrity Check, Space Freeing Up, and Delete Backup Data.
- The CBT feature only supports Run Direct enabled storage destinations. The storage destinations are restricted to Local drives, mapped drives, or removable Drives.
- CBT cluster service is only applicable to Windows x64 installation.
Run Direct
Hyper-V Run Direct is a feature that helps to reduce disruption and downtime of your production guest virtual machines.
Unlike normal recovery procedures where the guest virtual machine(s) are restored from the backup destination and copied to production storage, which can take hours to complete. Restore with Run Direct can instantly restore a guest virtual machine by running it directly from the backup file in the backup destination; this process can be completed in minutes. Administrators can then troubleshoot on the failed guest virtual machine, while users are back in production with minimal disruption.
The following steps are taken when a Run Direct restore is initiated:
- Delete Guest Virtual Machine: Retrospect Virtual Host Server will delete the existing guest virtual machine on the original or alternate location (if applicable).
- Create Virtual Hard Disk Image Files: Empty virtual hard disk image files are created on the Hyper-V server (either on the original location or alternate location).
- Create VSS Snapshot: A VSS snapshot is created to make the backup data read only and track changes made within the guest virtual machine environment.
- Start Up Virtual Machine: The guest virtual machine is started up. To finalize recovery of the guest virtual machine, you will still need to migrate it to from the backup destination to the designated permanent location on the Hyper-V server.
- Copy Data: Copy the data from the backup files in the backup destination to empty hard disk images on the Hyper-V server.
- Apply Changes: Apply any changes made within the guest virtual machine environment to the hard disk image files on the Hyper-V server.
- Delete VSS Snapshot: The VSS snapshot will be deleted after the Run Direct restoration is completed.
The restored virtual machine, at this stage (e.g. before the restore is finalized) is in a read-only state to avoid unexpected changes. All changes made to the virtual disks (e.g. operation within the guest virtual machine) are stored in a VSS snapshot created for the Run Direct restore. These changes are discarded when Run Direct is stopped, where the restored guest virtual machine will be removed and all changes will be discarded, or the changes will be consolidated with the original virtual machine data when the restore is finalized.
Granular Restore Technology
What is Granular Restore Technology?
Retrospect Virtual Host Server granular restore technology enables the recovery of individual files from a guest VM without powering up or restoring the whole guest VM first.
Granular restore is one of the available restore options for Hyper-V backup sets from Retrospect Virtual Host Server. Retrospect Virtual Host Server makes use of granular restore technology to enable a file level restore from a virtual disk file (VHD) of guest VM backup possible. It is particularly useful if you only need to restore individual file(s) from a guest VM which would normally take a long time to restore and then startup before you can gain access the files on the virtual disks. Granular restore gives you a fast and convenient way to recover individual files from a guest VM.
During the granular restore process, the virtual disks of the guest VM can be mounted on the Hyper-V host or on another Windows machine as a local drive. This will allow the individual files on the virtual disks to be viewed via the file explorer within Retrospect Virtual Host Server or from the Windows File Explorer on the Windows machine you are performing the restore on, without having to restore the entire virtual machine. Granular restore can only mount virtual disks if the guest VM is running on a Windows Platform. The mounting of Linux/Unix file systems from virtual disk file is currently not available due to limitations of the file system drivers. It is supported for all backup destinations, i.e. Retrospect Virtual Console, Cloud storage, or Local/Network drives.
IMPORTANT: Granular restore requires an additional Granular Restore add-on module license to work for each backup set. Contact your backup service provider for further details.
Benefits of using Granular Restore
Comparison between Granular Restore and Traditional Restore
Granular Restore
Granular restore allows you to quickly mount virtual disk(s) directly from the backup file of a guest VM, so that individual files from virtual disk(s) can be exposed via the file explorer on Retrospect Virtual Host Server, or to be copied from the file explorer on to a 32 bit or 64 bit Windows machine you are performing the restore.
Advantages
- Restore of Entire Guest VM Not Required: Compared to a traditional restore where you have to restore the entire guest VM first, before you can access any individual files/folders, granular restore allows you to view and download individual files, without having to restore the entire guest VM first.
- Ability to Restore Selected Files: In some cases, you may only need to restore a few individual file(s) from the guest VM, therefore, granular restore gives you a fast, convenient, and flexible tool to restore selected file(s) from a guest VM quickly.
- Only One Backup Set Required: With traditional restore methods, if you wish to restore individual file(s) from a guest VM, you will have to create two different backup sets; a Hyper-V guest VM backup set and a separate file backup set for the file(s) you wish to restore. You will required an additional Retrospect Virtual Host Server installation on the guest VM environment, with Granular Restore feature, only one backup set is required.
- Less storage space required: As you only need to provide storage for one backup set.
- Less backup time required - As only one backup job needs to run.
- Less time spent on administration - As there are fewer backup sets to maintain.
Disadvantages
- No Encryption and Compression: To ensure optimal restore performance, the backup of the guest VM will NOT be encrypted and compressed, therefore, you may have to take this factor in consideration when using this restore method.
Traditional Restore
The traditional restore method for guest VMs, restores the entire backup files to either to the original VM location or another standby location. The files or data on the guest VM can only be accessed once the guest VM has been fully recovered and powered up.
Advantages
- Backup with Compression and Encryption: Guest VM is encrypted and compressed, therefore is in smaller file size, and encrypted before being uploaded to the backup destination.
Disadvantages
- Slower Recovery: As the entire guest VM has to be restored before you can access any of its file(s) or data, the restore time could be long if the guest VM size is large.
Requirements
Supported Backup Modules
Granular restore is supported on Hyper-V backup sets created and backed up using Retrospect Virtual Host Server installed on a Windows platform with the Granular Restore feature enabled on each backup set.
License Requirements
An Granular restore add-on module license is required per backup set for this feature to work. Contact your backup service provider for more details.
Backup Quota Storage
As compression is not enabled for Granular backup sets, to optimize restore performance, the storage quota required will be higher than non-Granular backup sets. Contact your backup service provider for details.
Operating System
Retrospect Virtual Host Server must be installed on a 32/ 64 bit Windows machine. Retrospect Virtual Host Server must be installed on the following Windows Operating Systems:
- Windows 2012
- Windows 2012 R2
- Windows 2016
- Windows 8
- Windows 8.1
- Windows 10
Temporary Directory Requirement
The temporary Directory Folder should have at least the same available size as the guest VM to be restored and should be located on a local drive to ensure optimal performance.
Available Spare Drive Letter
One spare drive letter must be available on the Windows machine for the granular restore process, as the VHD virtual disk is mounted on Windows as a logical drive. Retrospect Virtual Host Server will automatically take the next available drive letter in alphabetical order for the mounted virtual disk.
- The Windows drive letters A, B, and C are not used by granular restore.
- The granular restore assigned drive letter(s) will be released once you exit from Retrospect Virtual Host Server UI.
Network Requirements
Recommended minimum network speed is at least 100Mbps download speed.
The network bandwidth requirements will increase in proportion to the size of the guest VM and the incremental delta chain length to ensure optimal performance. Working with limited network bandwidth may severely affect the granular restore performance.
You can use an online network speed test website (e.g. www.speedtest.net) to get an idea of the actual bandwidth of the machine.
Other Dependencies
The following dependencies are required for restore and therefore they are verified by Retrospect Virtual Host Server only when granular restore is performed. Absence of these dependencies will not affect the backup job but would cause the granular restore to fail.
- Microsoft Visual C++ 2015 Redistributable (x86) / (x64): https://www.microsoft.com/en-us/download/details.aspx?id=48145
- Update for Universal C Runtime in Windows: https://support.microsoft.com/en-us/help/2999226/update-for-universal-c-runtime-in-windows
Permissions
The Windows login account used for installation and operation of the Retrospect Virtual Host Server client machine requires Administrator privileges
Starting Retrospect Virtual Host Server
Login to Retrospect Virtual Host Server
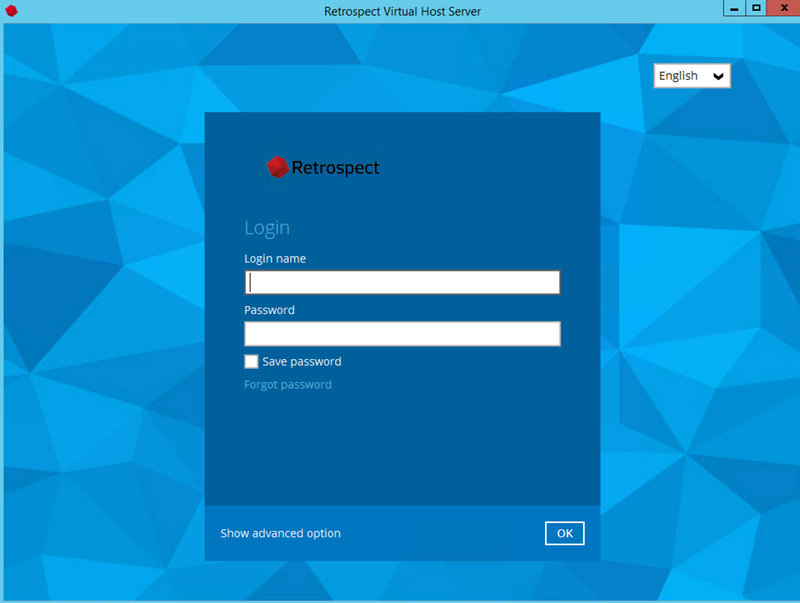
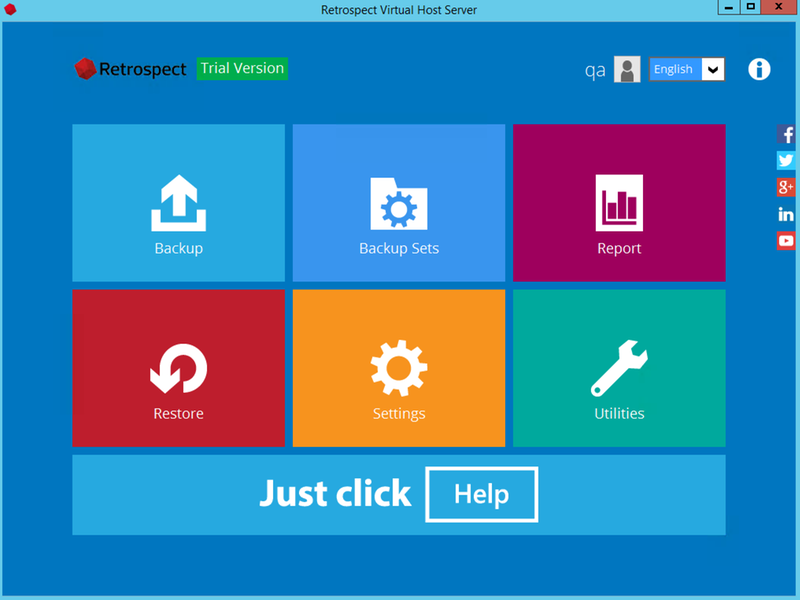
- A shortcut icon of Retrospect Virtual Host Server should have been created on your Windows desktop after installation. Double click the icon to launch the application.
- Enter the login name and password of your Retrospect Virtual Host Server account provided by your backup service provider, then click OK to login.
Creating a Hyper-V Backup Set
Non-Cluster Environment
Run Direct Backup Set
- Click the Backup Sets icon on the main interface of Retrospect Virtual Host Server.
- Create a new backup set by clicking the “+” icon or Add button to created new backup set.
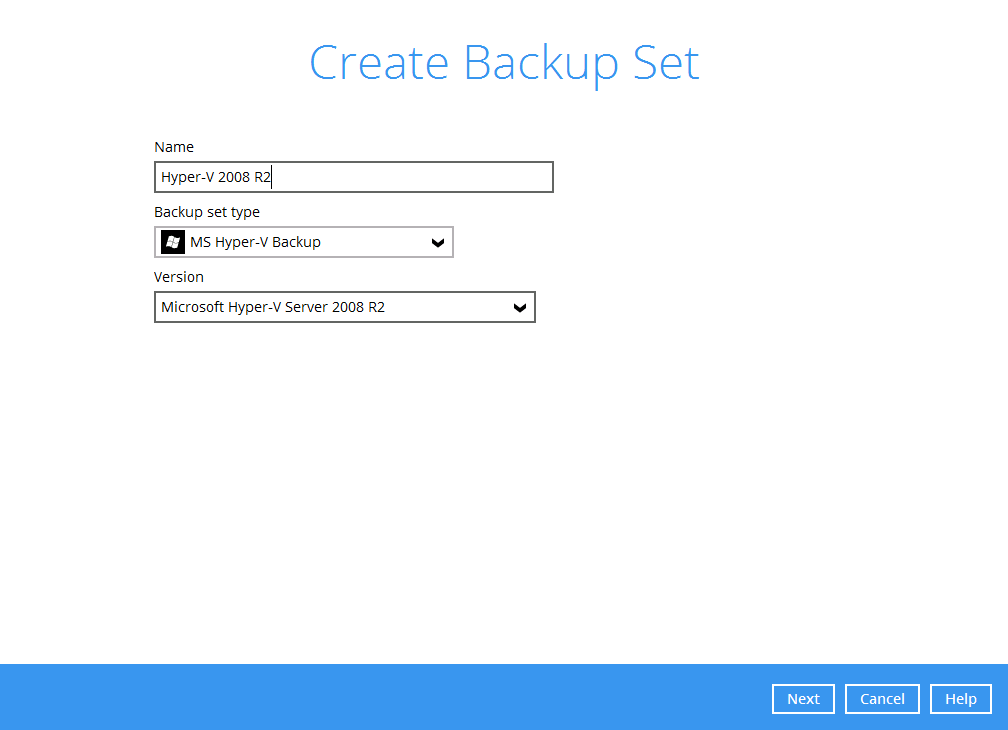
- Select the Backup set type and name your new backup set then click Next to proceed.
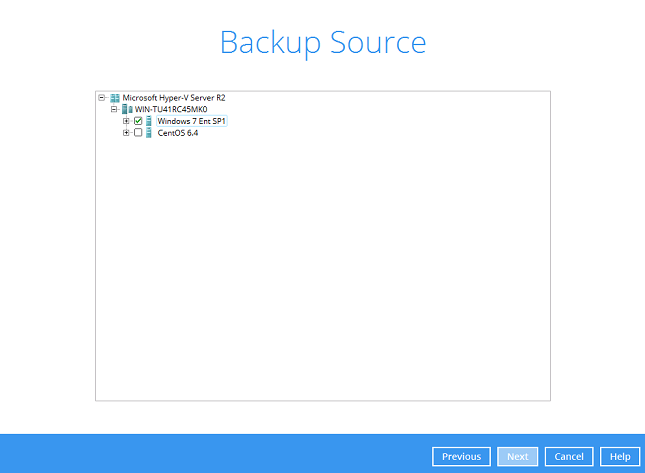
- In the Backup Source menu, select the guest virtual machines you would like to backup. Click Next to proceed.
- In the Schedule menu, you can configure a backup schedule for backup job to run automatically at your specified time interval.
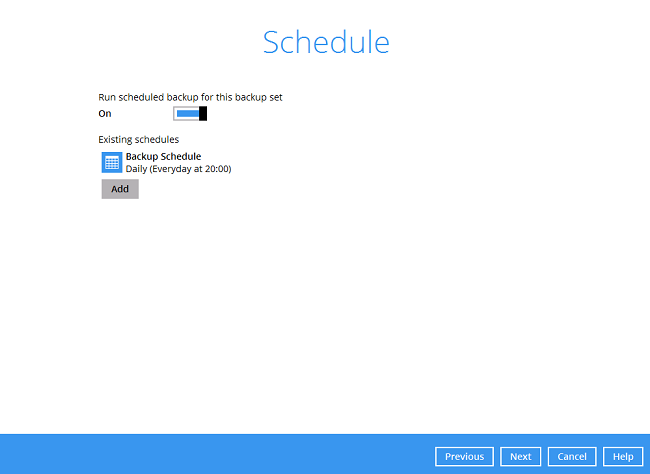
Click Add to add a new schedule or double click on the existing schedule to change the values. Click Next to proceed when you are done setting.
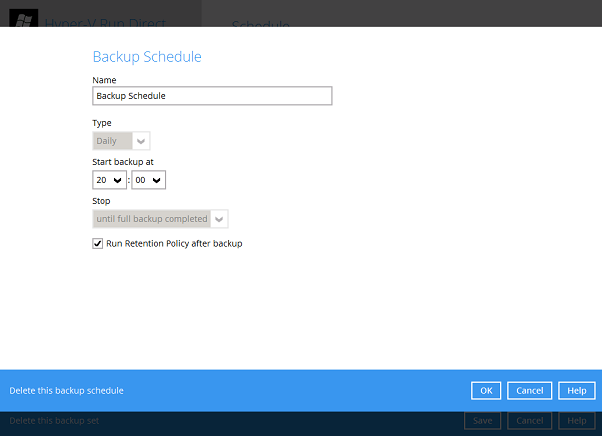
Note: The default backup schedule is daily backup at 22:00 with the backup job will run until completion and the retention policy job will be run immediately after the backup job.
- Select the backup storage destination.
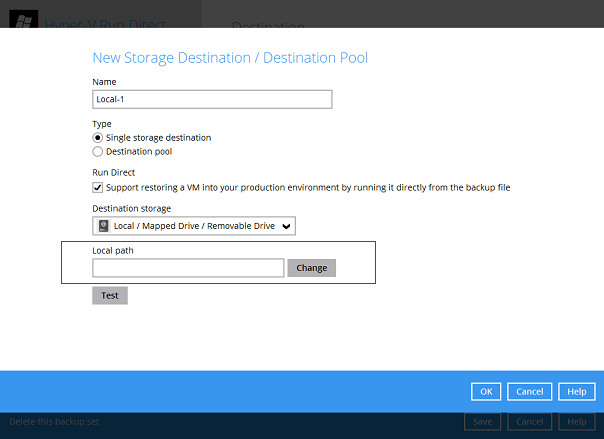
Note: For Hyper-V backup sets by the default the Run Direct feature is enabled.
- Click on Change to select the storage destination a Local, Mapped Drive, or Removable Drive.
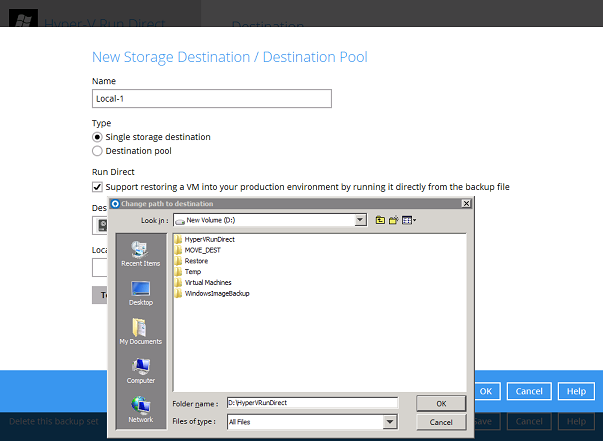
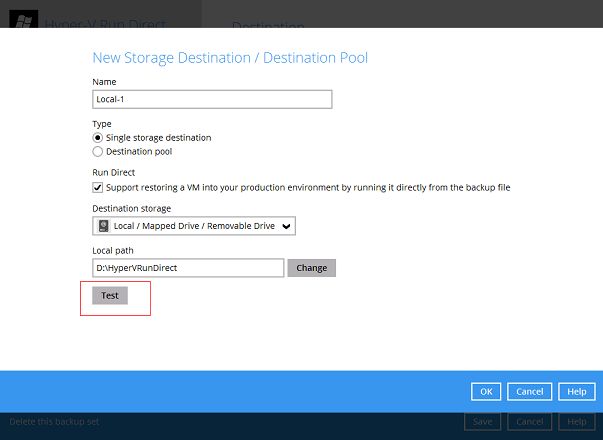
- After selecting the storage destination click on the Test button to verify if Retrospect Virtual Host Server has permission to access the folder on the storage destination.
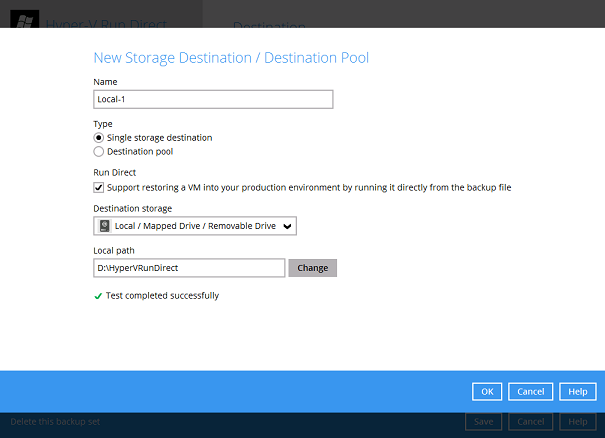
- Once the test is finished Retrospect Virtual Host Server will display “Test completed successfully” message. Click OK to proceed.
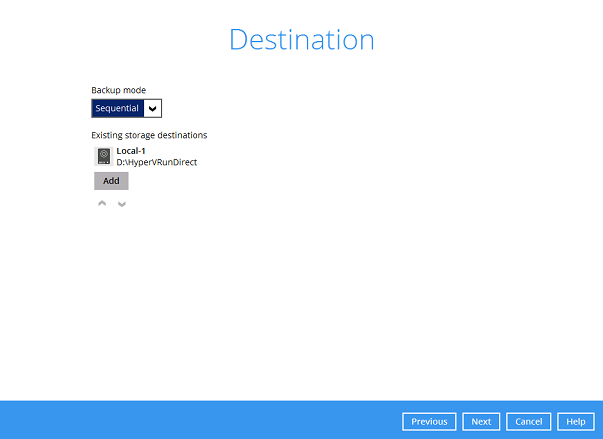
- To add extra storage destination click Add, otherwise Click Next to proceed.
- Select data encryption method.
By default, the Encrypt Backup Data option is enabled with an encryption key preset by the system which provides the most secure encryption method (256 bit AES with a randomly generated 44 character alphnumeric encryption key). Click Next when you are done with the setting.
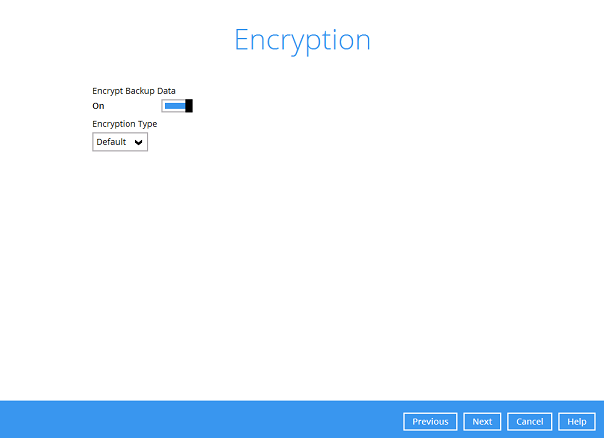
You can also change the Encryption Type to Custom to set your own encryption key, key length, algorithm and method.
For local, mapped drive, or removable drive storage destinations with Run Direct enabled the compression type will always be set No Compression and data encryption is disabled to ensure optimal backup and restore performance. The backup set compression type and data encryption settings will only be applied to Management Console, SFTP/FTP, or Cloud storage destinations for the backup set.
- If you have enabled the Encryption Key feature in the previous step, the following pop-up window shows, whether you set the Encryption Type as Default or Custom.
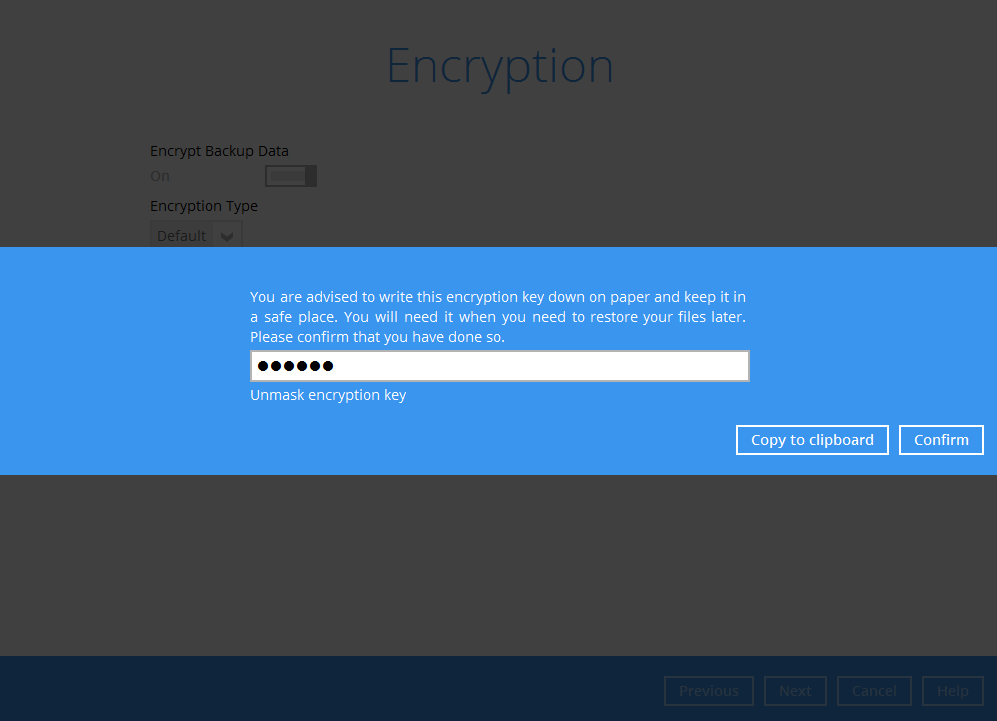
The pop-up window has the following three options to choose from:
- Unmask encryption key: The encryption key is masked by default. Click this option to show the encryption key.
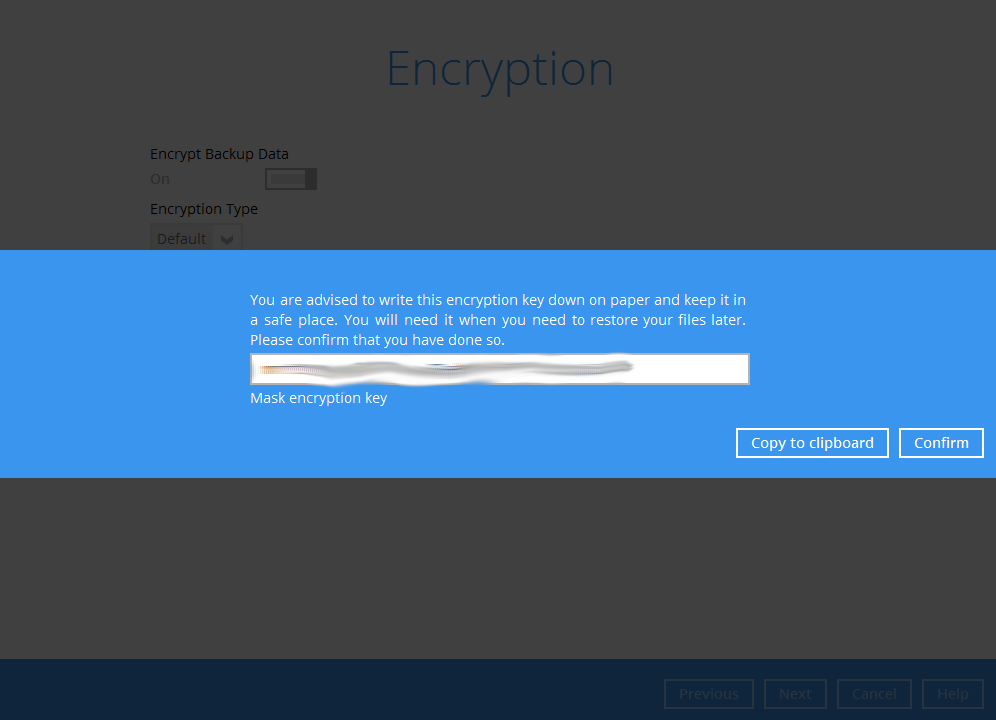
- Copy to clipboard: Click to copy the encryption key, then you can paste it in another location of your choice.
- Confirm: Click to exit this pop-up window and proceed to the next step.
- Windows User Authentication
Enter the Windows login credentials used by Retrospect Virtual Host Server to authenticate the scheduled or continuous backup job.
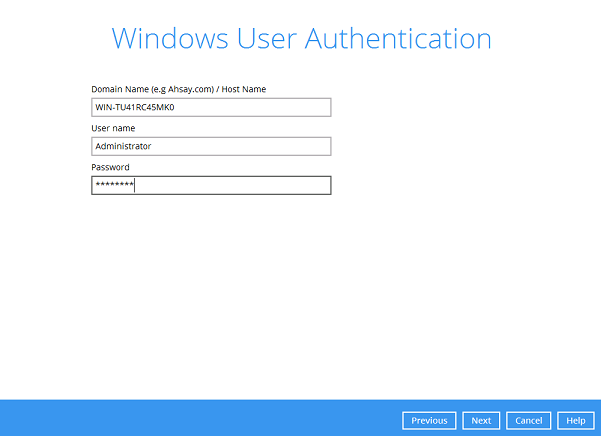
Note: If the backup schedule is turned off for the backup set the Windows User Authentication screen will be automatically skipped. The Windows User Authentication login credentials can be added or update post backup set creation.
- Backup set created.
- To start a manual backup job click on Backup now.
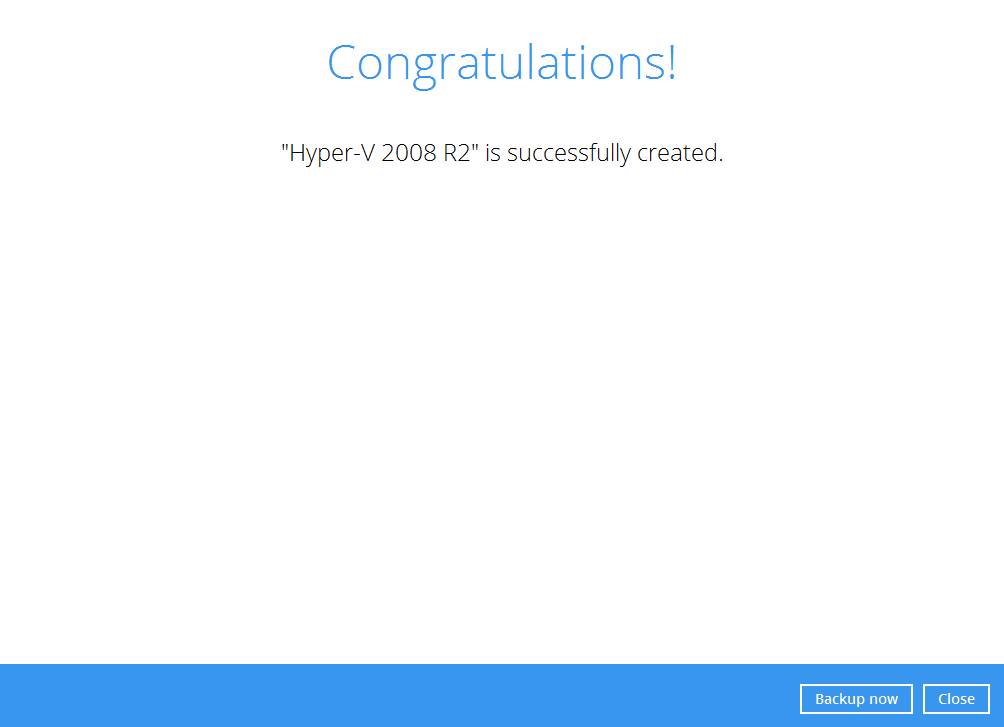
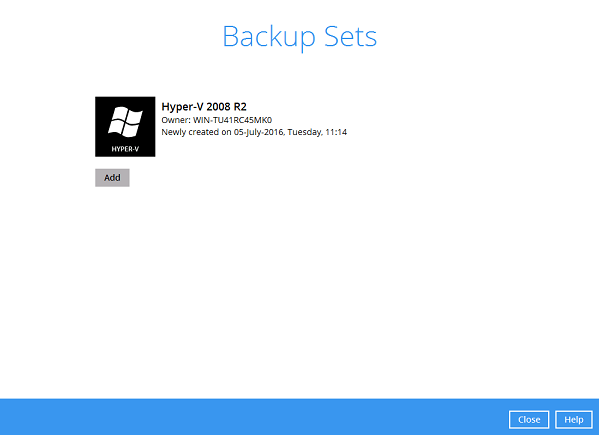
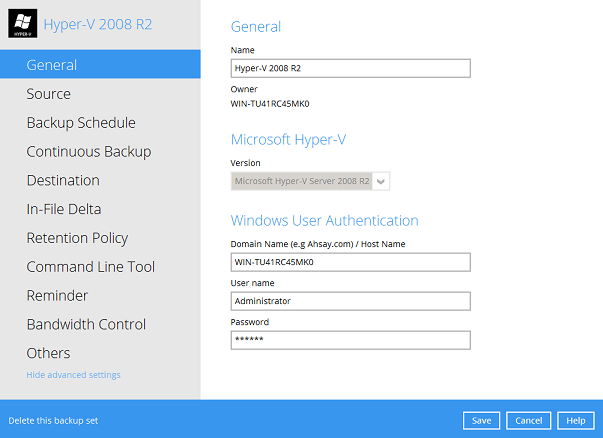
- To verify the backup set settings click on Close and then click on the Hyper-V backup set to complete the setup.
Non Run Direct Backup Set
- Click the Backup Sets icon on the main interface of Retrospect Virtual Host Server.
- Create a new backup set by clicking the “+” icon next to Add new backup set.
- Select the Backup set type and name your new backup set then click Next to proceed.
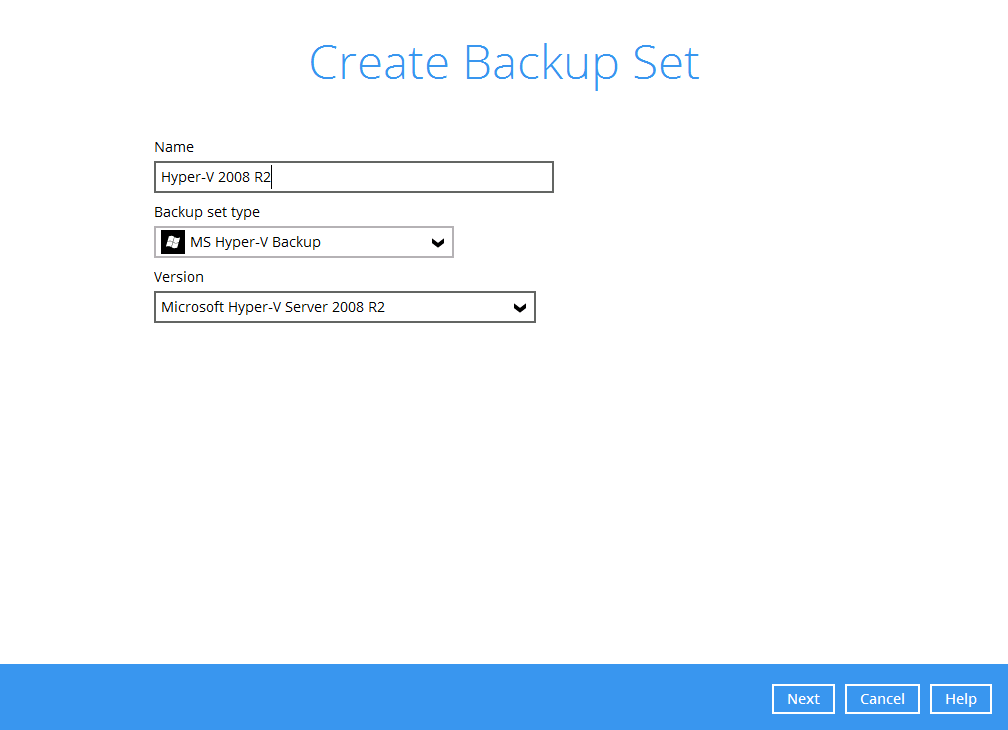
+ Note: Retrospect Virtual Host Server will automatically detect the Hyper-V version installed on the host.
- In the Backup Source menu, select the guest virtual machines you would like to backup. Click Next to proceed.
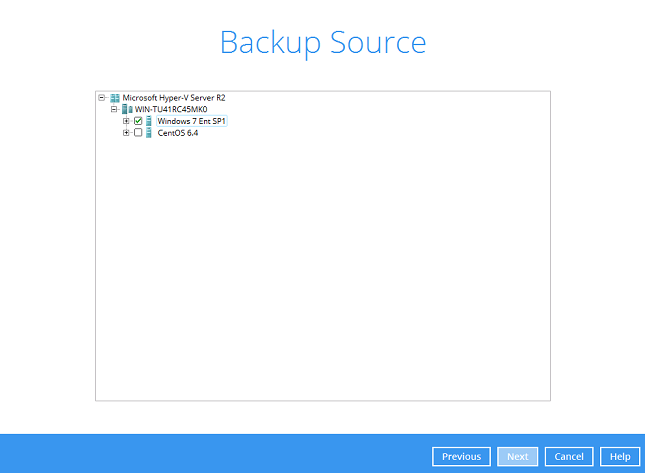
- In the Schedule menu, you can configure a backup schedule for backup job to run automatically at your specified time interval.
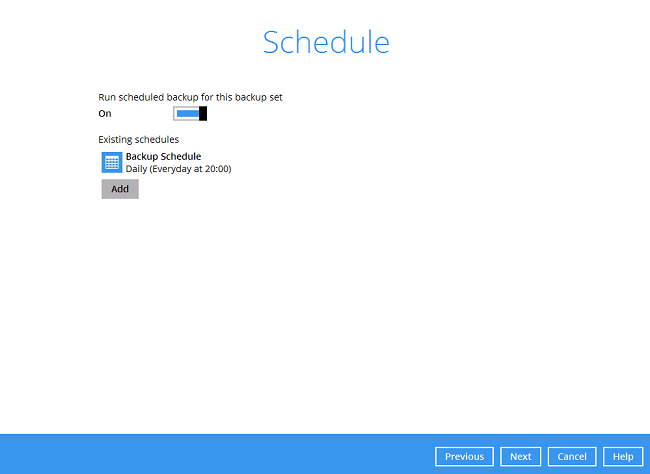
Click Add to add a new schedule or double click on the existing schedule to change the values. Click Next to proceed when you are done setting.
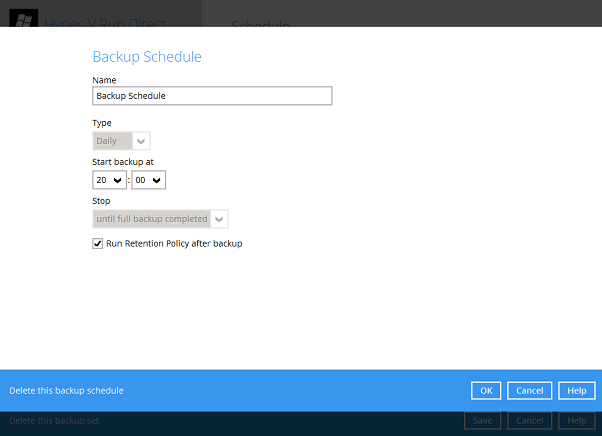
Note: The default backup schedule is daily backup at 22:00 with the backup job will run until completion and the retention policy job will be run immediately after the backup job.
- Select the backup storage destination.
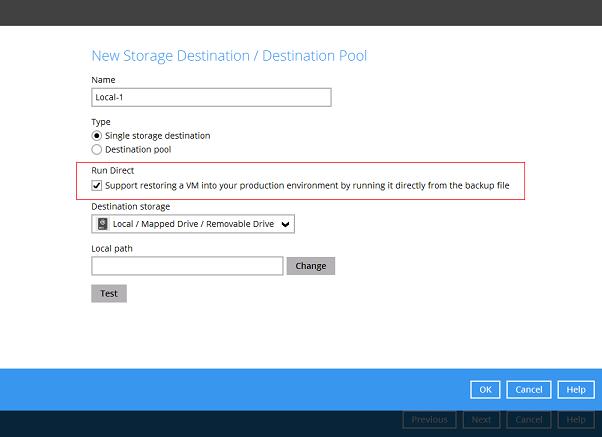
Note: For Hyper-V backup sets, the default setting is for Run Direct to be enabled and the storage destination is either a Local, Mapped Drive, or Removable Drive.
To select a cloud, sftp/ftp, or Management Console as a storage destination un-select Run Direct setting and select your desired cloud, sftp/ftp, or Management Console as a storage destination. Click OK to proceed when you are done.
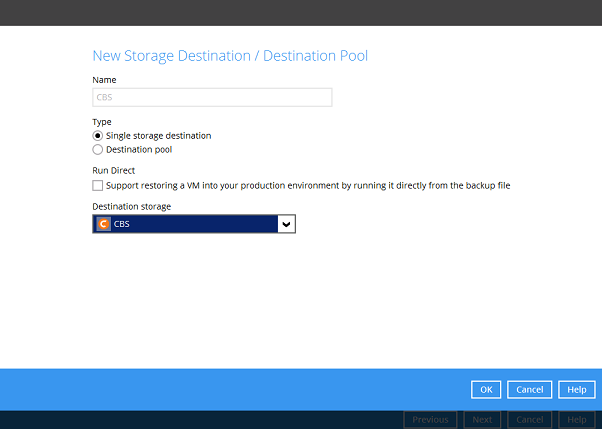
- Click Add to an additional storage destination or click Next to proceed when you are done.
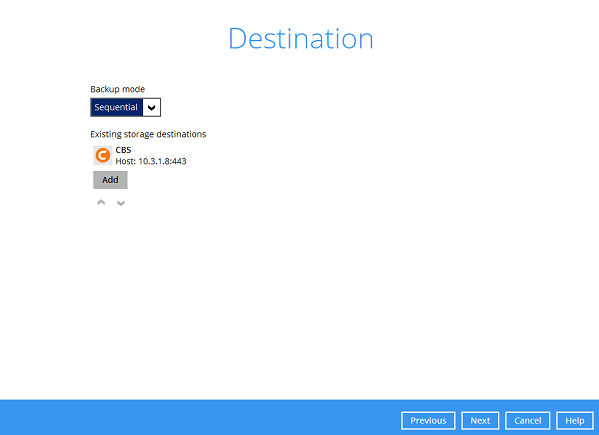
Note: To utilize the CBT feature, the storage destination must be a Local, Mapped Drive, or Removable Drive.
- Select data encryption method.
By default, the Encrypt Backup Data option is enabled with an encryption key preset by the system which provides the most secure encryption method (256 bit AES with a randomly generated 44 character alphnumeric encryption key). Click Next when you are done with the setting.
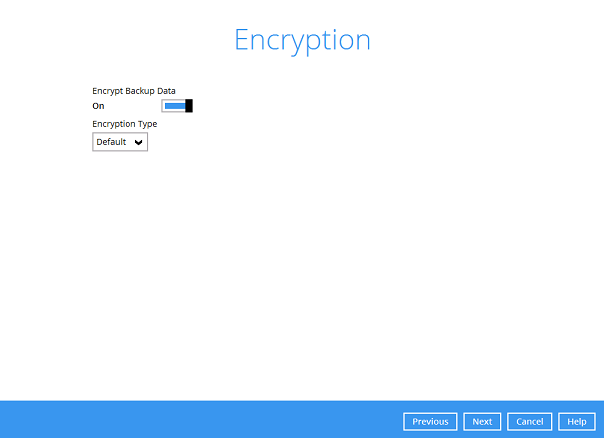
You can also change the Encryption Type to Custom to set your own encryption key, key length, algorithm and method.
- If you have enabled the Encryption Key feature in the previous step, the following pop-up window shows, whether you set the Encryption Type as Default or Custom.
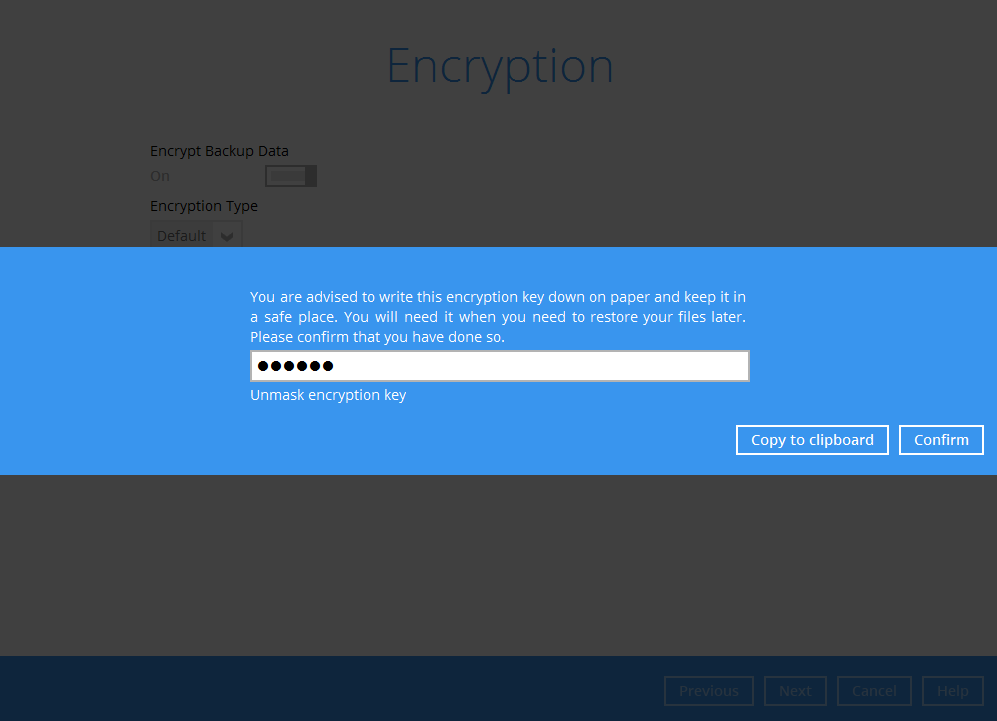
The pop-up window has the following three options to choose from:
- Unmask encryption key: The encryption key is masked by default. Click this option to show the encryption key.
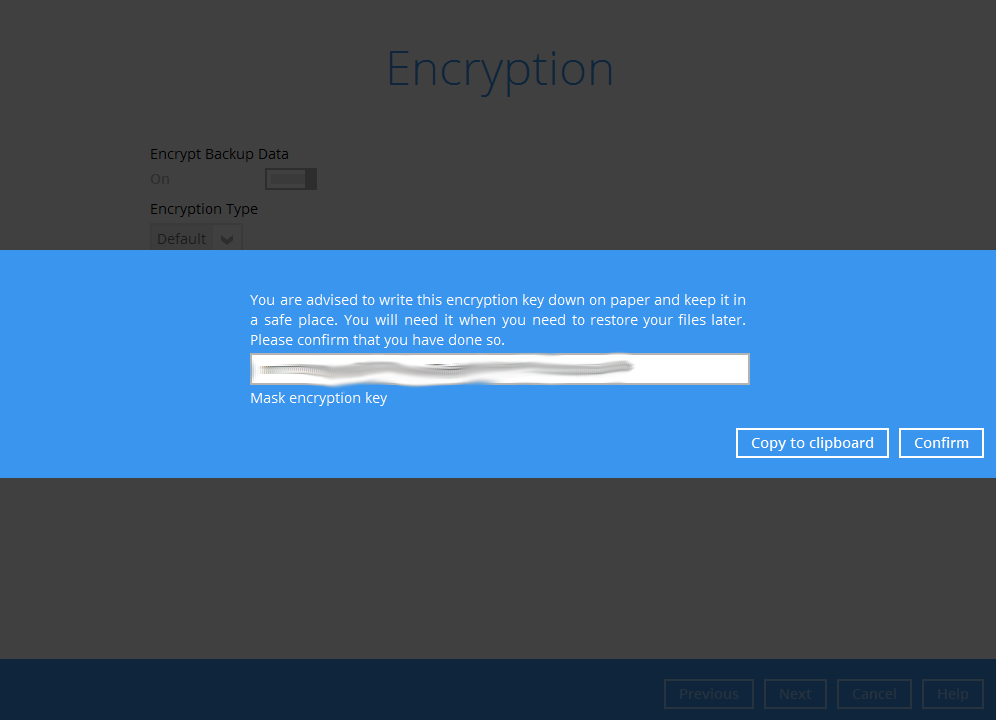
- Copy to clipboard: Click to copy the encryption key, then you can paste it in another location of your choice.
- Confirm: Click to exit this pop-up window and proceed to the next step.
- Windows User Authentication
Enter the Windows login credentials used by Retrospect Virtual Host Server to authenticate the scheduled backup job.
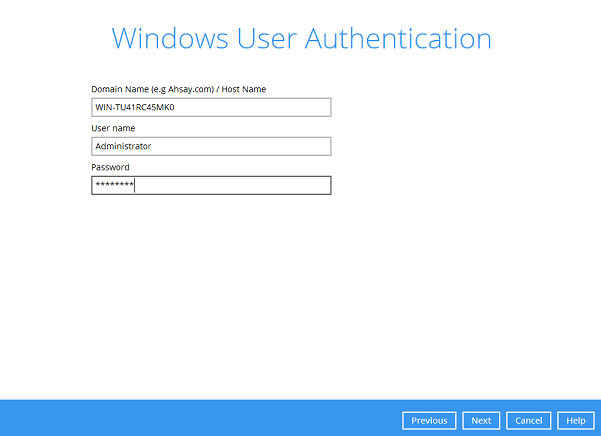
Note: If the backup schedule is turned off for the backup set the Windows User Authentication screen will be automatically skipped. The Windows User Authentication login credentials can be added or update post backup set creation.
- Backup set created.
- To start a manual backup job click on Backup now.
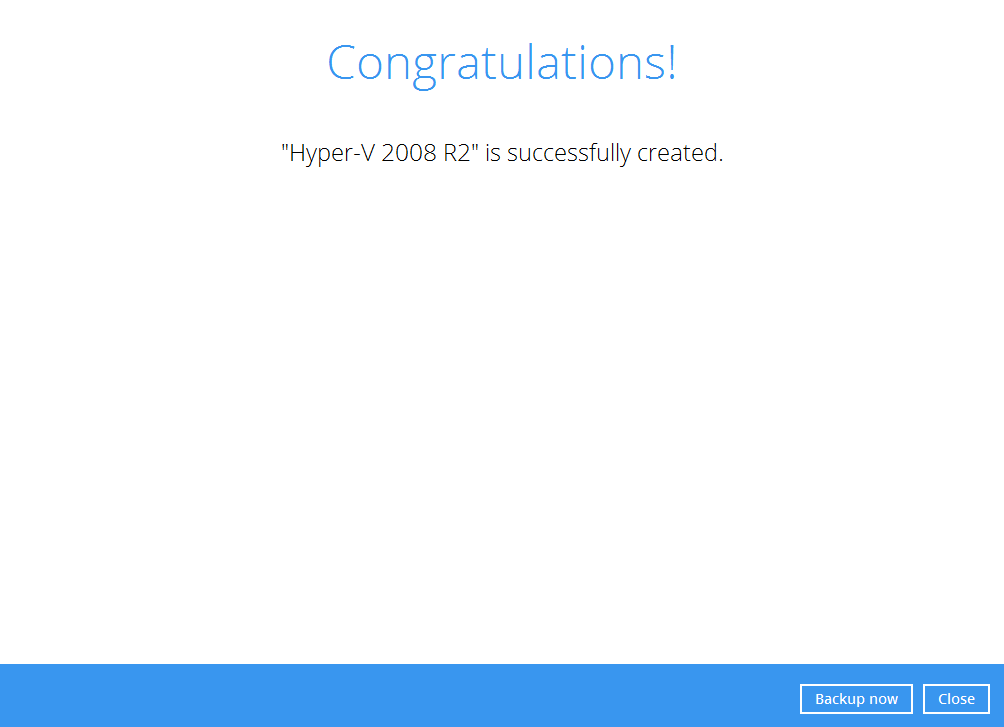
- To verify the backup set settings click on Close and then click on the Hyper-V backup set to complete the setup.
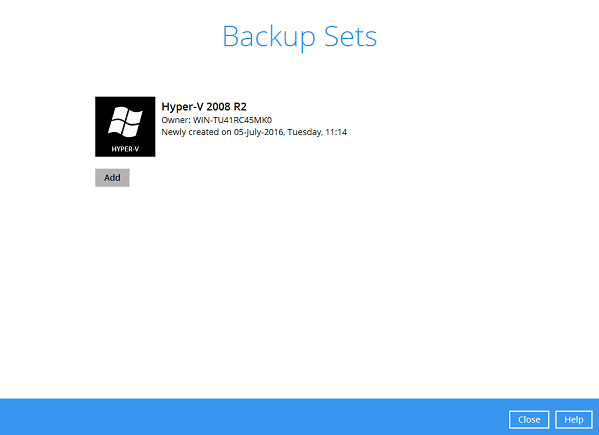
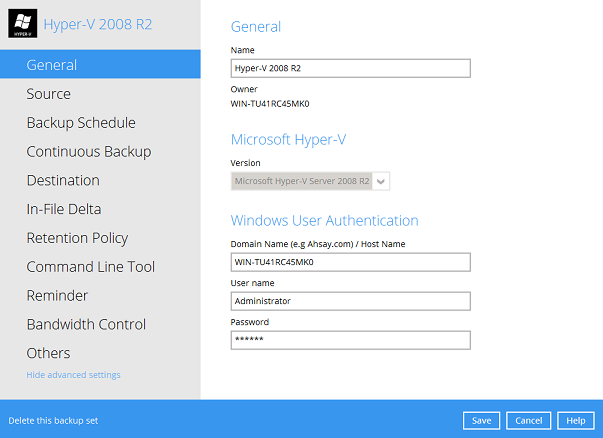
Cluster Environment
For Hyper-V Cluster backup sets
- The same version of Retrospect Virtual Host Server must be installed on all Hyper-V Cluster nodes.
- The same backup user account must be used.
- The backup schedule must be enabled on all Hyper-V Cluster nodes.
Run Direct Backup Set
- Click the Backup Sets icon on the main interface of Retrospect Virtual Host Server.
- Create a new backup set by clicking the “+” icon or Add button to created new backup set.
- Select the Backup set type MS Hyper-V Backup, Version Microsoft Hyper-V Server 2012 R2 (Failover Cluster), and name your new backup set then click Next to proceed.
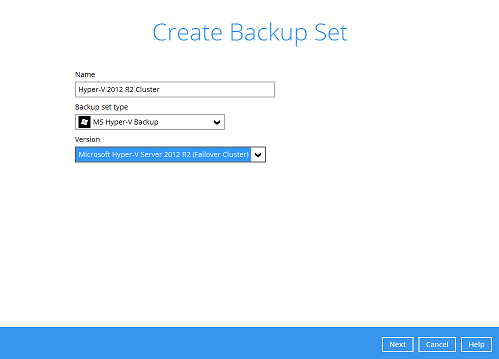
- In the Backup Source menu, select the guest virtual machines you would like to backup. Click Next to proceed.
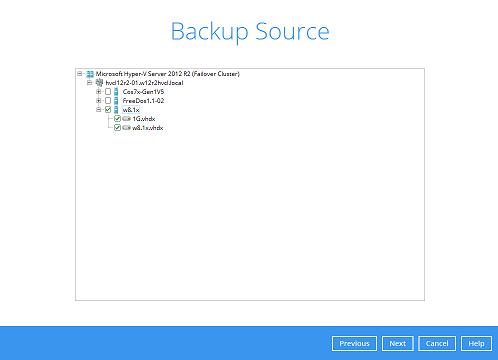
- Click Add to add a new schedule or double click on the existing schedule to change the values. Click Next to proceed when you are done setting.
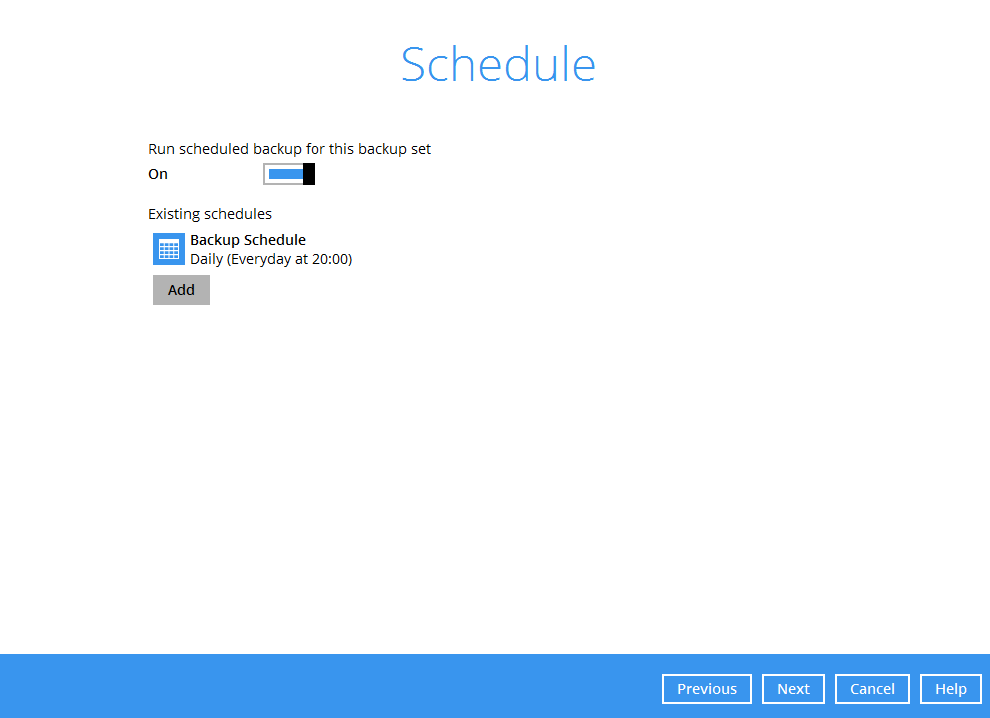
Note: The default backup schedule is daily backup at 22:00 with the backup job will run until completion and the retention policy job will be run immediately after the backup job.
- Select the backup storage destination.
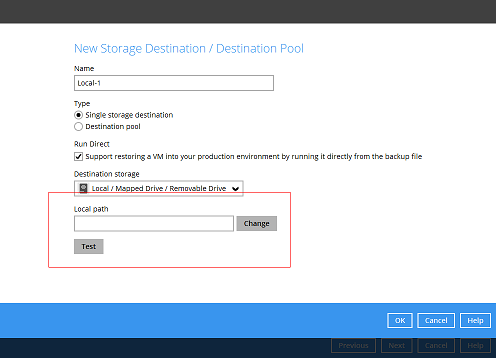
Note: For Hyper-V backup sets by the default the Run Direct feature is enabled.
- Click on Change to select the storage destination a Local, Mapped Drive, or Removable Drive.
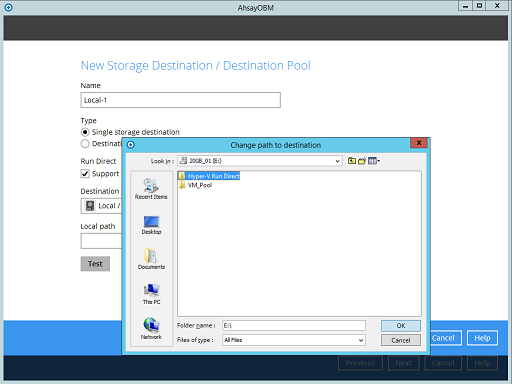
- After selecting the storage destination click on the Test button to verify if Retrospect Virtual Host Server has permission to access the folder on the storage destination.
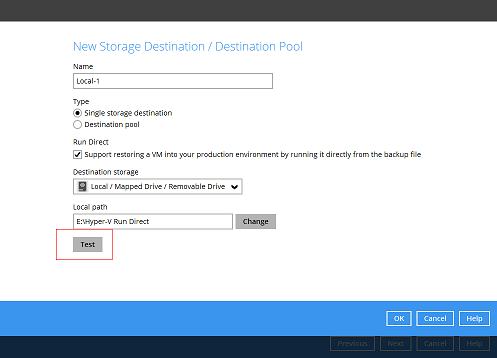
- Once the test is finished Retrospect Virtual Host Server will display “Test completed successfully” message. Click OK to proceed.
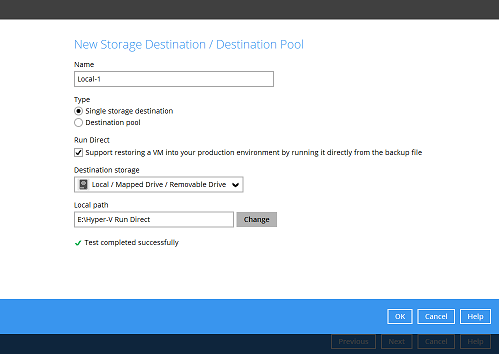
Note: For Hyper-V Cluster backup set with Run Direct enabled please ensure all nodes have access to the Local, Mapped Drive, or Removable Drive destination storage.
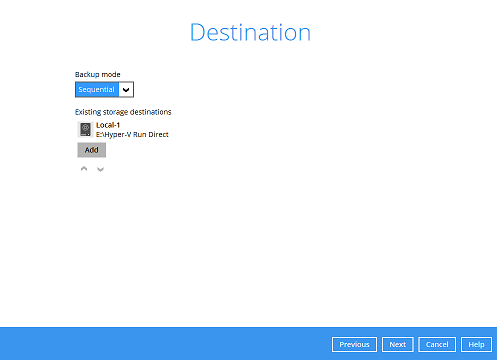
- To add extra storage destinations click Add, otherwise Click Next to proceed.
- Select data encryption method.
By default, the Encrypt Backup Data option is enabled with an encryption key preset by the system which provides the most secure encryption method (256 bit AES with a randomly generated 44 character alphnumeric encryption key). Click Next when you are done with the setting.
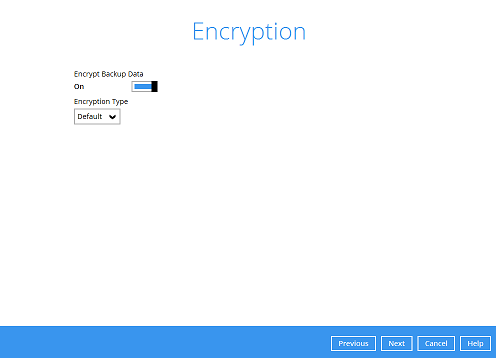
You can also change the Encryption Type to Custom to set your own encryption key, key length, algorithm and method.
For local, mapped drive, or removable drive storage destinations with Run Direct enabled the compression type will always be set No Compression and data encryption is disabled to ensure optimal backup and restore performance. The backup set compression type and data encryption settings will only be applied to Management Console, SFTP/FTP, or Cloud storage destinations for the backup set.
- If you have enabled the Encryption Key feature in the previous step, the following pop-up window shows, whether you set the Encryption Type as Default or Custom.
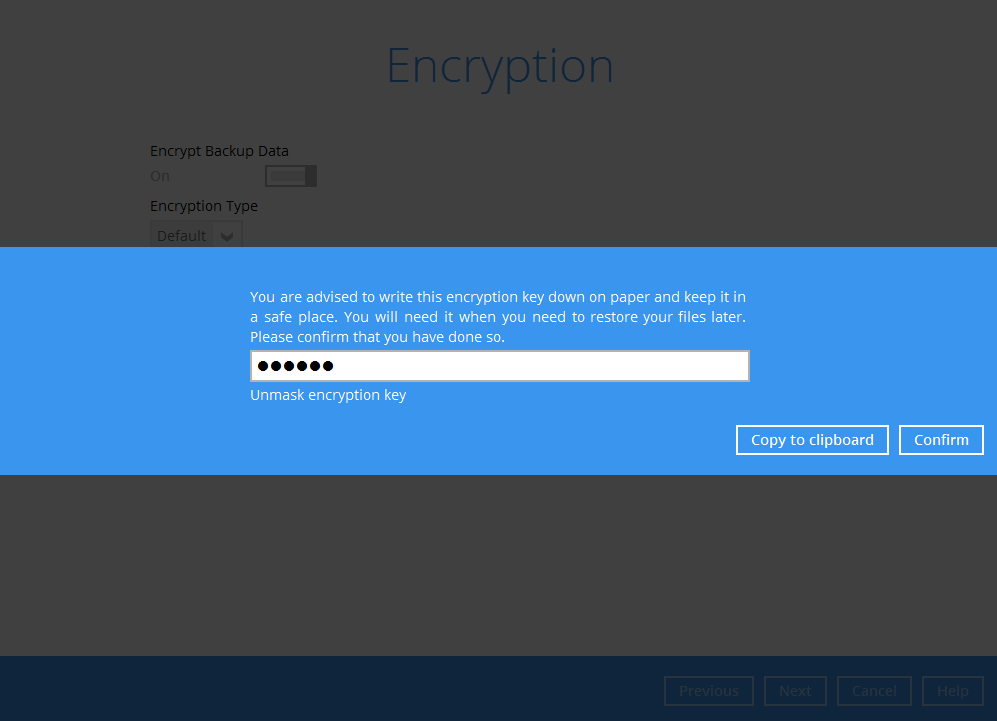
The pop-up window has the following three options to choose from:
- Unmask encryption key: The encryption key is masked by default. Click this option to show the encryption key.
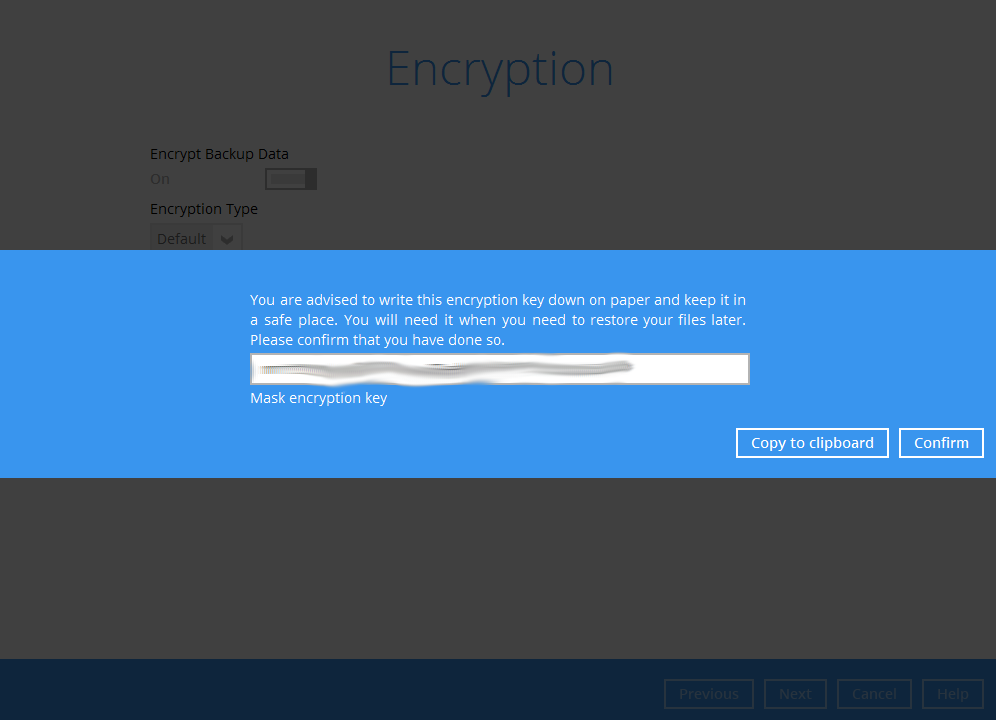
- Copy to clipboard: Click to copy the encryption key, then you can paste it in another location of your choice.
- Confirm: Click to exit this pop-up window and proceed to the next step.
- Windows User Authentication
Enter the Windows login credentials used by Retrospect Virtual Host Server to authenticate the scheduled or continuous backup job.
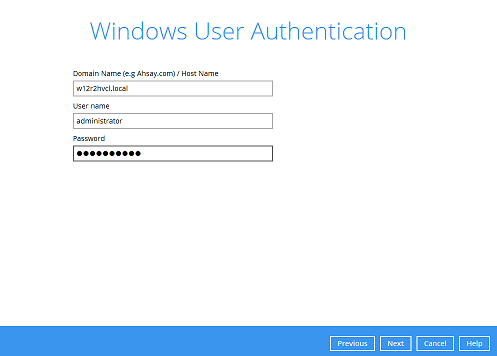
Note: If the backup schedule is turned off for the backup set the Windows User Authentication screen will be automatically skipped. The Windows User Authentication login credentials can be added or update post backup set creation.
- Backup set created.
- To start a manual backup job click on Backup now.
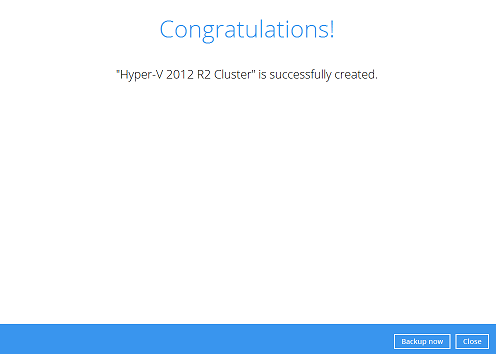
- To verify the backup set settings click on Close and then click on the Hyper-V backup set to complete the setup.
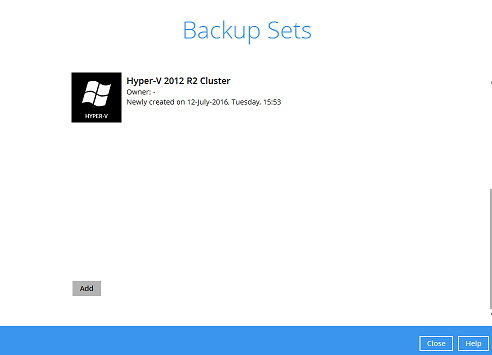
- Go to General and verify if the node has been added to the backup schedule.
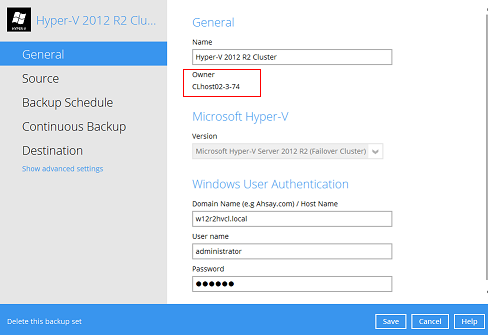
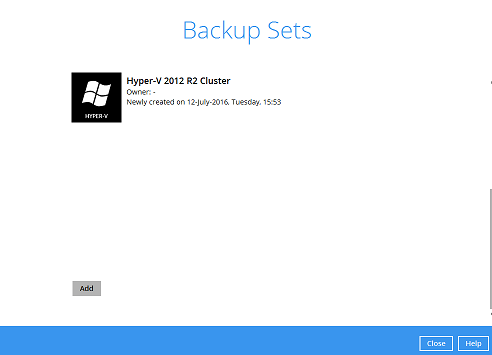
- On the next Hyper-V node startup Retrospect Virtual Host Server and select the Hyper-V backup set.
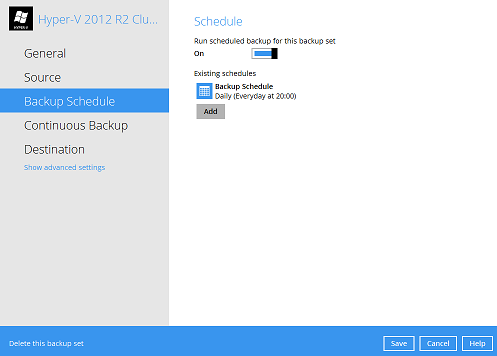
- Go to Backup schedule and enable the Run schedule backup for this backup set and set the backup schedule time and click on Save when finished.
- Go to General and verify if the node has been added to the backup schedule.
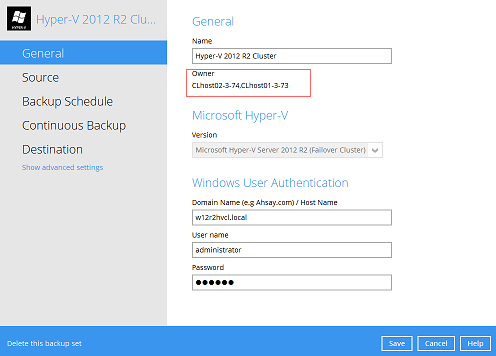
- Repeat steps 11 to 12 for all Hyper-V Cluster nodes.
Non Run Direct Backup Set
- Click the Backup Sets icon on the main interface of Retrospect Virtual Host Server.
- Create a new backup set by clicking the “+” icon or Add button to created new backup set.
- Select the Backup set type MS Hyper-V Backup, Version Microsoft Hyper-V Server 2012 R2 (Failover Cluster), and name your new backup set then click Next to proceed.
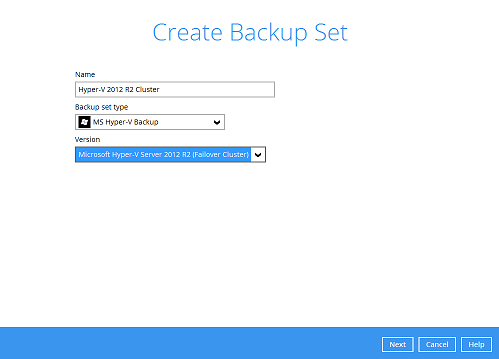
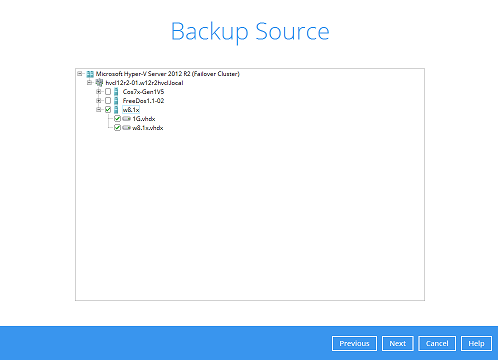
- In the Backup Source menu, select the guest virtual machines you would like to backup. Click Next to proceed.
- In the Schedule menu, you can configure a backup schedule for backup job to run automatically at your specified time interval.
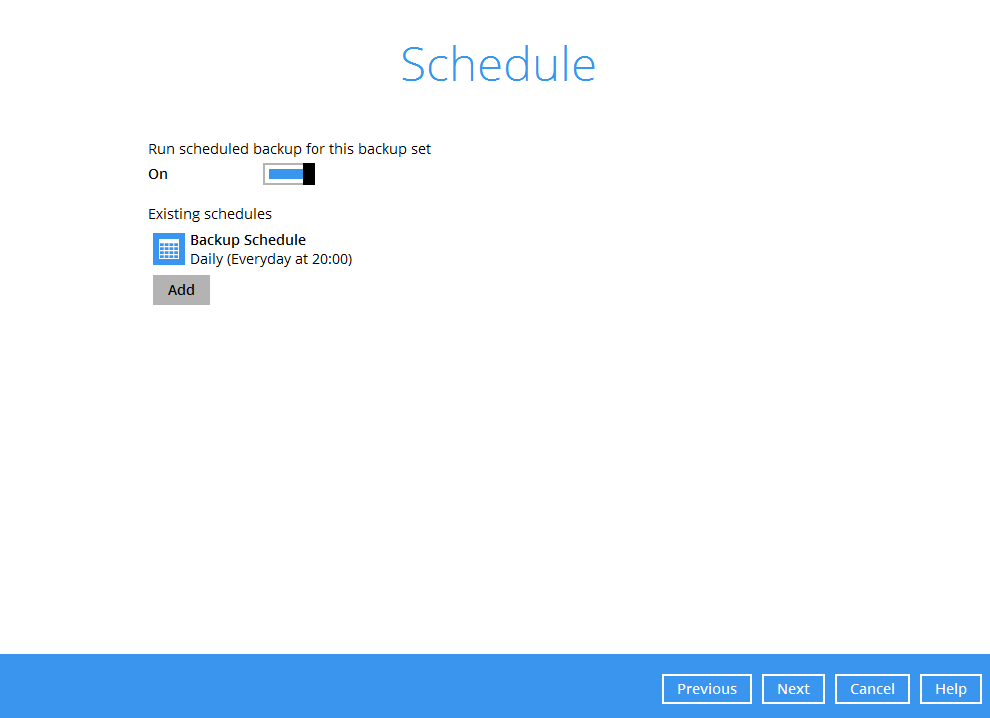
Click Add to add a new schedule or double click on the existing schedule to change the values. Click Next to proceed when you are done setting.
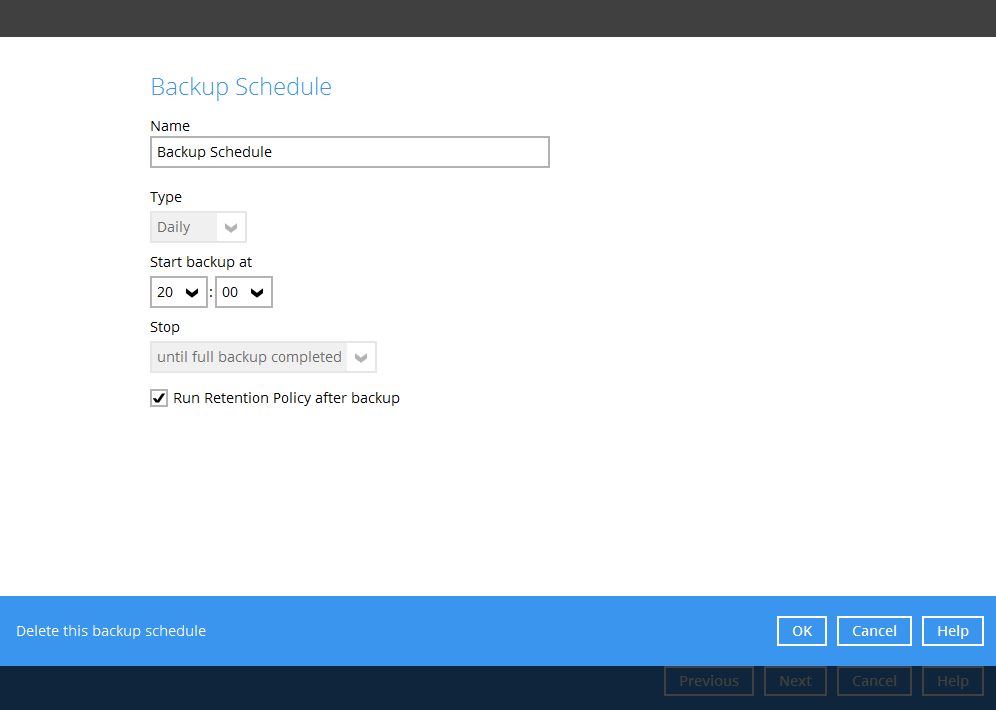
Note: The default backup schedule is daily backup at 22:00 with the backup job will run until completion and the retention policy job will be run immediately after the backup job.
- Select the backup storage destination.
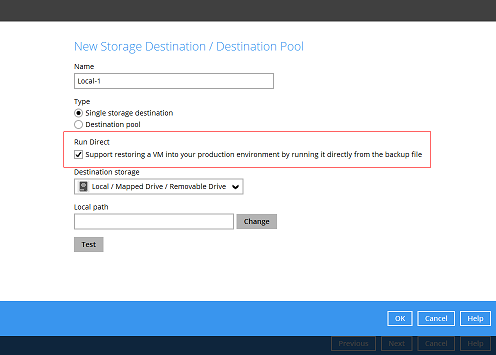
Note: For Hyper-V backup sets, the default setting is for Run Direct to be enabled and the storage destination is a Local, Mapped Drive, or Removable Drive.
To select a cloud, sftp/ftp, or Management Console as a storage destination un-select *Run Direct* setting and select your desired cloud, sftp/ftp, or Management Console as a storage destination. Click OK to proceed when you are done.
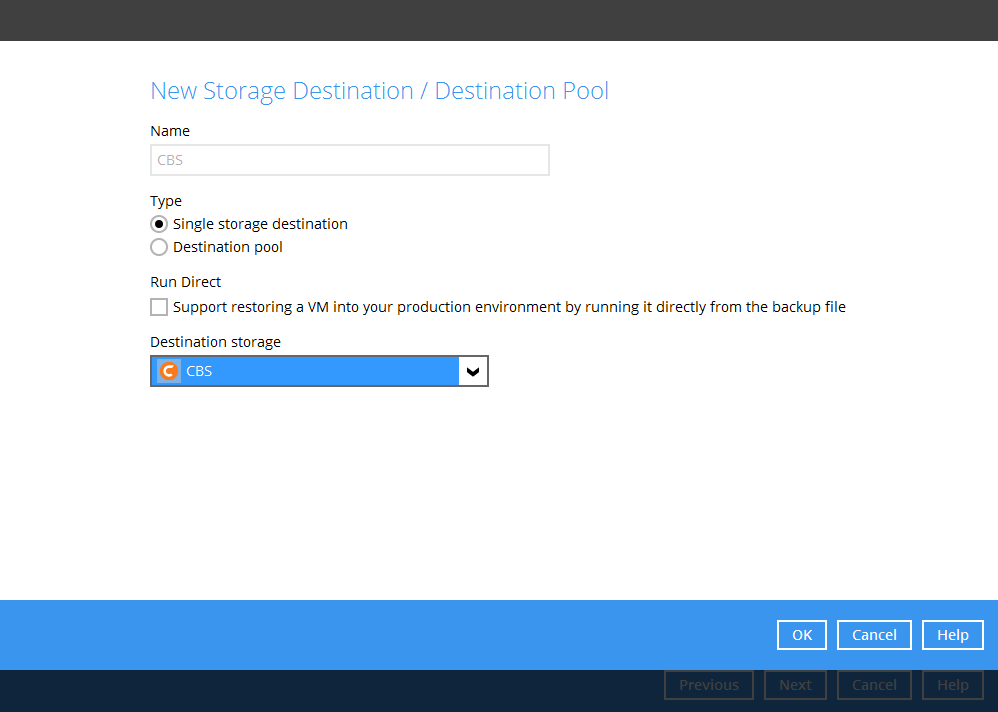
- Click Add to an additional storage destination or click Next to proceed when you are done.
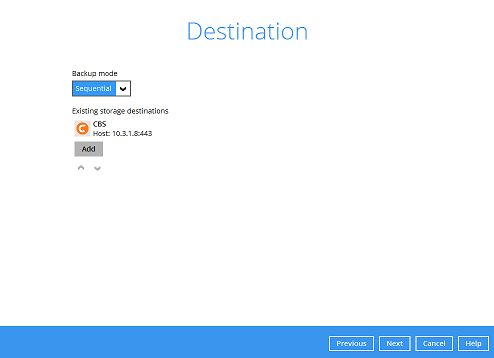
Note: To utilize the CBT feature, the storage destination must be a Local, Mapped Drive, or Removable Drive.
- Select data encryption method.
By default, the Encrypt Backup Data option is enabled with an encryption key preset by the system which provides the most secure encryption method (256 bit AES with a randomly generated 44 character alphnumeric encryption key). Click Next when you are done with the setting.
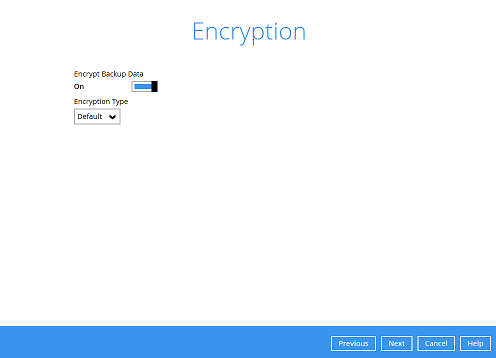
You can also change the Encryption Type to Custom to set your own encryption key, key length, algorithm and method.
- If you have enabled the Encryption Key feature in the previous step, the following pop-up window shows, whether you set the Encryption Type as Default or Custom.
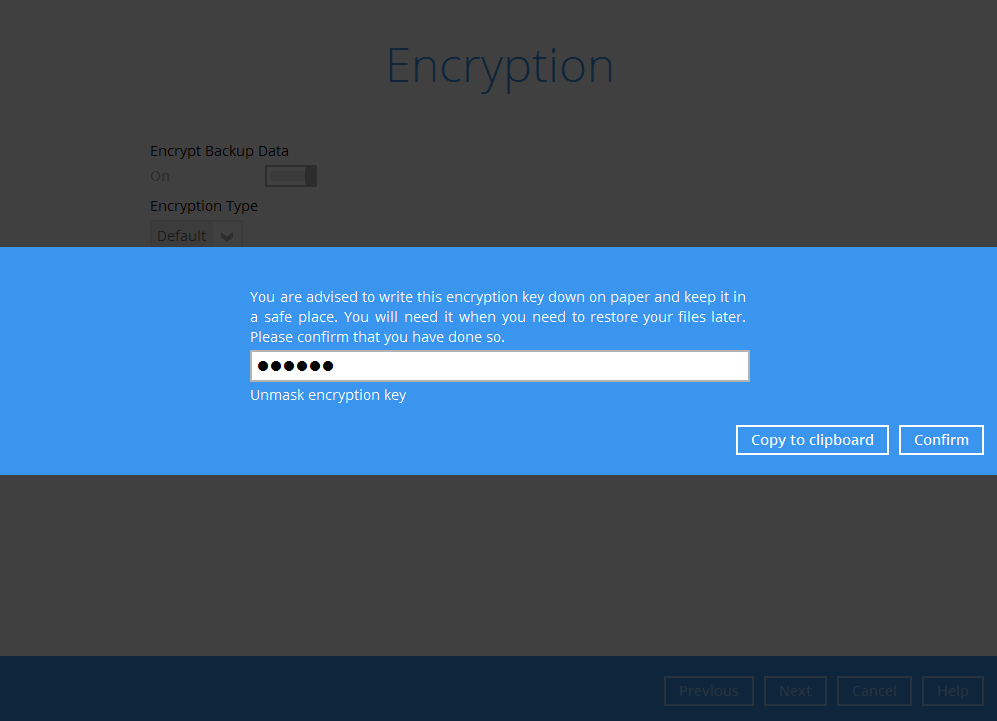
The pop-up window has the following three options to choose from:
- Unmask encryption key: The encryption key is masked by default. Click this option to show the encryption key.
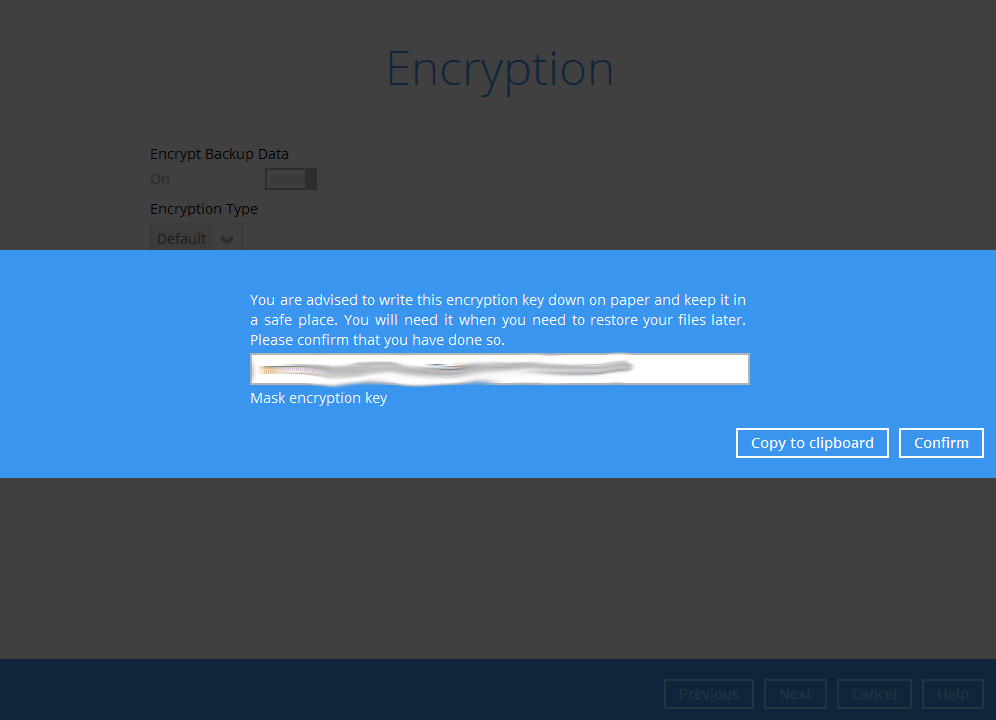
- Confirm: Click to exit this pop-up window and proceed to the next step.
- Windows User Authentication
Enter the Windows login credentials used by Retrospect Virtual Host Server to authenticate the scheduled backup job.
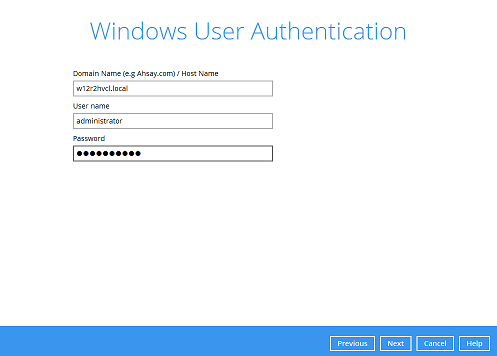
Note: If the backup schedule is turned off for the backup set the Windows User Authentication screen will be automatically skipped. The Windows User Authentication login credentials can be added or update post backup set creation.
- Backup set created.
- To start a manual backup job click on Backup now.
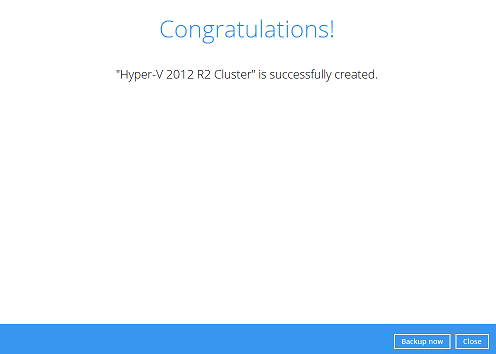
- To verify the backup set settings click on Close and then click on the Hyper-V backup set to complete the setup.
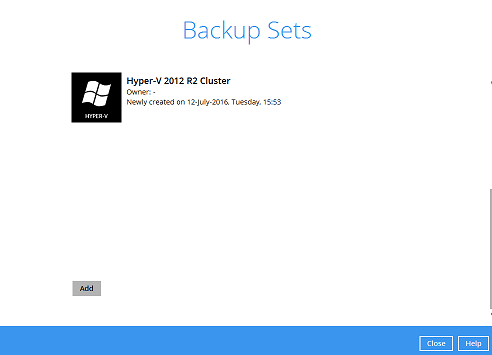
- Go to General and verify if the node has been added to the backup schedule.
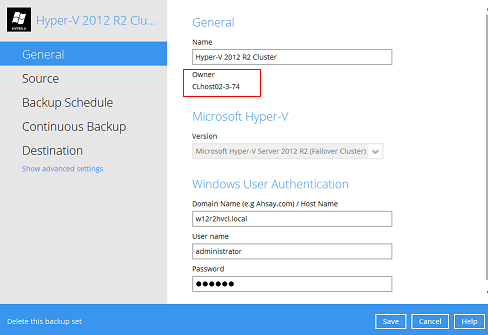
- On the next Hyper-V node startup Retrospect Virtual Host Server and select the Hyper-V backup set.
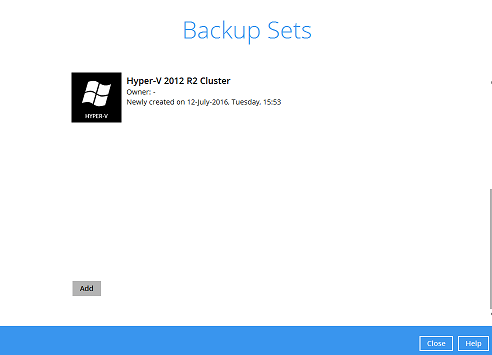
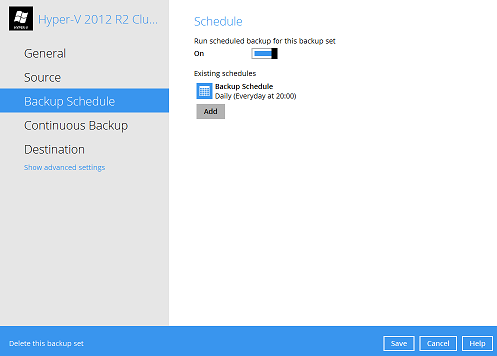
- Go to Backup schedule and enable the Run schedule backup for this backup set and set the backup schedule time and click on Save when finished.
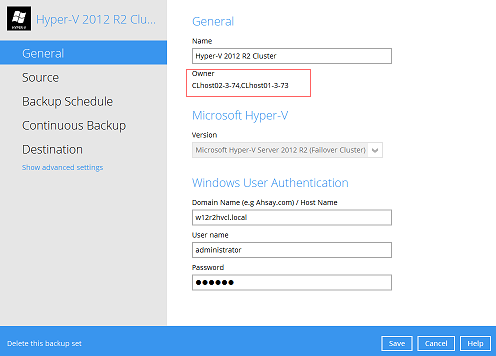
- Go to General and verify if the node has been added to the backup schedule.
- Repeat steps 13 to 15 for all Hyper-V Cluster nodes.
Overview on the Backup Process
The following steps are performed during a Hyper-V VM backup job.
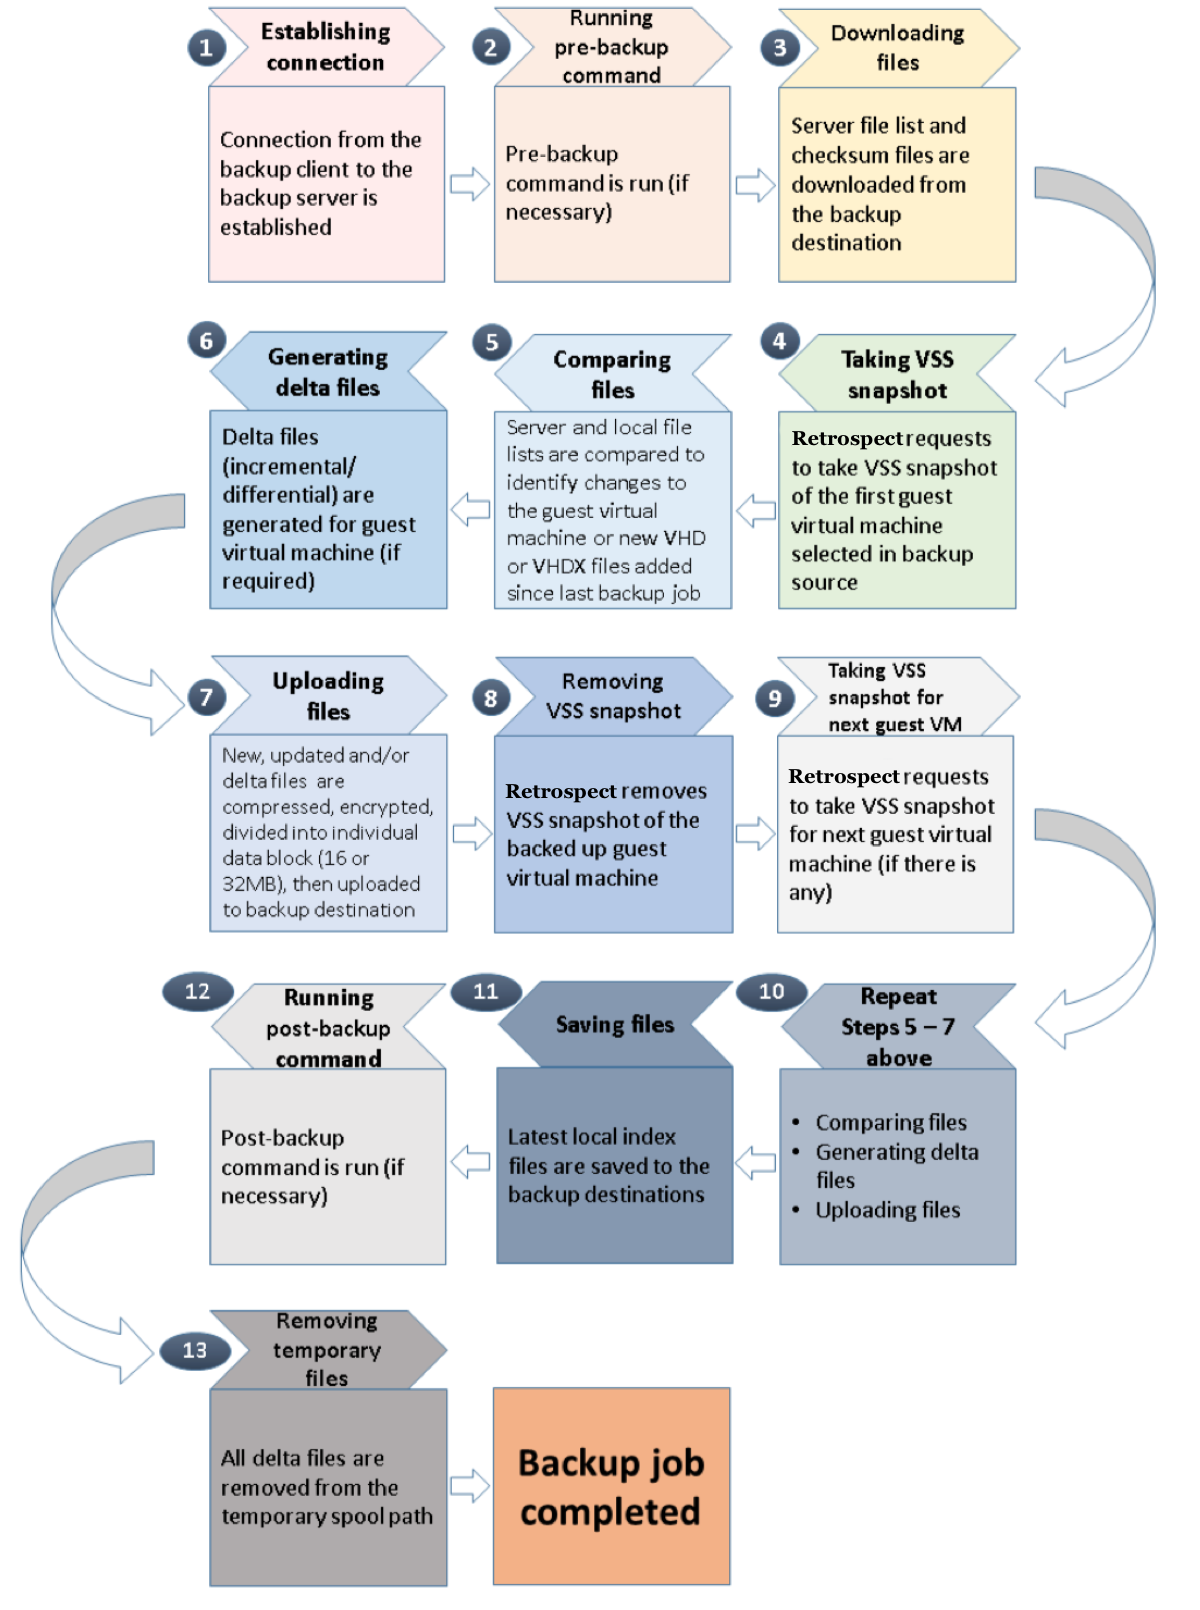
Running Backup Jobs
Start a Manual Backup
- Click the Backup icon on the main interface of Retrospect Virtual Host Server.
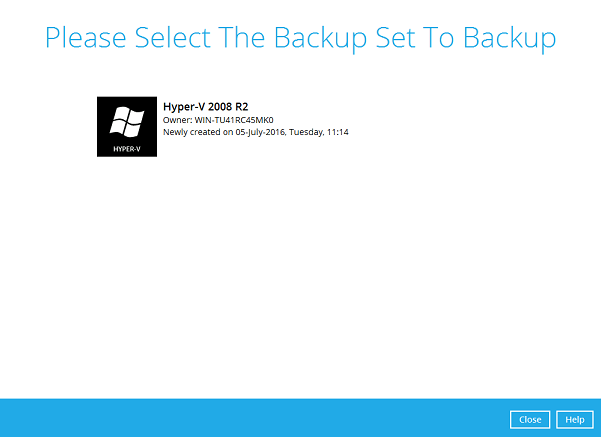
- Select the Hyper-V backup set which you would like to start a manual backup.
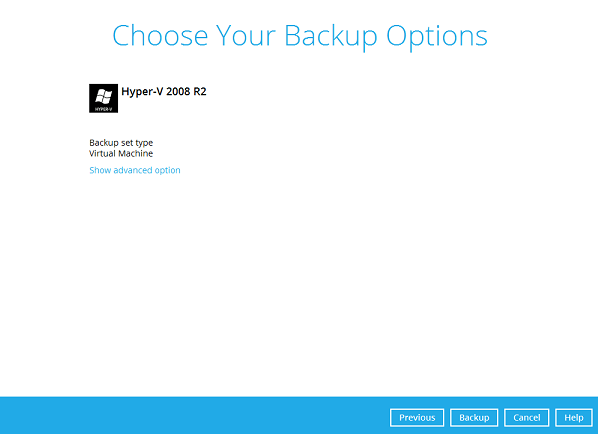
- Click on Backup to start the backup job.
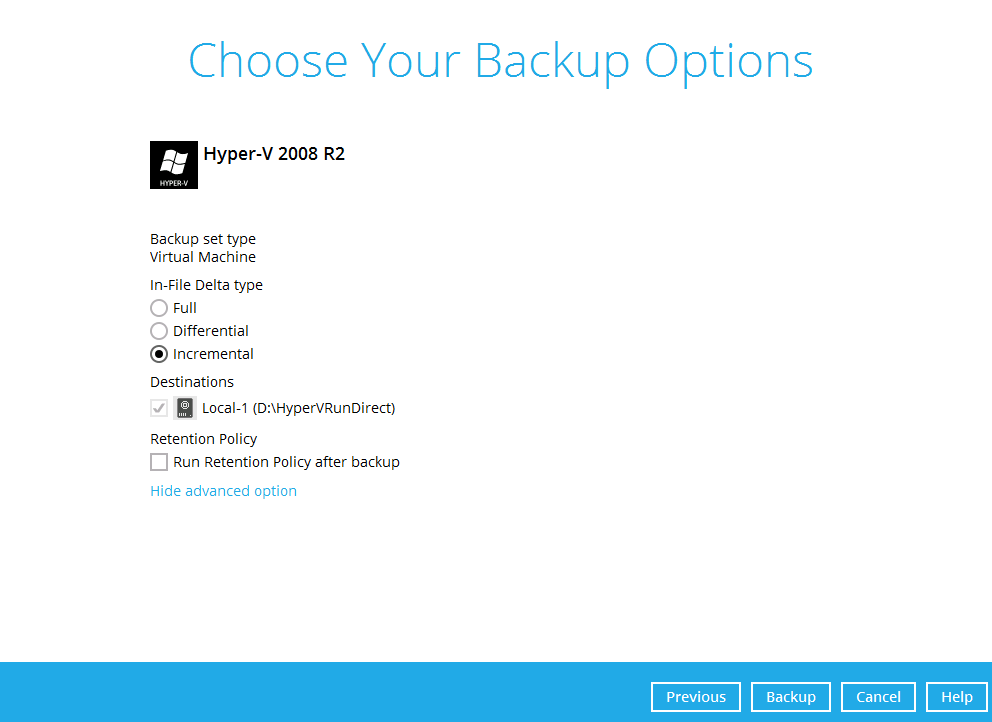
- If you would like to modify the In-File Delta type, Destinations, or Run Retention Policy Settings, click on Show advanced option.
- Backup job is completed.
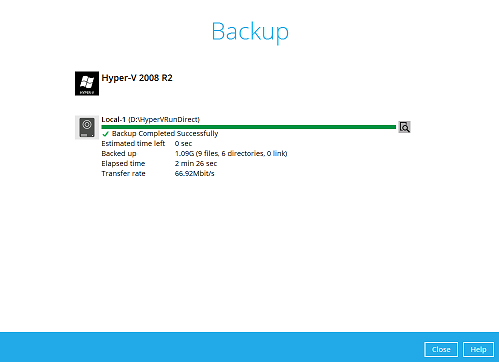
Configure Backup Schedule for Automated Backup
- Click on the Backup Sets icon on the Retrospect Virtual Host Server main interface.
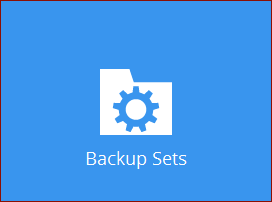
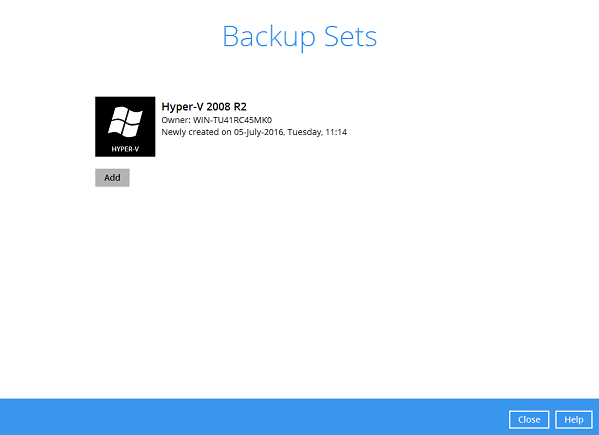
- Select the backup set that you would like to create a backup schedule for.
- Click Backup Schedule.
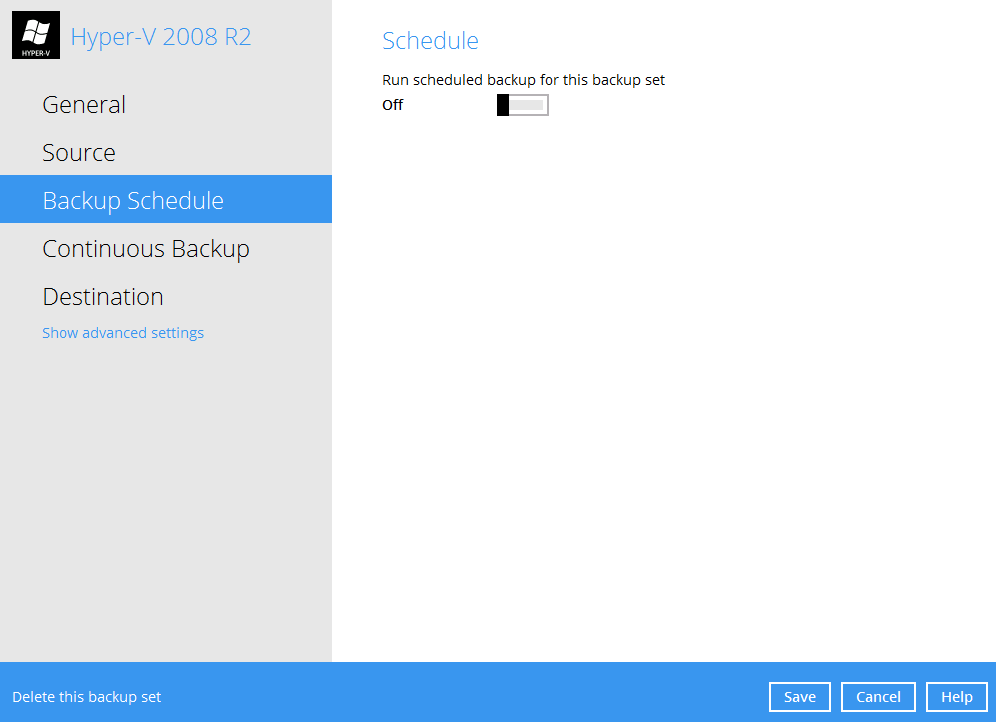
- Then create a new backup schedule by clicking on the Run scheduled backup for this backup set. Set this to On.
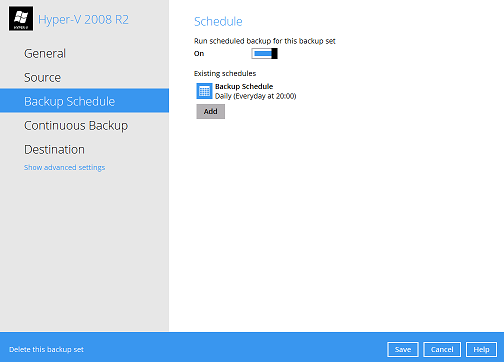
Click Add to add a new schedule or double click on the existing schedule to change the existing values. Click Save to proceed when you are done setting.
Note: The default backup schedule is daily backup at 22:00 with the backup job will run until completion and the retention policy job will be run immediately after the backup job_
Restoring Hyper-V Guest Virtual Machines
Restore
Run Direct
The restore options available:
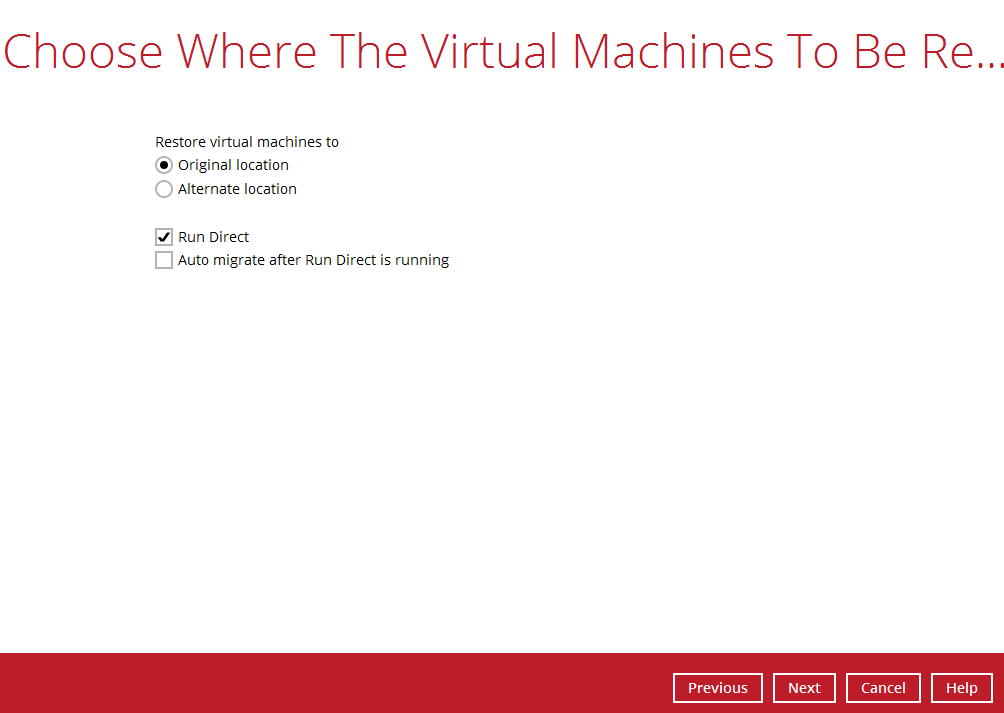
- Original location – Retrospect Virtual Host Server will restore the guest to the original location if the original guest virtual machine still exist Retrospect Virtual Host Server will prompt for confirmation to delete it before commencing with the restore operations.
- Alternate location – another drive or folder on the original Hyper-V server.
For Run Direct enabled storage destinations there are three restore options available:
- Select Run Direct – to start up the guest virtual machine directly from the backup file without restoring the guest virtual machine to the Hyper-V server.
Note: If a guest machine is started in a Run Direct instance is stopped without migrating to the Hyper-V Server any changes made within the guest environment will be lost.
- Select both Run Direct & Auto migrate after Run Direct is running - to start up the guest virtual machine directly from the backup file and then start restoring the guest virtual machine files to the Hyper-V server.
- Run Direct is not selected – Retrospect Virtual Host Server will restore the guest virtual machine files to the Hyper-V server (same as non Run Direct restore).
Startup a guest virtual machine from backup destination
- In the Retrospect Virtual Host Server main interface, click the Restore icon.**
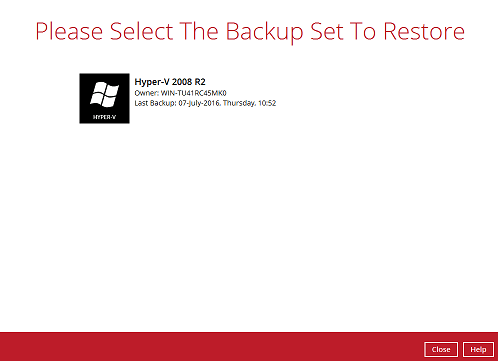
- Select the backup set that you would like to restore the guest virtual machine from.
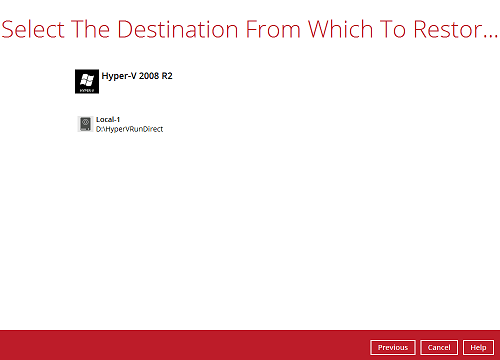
- Select the local, mapped drive, or removable drive storage destination that contains Hyper-V guest virtual machine that you would like to restore.
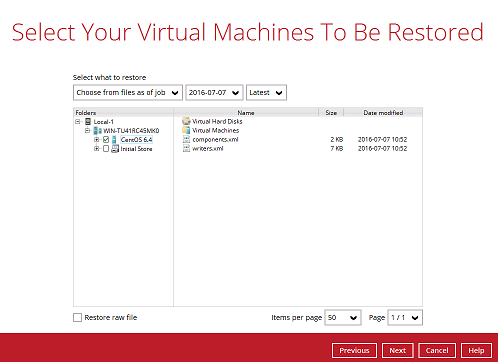
- Select to restore the Hyper-V guest from a specific backup job then select the files or folders that you would like to restore. Click Next to proceed.
- Select to restore the Hyper-v guest to the Original location and then select Run Direct click Next to proceed.
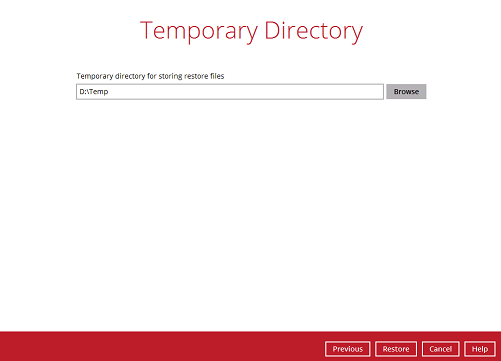
- Confirm the temporary directory path is correct and then click Restore to proceed.
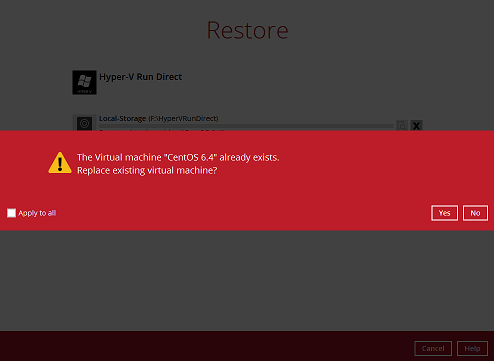
- If the guest virtual machine selected to be restore already exists on the Hyper-V server Retrospect Virtual Host Server will prompt to confirm overwriting of the existing guest.
- Yes - the exiting guest virtual machine will be deleted from the Hyper-V server before the restore process starts.
- No – the restore of the current guest virtual machine will be skipped.
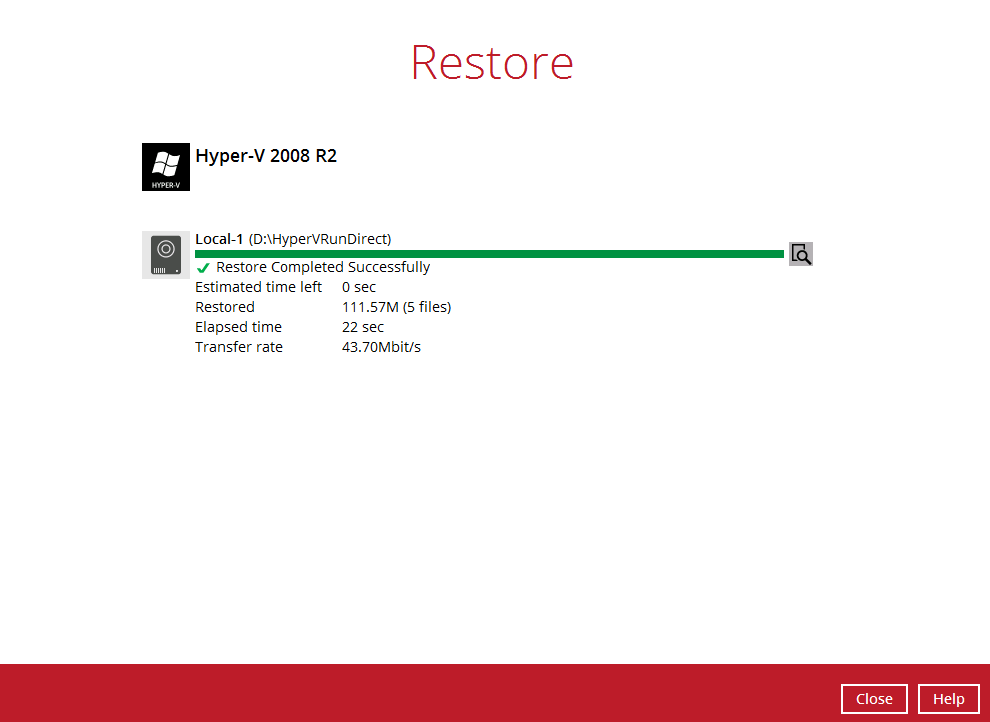
- After the Hyper-V guest virtual machine has been restored.
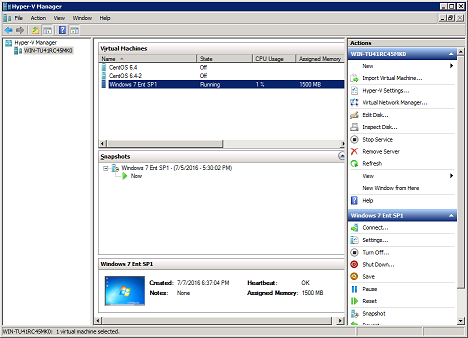
- Go to the Hyper-V server and open the Hyper-V Manager to verify the guest has been restored and is powered on.
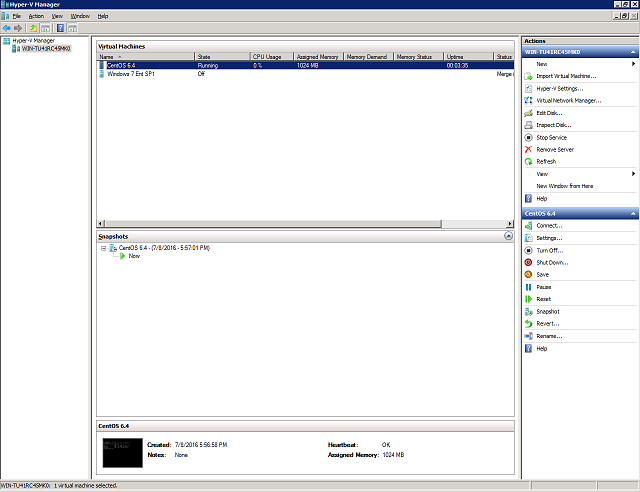
- Connect to the guest virtual machine to verify if is running correctly.
Stopping Run Direct Virtual Machines
To stop running guest virtual machines started up using Run Direct can be done by either
- Quitting Retrospect Virtual Host Server.
- Click on Stop Run Direct.
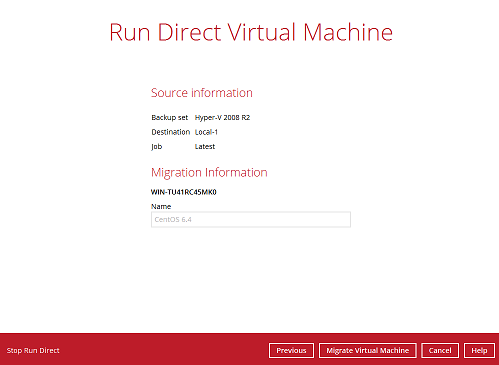
- Under [Restore]>[%BackupSetName%]. Click on **Stop all Run Direct virtual machines.
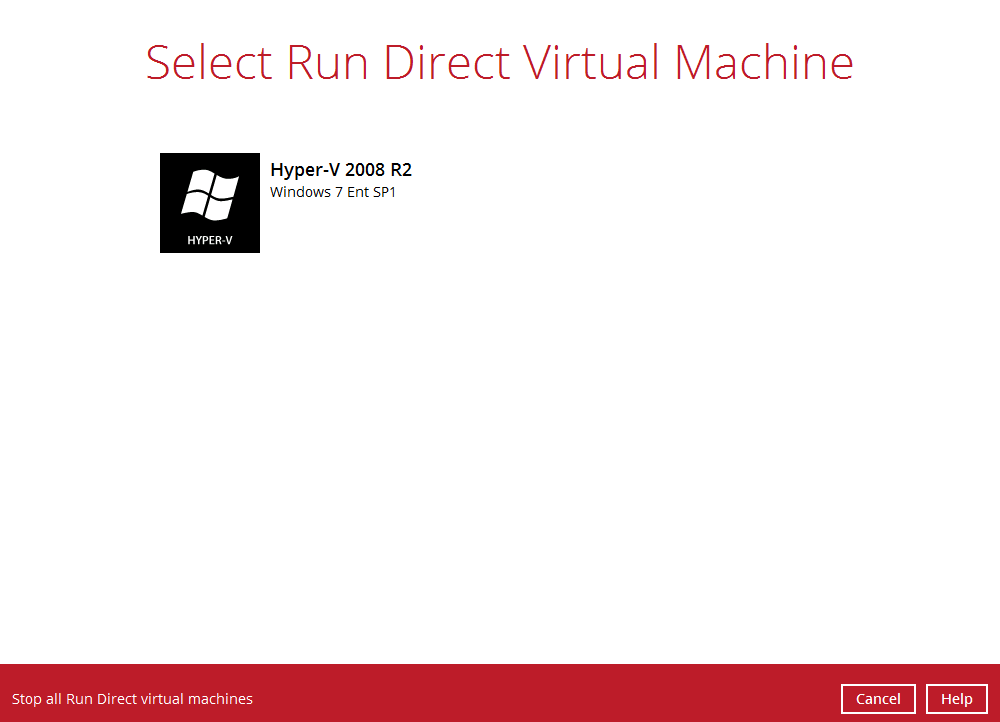
Note: When a guest virtual machine is started in a Run Direct instance is stopped any changes made within the guest environment will be lost, if the guest virtual is not migrated to the Hyper-V Server using the “Auto migrate after Run Direct is running” option.
Migrate Virtual Machine (Permanently Restore)
To permanently restore the guest virtual machine after starting up using the Run Direct option, you will still need to migrate it to from the backup destination to the designated permanent location on the Hyper-V server using the Migrate Virtual Machine option. This process can be performed even when the guest machine is already running.
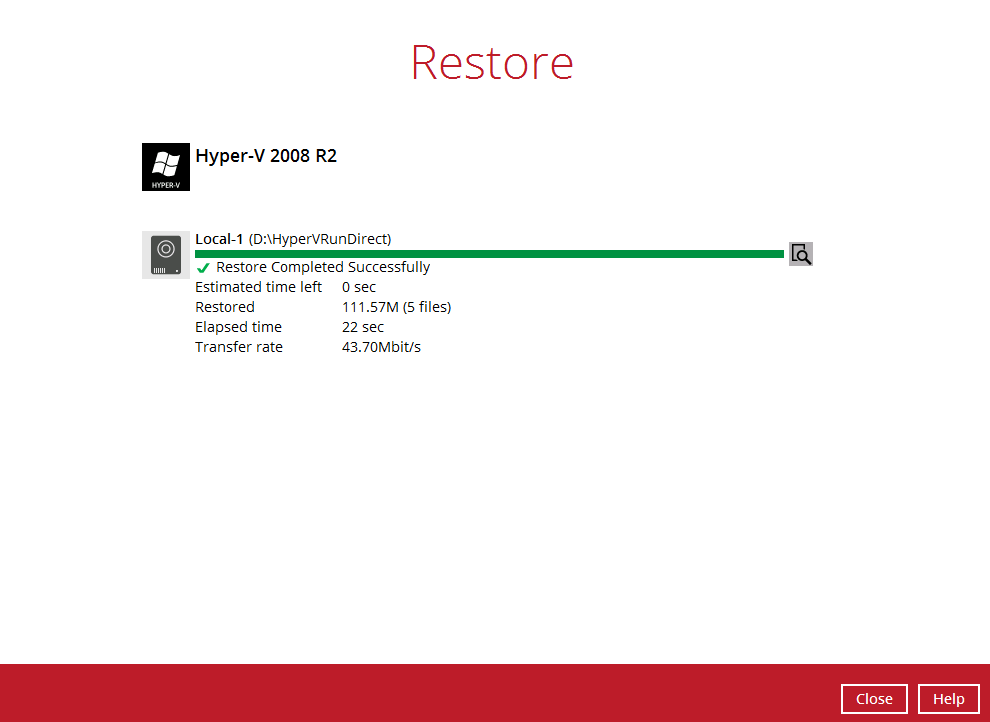
- After starting up the guest machine from the backup destination. Click on Close.
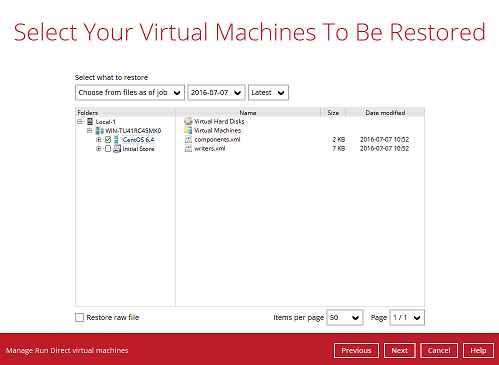
- Click on Manage Run Direct virtual machines.
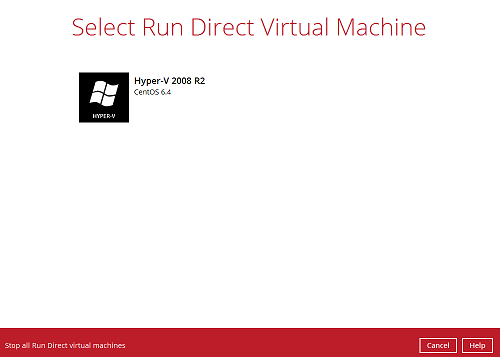
- Click on the guest virtual machine.
- To permanently restore the guest virtual machine, click on **Migrate Virtual Machine.
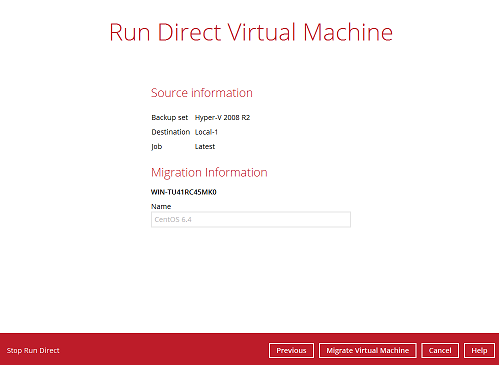
Retrospect Virtual Host Server will begin migration of the guest virtual machine from the backup destination to the Hyper-V Server. The guest virtual machine can be used during the migration process. Any changes made in the guest virtual machine environment are saved in transaction logs and will be applied when the migration process is completed.
Startup a guest virtual machine from backup destination with Auto migration
- In the Retrospect Virtual Host Server main interface, click the Restore icon.
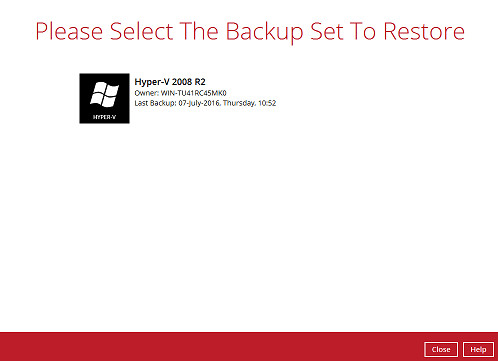
- Select the backup set that you would like to restore the guest virtual machine from.
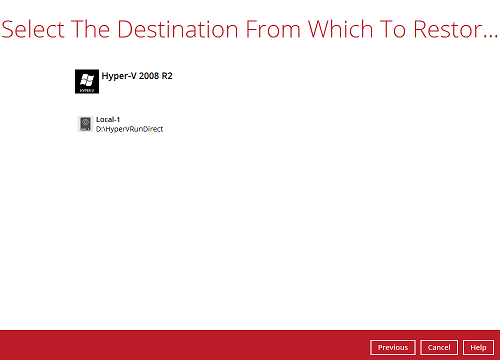
- Select the local, mapped drive, or removable drive storage destination that contains Hyper-V guest virtual machine that you would like to restore.
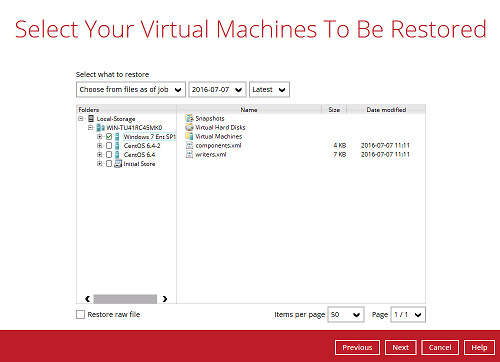
- Select to restore the Hyper-V guest from a specific backup job then select the files or folders that you would like to restore. Click Next to proceed.
- Select to restore the Hyper-V guest to the Original location, or to an Alternate location, then select Run Direct and or Auto migrate after Run Direct is running, click Next to proceed.
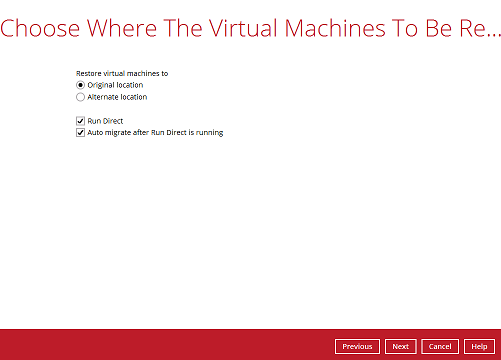
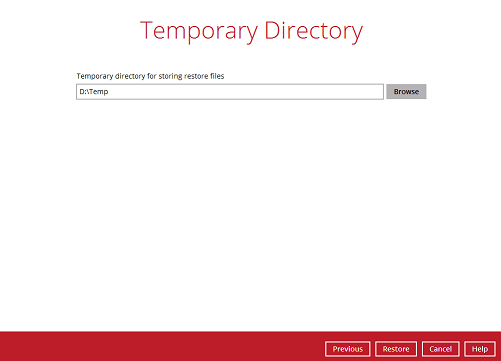
- Confirm the temporary directory path is correct and then click Restore to proceed.
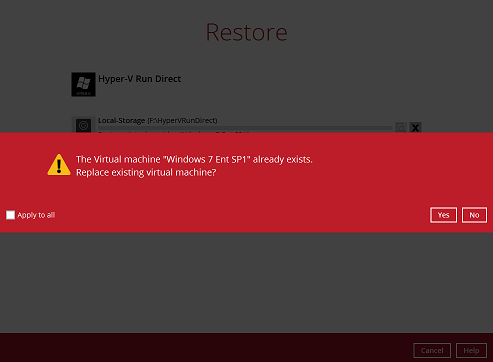
- If the guest virtual machine selected to be restore already exists on the Hyper-V server Retrospect Virtual Host Server will prompt to confirm overwriting of the existing guest.
- Yes - the exiting guest virtual machine will be deleted from the Hyper-V server before the restore process starts.
- No – the restore of the current guest virtual machine will be skipped.
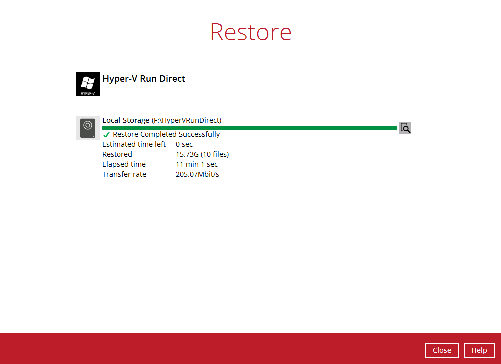
- After the Hyper-V guest virtual machine has been restored.
- Go to the Hyper-V server and open the Hyper-V Manager to verify the guest has been restored and is powered on.
Non Run Direct
- In the Retrospect Virtual Host Server main interface, click the Restore icon.
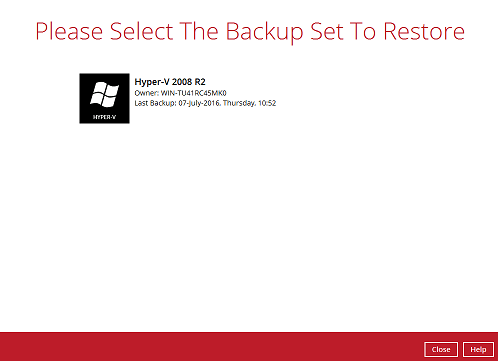
- Select the backup set that you would like to restore the guest virtual machine from.
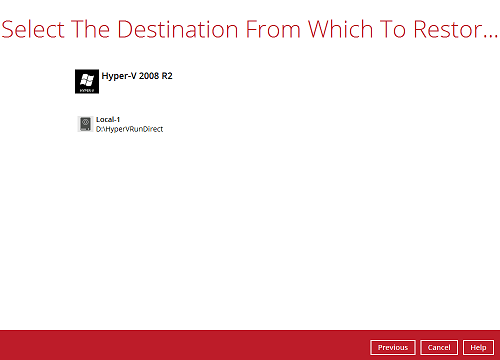
- Select the drive storage destination that contains Hyper-V guest virtual machine that you would like to restore.
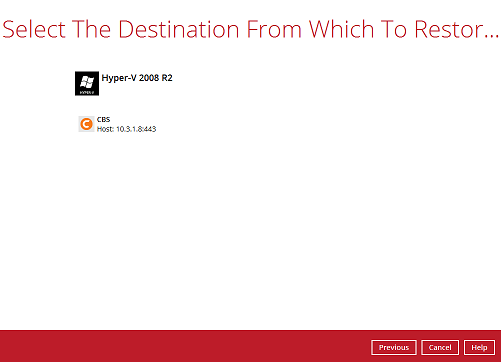
- Select the Management Console, cloud, SFTP/FTP storage destination that contains Hyper-V guest virtual machine that you would like to restore.
Example: Restore from Retrospect Virtual Management Console
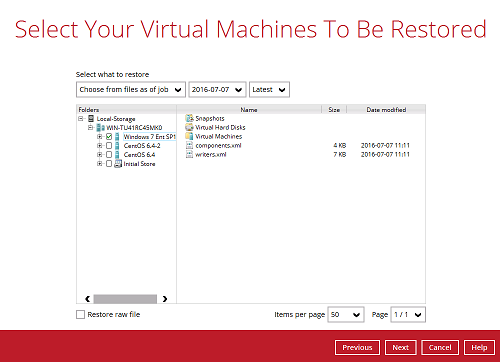
- Select to restore the Hyper-V guest from a specific backup job then select the files or folders that you would like to restore. Click Next to proceed.
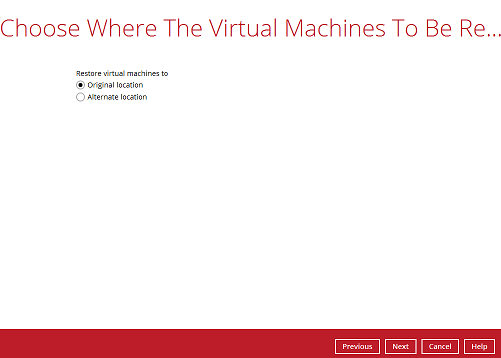
- Select to restore the Hyper-v guest to the Original location, or to an Alternate location, then click Next to proceed.
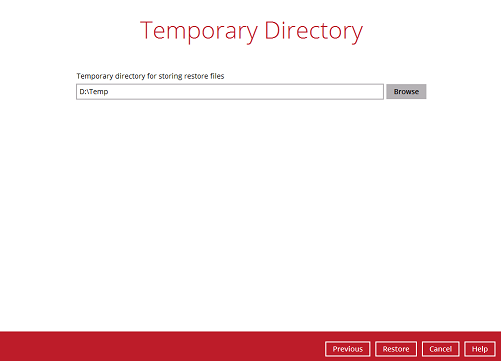
- Confirm the temporary directory path is correct and then click Restore to proceed.
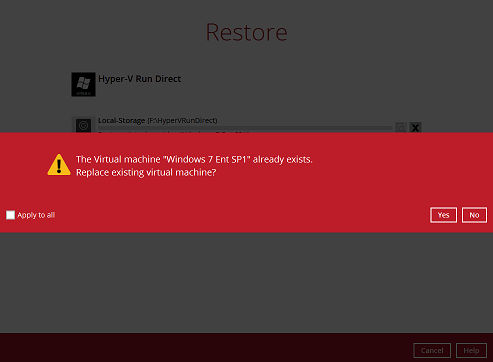
- If the guest virtual machine selected to be restored already exists on the Hyper-V server Retrospect Virtual Host Server will prompt to confirm overwriting of the existing guest.
- Yes - the exiting guest virtual machine will be deleted from the Hyper-V server before the restore process starts.
- No – the restore of the current guest virtual machine will be skipped.
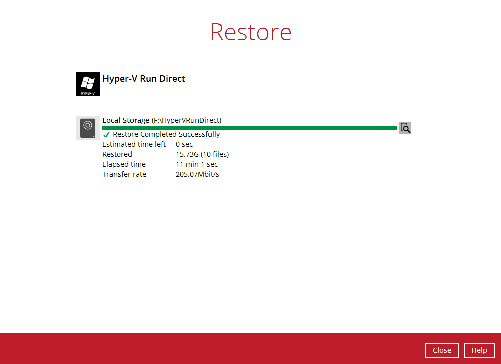
- After the Hyper-V guest virtual machine has been restored.
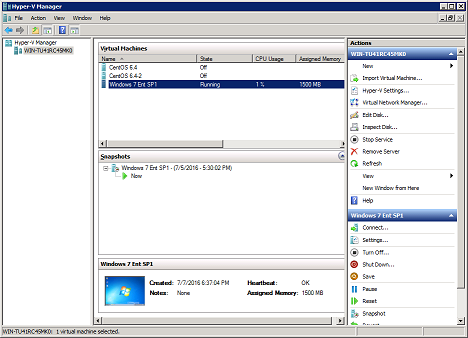
- Go to the Hyper-V server and open the Hyper-V Manager to verify the guest has been restored and power on the guest virtual machine.
Restoring an individual virtual disk to original/different guest virtual machine
The Restore raw file feature is used to the restore of an individual virtual disk to the original or a different guest virtual machine.
- In the Retrospect Virtual Host Server main interface, click the Restore icon.
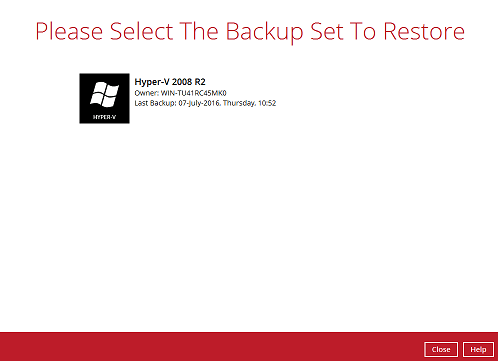
- Select the backup set that you would like to restore the guest virtual machine from.
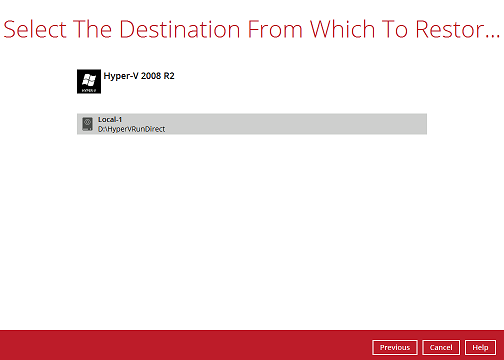
- Select the drive storage destination that contains Hyper-V guest virtual machine that you would like to restore.
- Select to restore the Hyper-V guest from a specific backup job then select the files or folders that you would like to restore.
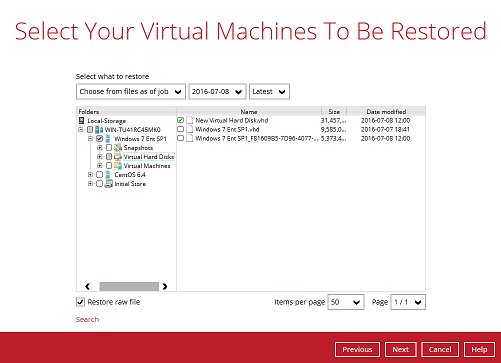
Then select the Restore raw file option and under the Virtual Hard Disks folder select the virtual disk you would like to restore. Click Next to proceed.
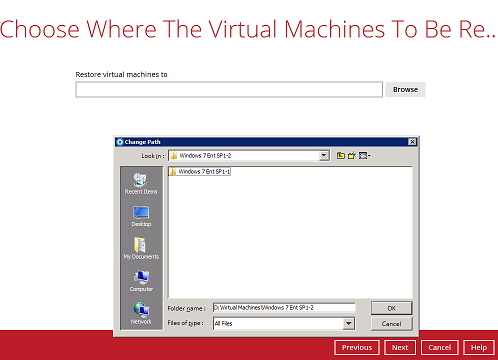
- Select to location on the Hyper-V server you want to restore the virtual disk to. Click Next to proceed.
- Confirm the temporary directory path is correct and then click Restore to proceed.
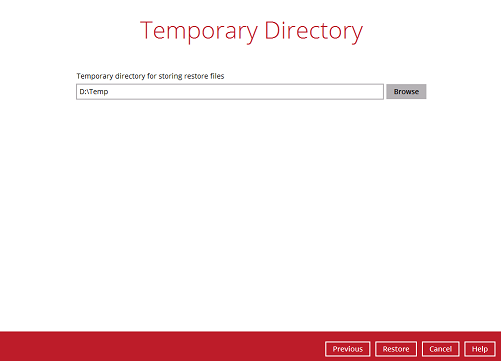
- After the Hyper-V guest virtual machine has been restored.
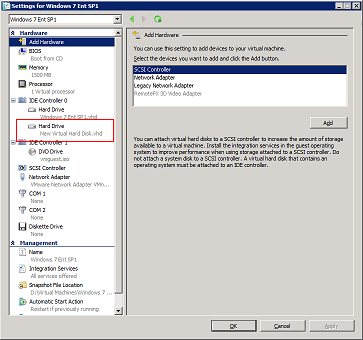
- In Hyper-V Manager and right click on the guest virtual machine you wish to add the virtual disk to and select Settings.
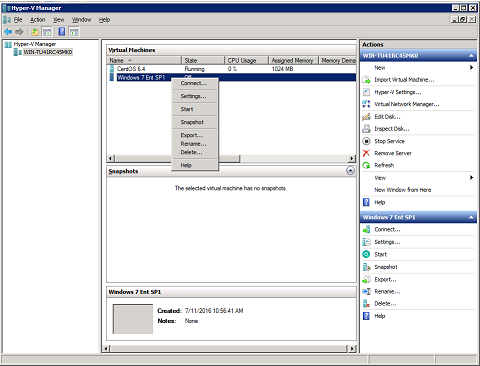
- Select Add to add virtual disk to the guest virtual machine.
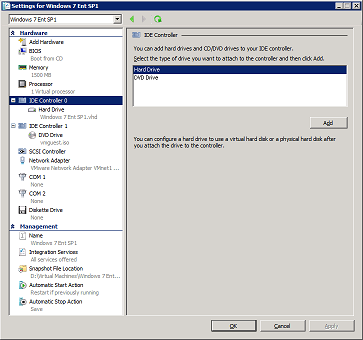
- Select the folder where the restore virtual disk is located.
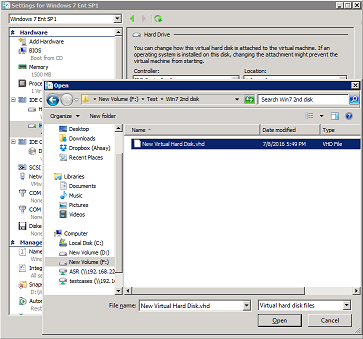
- After the virtual disk is added
Start the guest virtual machine to confirm. Depending on the guest operating system there may be other configuration settings to be completed before the disk is available.
Alternate Location
The restore to Alternate location is available for both Run Direct and Non-Run Direct backup sets, this feature will restore any guest virtual machine to another location on the same Hyper-V server. The Restore to Alternate location can be used to restore only one guest virtual machine at any one time.
- In the Retrospect Virtual Host Server main interface, click the Restore icon.
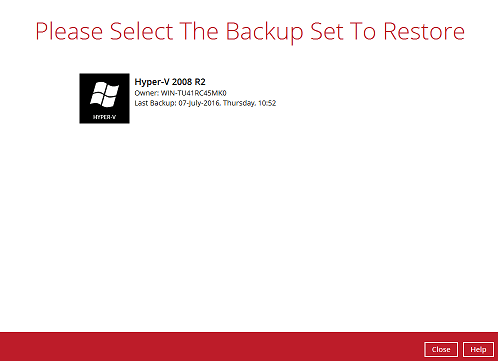
- Select the backup set that you would like to restore the guest virtual machine from.
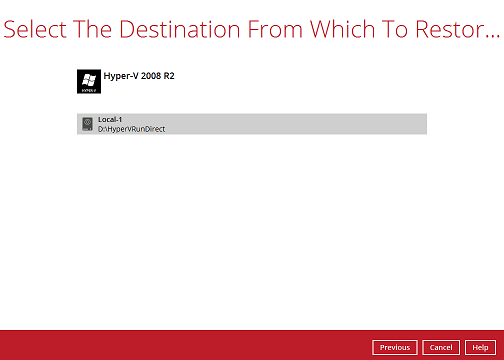
- Select the drive storage destination that contains Hyper-V guest virtual machine that you would like to restore.
- Select to restore the Hyper-V guest from a specific backup job then select the files or folders that you would like to restore.
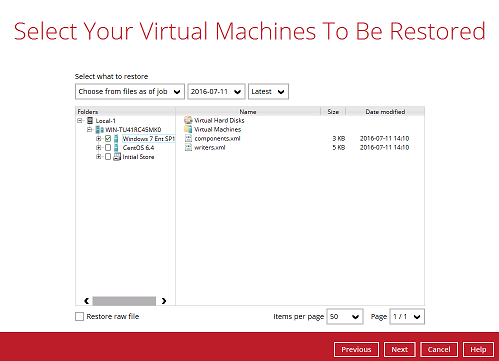
- Select Alternate location and click Next to proceed.
Example: Restore a guest from using Run Direct with Auto Migration to another location.
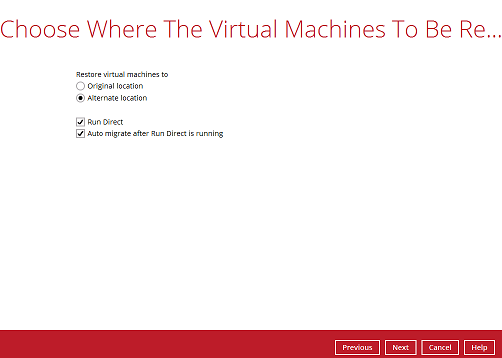
- To restore the guest virtual machine to an Alternate location update the following values for:
- Virtual Machine Name
- Virtual Machines Directory Location (guest configuration files)
- Restore As (new location for the guest VHD files)
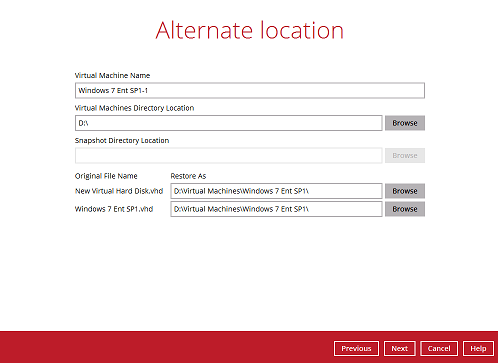
When the values have been updated click on Next to proceed.
- Confirm the temporary directory path is correct and then click Restore to proceed.
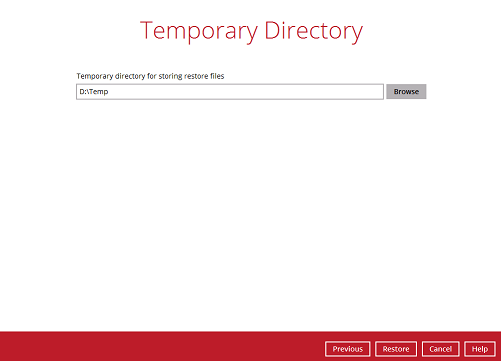
- After the Hyper-V guest virtual machine has been restored successfully.
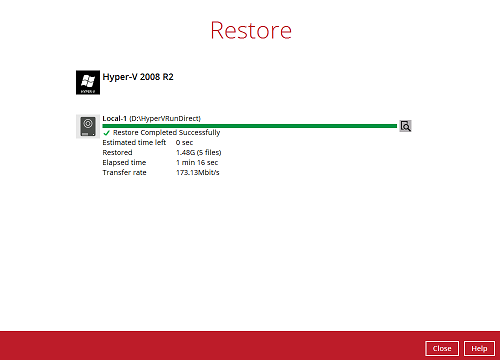
- Open Windows File Explorer and verify the guest has been restored to the new location.
Technical Assistance
To contact Retrospect support representatives for technical assistance, visit the following website: https://www.retrospect.com/support.
To access Retrospect Knowledgebase, visit the following website: https://www.retrospect.com/support/kb.