Maintaining Scripts
This section provides instructions for various tasks you may need to perform in maintaining the scripts you have created. Maintenance tasks include:
- Checking Scripts
- Modifying Script Settings
- Duplicating, Renaming, or Deleting a Script
- Viewing Scheduled Scripts
- Skipping Script Execution
Checking Scripts
Before exiting Retrospect to run a script unattended, it is a good idea to confirm the script is valid. You can also make sure the required media is available in the backup device.
To check a script
- From the navigation bar, click Automate> Validate Scripts.
- Select the script to test and click OK.
Retrospect checks the script definition to make sure that a Source and Destination have been properly defined. A message informs you if the script is missing necessary information. Click Edit to modify the script.
If the script is complete, a message appears telling you the script is ready.
- The information in this window depends on the type of Backup Set and the media currently loaded in the backup device.
- Click OK to close the window, or click Check Media to have Retrospect check whether the required Backup Set member is available.
- When you exit Retrospect, it automatically prompts you to check media for the next scheduled valid script.
Modifying Script Settings
At any time, you can modify the settings you specified when creating a script—you can choose different source volumes or destination Backup Sets, change the file selection criteria, the options, or the schedule. You modify scripts from the script summary window.
To modify script settings:
- From the navigation menu, click Automate> Manage Scripts.
- Select the script to modify and click Edit.
- Modifying the script is the same as creating it. See Automated Operations.
- Click the Save icon in the toolbar to save the modified script.
Duplicating, Renaming, or Deleting a Script
You can base a new script on an existing one by duplicating a script and then modifying the settings of the duplicate. Scripts can also be renamed or permanently deleted.
To duplicate, rename, or delete a script
- Click Automate from the navigation bar, then click Manage Scripts to display the list of scripts.
- Select the script to duplicate, rename or delete.
- To duplicate the script, click Duplicate from the toolbar.
Enter a name for the new script and click New.
- To rename the script, click Rename from the toolbar.
Enter a new name for the script and click OK.
- To delete a script, click Delete from the toolbar.
Click OK to confirm deletion. The script is removed from the list and its scheduled executions are eliminated.
If you do not want to receive a confirmation message when you delete or duplicate scripts, press and hold the Shift key as you issue these commands.
Viewing Scheduled Scripts
Retrospect maintains a list of upcoming scripts. You can view this list to see which scripts are scheduled to run and when. You can also modify the execution schedule by deleting scheduled events or by editing a script and changing its schedule.
Click Activity Monitor >Scheduled , to view the execution schedule for all scheduled scripts.
To view scheduled Proactive Scripts, click the Proactive tab in the Activity Monitor.
The Scheduled pane displays the date, time, and day of the week that upcoming scripts are scheduled to run. It also lists the script name, backup action, and destination.
Deleting a Scheduled Event
To delete a scheduled event and all prior events for the same script, click the event to select it then click Delete. Click OK to confirm deletion. The event and all prior events for the same script are removed.
Editing Scheduled Scripts
To edit the script associated with an event listed in this window, click the event to select it then click Edit Script. The script summary window appears, and you can click the Schedule button to modify the schedule.
For details on modifying schedules, see Scheduling Scripts.
Skipping Script Execution
If you do not want a script to run for a period of time, you can turn the script schedule off and specify when to turn it on again. This is useful, for example, if your office closes a week for holidays and nobody will be there to change media in the backup device.
To skip script execution:
- Click Automate>Manage Scripts to display the list of scripts.
- Select a script then click Edit.
The script summary window appears.
- Click Schedule.
Retrospect lists the currently scheduled dates and times for this script.
- Click the Skip scheduled execution checkbox at the bottom of the window.
A date and time field appears at the bottom of the window.
- Set the date and time at which the script is to again be allowed to execute, then click OK.
- Retrospect ignores execution events prior to the date.
. When multiple schedulers are shown in the script schedule window, the selected scheduler is not the only one skipped by this feature. It skips _all_ the scheduled executions for this script.
Retrospect Preferences
You can adjust Retrospect preferences to modify the application’s behavior to best meet your needs. Retrospect preferences are global, that is, they affect all operations performed by Retrospect.
To access Retrospect preferences, click Configure from the navigation bar, then click the Preferences button. The Preferences window displays.
The list box on the left contains the category options. The options for the selected category appear on the right. Set the options, then click OK to save your selections.
If you change the default setting for an option, the category name will appear in bold in the list box. To restore the default settings, select the category name and click Use Default.
Execution Preferences
The Execution preferences control Retrospect’s execution units, look ahead time, and password protection, among other things.
There are four categories of Execution preferences:
General Preferences
Depending on which edition of Retrospect you have and which add-ons are licensed, you can: change configuration settings during execution; execute independent operations in parallel; handle resource conflicts (including serializing conflicting executions); have the ProactiveAI Backup system kick off multiple executions; and use multiple drives in a tape library simultaneously. See Multiple Executions for more information.
Retrospect Desktop does not support multiple concurrent executions.
Execution units lets you specify the maximum number of concurrent operations Retrospect can run. If your edition of Retrospect supports multiple execution units, this option is automatically set to the optimal number based on the backup computer’s total amount of memory.
The software allows up to 8 concurrent executions, provided the computer has enough memory and backup devices to support such a configuration.
Execution history limit specifies the maximum number of operations to save in the Activity Monitor’s History tab. Once this maximum is reached, Retrospect replaces the oldest operations with newer ones to stay within the limit. See History Tab for more information.
Execution event limit specifies the maximum number of events to save in the Activity Monitor’s Events tab. Once this maximum is reached, Retrospect replaces the oldest events with newer ones to stay within the limit. See Events Tab for more information.
Schedule Preferences
Look ahead time: n hours defines the number of hours Retrospect looks ahead for scheduled script executions. This affects what happens when you begin to shut down the backup computer or a Macintosh client, and what Retrospect does when it completes an unattended operation. The default preference is twelve hours.
For more information, see Alerts Preferences, Macintosh Client Options, and Startup Preferences.
Schedule lets you define a window during which scripts are allowed to execute. This preference affects all scripts, except Proactive Client Backup scripts, but it can be modified for individual scripts. The default window during which scripts are allowed to run is twenty-four hours a day, seven days a week.
To customize the schedule:
- Click Schedule.
The Weekly Schedule window displays.
- To select a day of the week, click it. Click and drag to select contiguous days of the week. Use the Shift or Control key and click or drag to select days without deselecting the previous selection.
To change a time, click on it and type or use the control.
- Start is the earliest time at which scheduled executions may begin.
- Wrap Up is the period of time (in hours and minutes) before the stop time, during which Retrospect should complete the current operation but not begin new operations.
- Stop is the time at which Retrospect absolutely must halt scripted operations (until the next start time).
- You can also set times by dragging the icons on the hourly schedule bar, but you should first experiment by typing the times to see how these controls work.
When a time is changed, the hourly schedule bar changes accordingly to graphically represent the start, wrap-up, and stop times.
+ Each selected day has a scaled-down hourly schedule bar, though it does not have controls.
+ The Always and Never buttons set the daily operating time to twenty-four hours and none, respectively.
- Click OK when done.
Security Preferences
Protect allows you to specify a password that must be entered to start Retrospect manually, though it does not interfere with automatic script execution. If a user enters three incorrect passwords an error is recorded in the Operations Log. By default, there is no password protection.
When protection is added Retrospect enables the Lock Application item in the File menu. Choose this item to force Retrospect into locked, unattended mode to prevent someone from interrupting executions. Click the mouse or press a key to enter the password and unlock the application.
Lock Retrospect after 15 minutes of user inactivity allows you to specify that Retrospect should automatically lock after 15 minutes. When Retrospect is locked, you will need to enter the password to unlock it again. You can only select this preference when Retrospect is password-protected.
Unprotect lets you enter the password and remove the protection from the Retrospect application. Unprotect appears only when Retrospect already has a password.
Run Retrospect as… lets you choose the user account under which Retrospect runs.
Run Retrospect as the logged-in user, provides access to only those resources available to that user. In addition, when you select this option and Retrospect is launched automatically to run a script, it will run under the local system account and only have access to resources available to that account.
What this means is that if you choose to run Retrospect as the logged-in user, you may not have access to SQL or Exchange servers or network volumes.
Always run Retrospect as the specified user, allows you to specify a user account that Retrospect will run under whether it is manually or automatically launched. See Auto Launching Retrospect for more information.
If you plan to back up SQL or Exchange servers, or need access to network volumes, you should create an account that has administrator access to all of those resources and enter that information here.
For SQL and Exchange, make sure the account has the necessary privileges to access all the database servers you want to back up. See SQL Server Agent and Exchange Server Agent for more information.
For network volumes make sure the account has the necessary privileges to access any volume you want to use as a source, destination, or location for saving Catalog Files.
Enter either your domain or local computer name into the “Log on to” field, depending on your situation.
Run Retrospect in the Terminal Services session lets you choose to run Retrospect in the Terminal Services session (if available) when the application is automatically launched. See Terminal Services and Remote Desktop.
Startup Preferences
Enable Retrospect Launcher service registers the launcher application as a service so it is always running. This allows the auto-launch preference described below, the alert preferences described in Alerts Preferences, and the reporting preference described in Reporting Preferences.
Automatically launch Retrospect automatically starts Retrospect when a scheduled script is waiting to execute. By default, this preference is turned on.
If the Stop all execution activity button on the Retrospect toolbar is selected, this preference is turned off and disabled. It is enabled and turned on again when the Stop button is deselected. See Stop Button for more information.
Stay in Retrospect, Exit, Log off, Restart, and Shut down determine what Retrospect does when a script is completed and no additional scripts are scheduled in the specified look ahead time. (See Schedule Preferences.) By default, this preference is set to Exit.
Show taskbar icon tells Retrospect whether or not to display the Retrospect icon in the Windows taskbar’s system tray. This preference is on by default. See The System Tray Icon for more information.
Clients Preferences
The Clients preferences control the creation of private and public keys and automatically adding clients.
These preferences are not available for Retrospect Desktop.
There are two categories of Clients preferences:
Adding Preferences
Create keys creates a private key certificate (privkey.dat) and a public key certificate (pubkey.dat) at C:\ProgramData\Retrospect\. These keys can be used to add multiple Retrospect Client for Windows users to Retrospect’s Backup Clients Database at once. See Adding Clients for more information.
Automatically add clients enables Retrospect to automatically discover Retrospect Client for Windows users that were installed with the public certificate key and add them to the Backup Clients Database. Select the check box, then specify how frequently (in days or hours) Retrospect should look for new clients. When you click OK to accept your selections, Retrospect immediately looks for new clients and then waits the specified period of time before checking again.
By default, Retrospect adds the clients it finds to the “Automatically Added Clients” folder in the Backup Clients container. If you enable this preference and choose the “Automatically Added Clients” folder as the source for a scripted backup, Retrospect will automatically add new clients to the folder and back them up without requiring any action from the backup administrator.
This preference only adds clients that Retrospect can discover using the multicast or subnet broadcast methods. See Access Methods for more information on these methods.
Media Preferences
The Media preferences control how Retrospect works with storage media including media requests, erasing media, retensioning tapes and more.
There are four categories of Media preferences:
Erasure Preference
These options only affect media that already have data on them.
Automatically reuse named media When this preference is selected, Retrospect automatically erases destination media with the same name when the media already contains data. By default this option is selected.
For example, if this option is selected and you do a Recycle backup to a tape Backup Set member named “1-Backup Set A”, and a member with that name is loaded in your tape drive, Retrospect will automatically erase and reuse the tape. In this case, Retrospect does not display a warning dialog asking if you really want to erase the tape.
Minimal erase confirmation When this preference is selected Retrospect skips the confirmation message that normally appears when you proceed with a backup operation and Retrospect needs to erase the media. By default, this preference is turned off.
For example, let’s say you do a Normal backup to a tape member Backup Set named “1-Backup Set A”, but the only member loaded in your tape drive has a different name. Retrospect displays the media request window in which you can select the currently loaded tape. If the minimal erase option is checked and you select the tape and click Proceed, Retrospect will erase and use the tape. If the minimal erase option is unchecked, Retrospect displays a warning dialog asking if you really want to erase the tape.
Handling Preferences
Retension tapes winds a tape forward to the end and back to even out the tension and alignment. (This applies only to some drives.) By default, this preference is turned off.
Don’t eject removable disks prevents Retrospect from ejecting removable disks when it needs other media in operations. By default, this preference is turned off.
Eject tapes and discs when exiting does so with tape cartridges and CD/DVD discs when Retrospect exits. By default, this preference is turned off.
Stop Removable Storage Manager causes Retrospect to automatically stop Windows Removable Storage service when Retrospect scans the communications bus for devices. With the service stopped, which is the default for this preference, you cannot use the Removable Storage management console to manage tape libraries and other storage devices in conjunction with the operating system’s built-in backup utility.
If you need the Removable Storage service intact for managing devices other than those used by Retrospect, you can deselect this preference and configure Removable Storage in order use both simultaneously. See Using Retrospect and Removable Storage Simultaneously.
Deselecting this preference may cause problems if you don’t also configure Removable Storage.
Use new media automatically after write failure allows Retrospect to continue backup, archive, and transfer operations to a tape library or autoloader, even after a media failure. If this option is selected and Retrospect encounters a media failure, it looks for the next available tape and uses it instead.
The tape that caused the media failure will appear with a red tape icon in Retrospect’s Storage Devices window.
Request Preferences
Media request timeout specifies a period of time for Retrospect to wait for media during execution. When the time elapses, the execution stops and Retrospect proceeds according to the next scheduled event. This preference is off by default, so it never times out.
Automatic skip to blank media allows Retrospect to use any available blank tape, disk, or CD/DVD when the current member of the Backup Set is not available; even when the current member is not full. Retrospect performs a Normal backup (i.e., only new and changed files since the last backup) to the blank media, which is added as a member of the destination Backup Set.
By default, this option is not selected and Retrospect always displays a media request when the current member of the Backup Set is not available. See New Member Backups for information on a related backup action.
This preference should not be turned on when you are using WORM tapes. Since WORM tapes cannot be erased or reused, you want to make sure each tape is filled with data before moving to a new tape.
Verification Preferences
Generate MD5 digests during backup operations enables the Media verification option for backup and archive operations, as well as for offline verification. See Scripted Verification, Backup Execution Options, and Verifying Backup Set Media for more information.
- Disable this preference only if you experience significant performance issues during backups.
Notification Preferences
The Notification preferences control the types of alerts Retrospect displays, the size of the log, and e-mail notifications.
There are three categories of Notification preferences:
Alerts Preferences
Check validity of next script does so when you quit Retrospect. It automatically verifies and displays information about the next script scheduled to execute. By default, this preference is turned on.
Notify for failures and media displays an alert message if errors occur during the automatic execution of a script. It also displays an alert message when media will be needed in the future. By default, this preference is turned on. This option is only available if the Enable Retrospect Launcher service unattended execution preference (see Startup Preferences) is on.
Report HP Compaq SMART hard drive errors opens Retrospect and starts a backup wizard when Retrospect learns of errors on HP Compaq SMART hard drive volumes. By default, this preference is turned on.
Logging Preferences
Log size limit (M Bytes) maintains the Operations Log size within the limit you set in the field provided. You can set the limit anywhere between 1MB and 100MB. When the log reaches the limit, the oldest portion of the log is deleted to keep its size within the limit. The default size is 10 MB.
Export the backup report and operations log produces or updates a backup report file (Backup Report.utx) and an operations log file (operations_log.utx) after each execution. The files are stored in a location you specify with the Select Location button.
See Printing or Exporting the Backup Report and Printing or Exporting the Log for more information on how to export these files manually.
E-mail Preferences
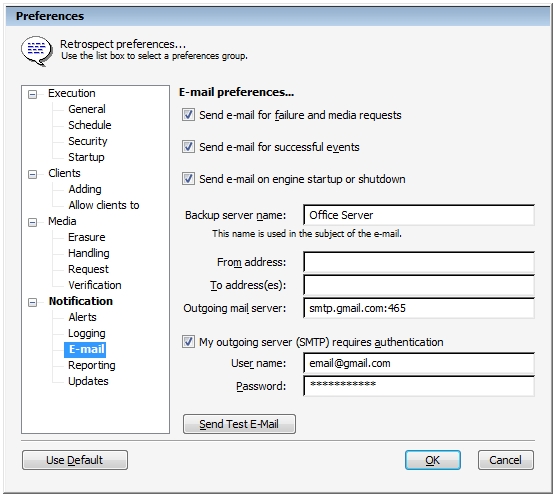
Send e-mail for failure and media requests, when selected, enables Retrospect to send e-mail to one or more recipients after failed operations or media requests.
Send e-mail for successful events, when selected, enables Retrospect to send e-mail to one or more recipients after successful operations.
This option is only available if the Send e-mail for failure and media requests check box is selected.
If e-mail notifications are enabled, Retrospect automatically enters the host computer name in the Backup server name field. You can enter a different name. This information is included in the subject field of e-mail notifications.
Enter the sending account in the From address field and enter one or more recipient accounts (separated by semicolons) in the To address field. Enter the mail server DNS name (e.g., mail.retrospect.com) in the Outgoing mail server field.
If your mail server requires SMTP authentication, select that check box and enter the user name and password.
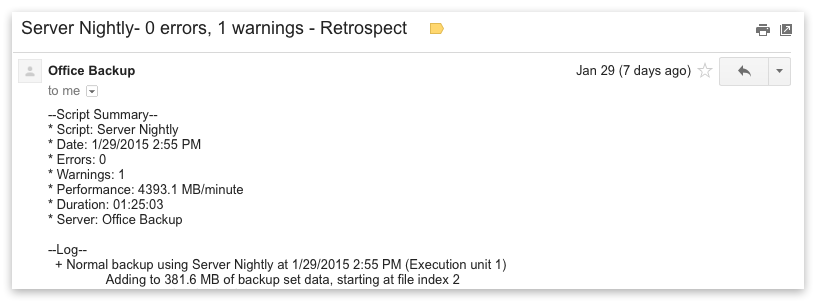
Proactive versus other scripts – As Proactive Backup intelligently adjusts priorities of backup sources, a report email is sent per backup source. For other scripts, when all sources of a script are completed, a single email is sent. However, if an event requires action, such as request for backup media, the email is sent immediately instead of at the end of script execution.
Improved Email Reporting – Improved email reporting provides a wealth of information about each backup. The Operations Log is now included in the report email to provide complete insight into each backup. With these detailed logs you can monitor backups from any device and filter emails based on errors or warnings to hone in on issues as soon as they happen. To simplify filtering using various email clients, the log is included as part of the email body, instead of as an attachment. The log format and contents are consistent with logs shown in the Retrospect user interface.
Reporting Preferences
Enable notification for external applications allows applications, such as EMC Legato NetWorker Management Console (NMC) to connect to Retrospect and display Retrospect events. This allows a backup administrator to monitor both NetWorker and Retrospect backup servers from a single console.
Retrospect can only notify external applications about events if the Retrospect Launcher service is enabled. See Startup Preferences.
For more information on events, see Events Tab. For more information on monitoring and managing Retrospect backup servers from the NetWorker Management Console, see the NMC documentation.
This preference is not available for Retrospect Desktop.
Updates Preferences
Automatically check for available updates is selected by default. When selected, Retrospect checks for free updates to your current version of Retrospect on a regular basis. If Retrospect finds an update, it displays a list of all available updates, which you can download and install. Retrospect Updates are free downloads that provide additional device support or address issues with your current version of Retrospect. Regardless of whether or not this preference is not enabled, you can always manually search for updates by choosing Retrospect Updates from the Help menu. See Manually Checking for Retrospect Updates for more information.
Retrospect cannot check for updates if the backup computer does not have an Internet connection.
Use a proxy server to connect to the internet lets you specify proxy server information. A proxy server is an intermediary between an internal network and the Internet. If you are not sure if you use a proxy server or not, contact your network administrator. If you use a proxy server to connect to the Internet, select the check box and enter the proxy server information and port number here, for example, cache.satchmo.com, port 8080.
Sounds
After installing Retrospect, the backup computer’s Windows Sounds control panel includes the Retrospect Attention Sound and Completion Sound. You can assign any available sound to these events.
Moving Retrospect
If you ever decide to switch backup computers, you must do more than just install Retrospect and your backup device on the new machine. You must move some other files to the new backup computer in order to keep Retrospect’s preferences, clients, catalogs, scripts, and schedules intact.
To move Retrospect to a new backup computer:
Install Retrospect on the new computer.
Copy the Catalog Files (with name extensions .rbc and .rbf ) from the old backup computer to the new computer.
The default location that Catalog Files are saved is ..\My Documents\ Retrospect Catalog Files.
Copy the configuration file (Config77.dat) from the old backup computer to the new computer.
The configuration file is saved is either in the same folder as the Retrospect application, or in ..\ProgramData\Retrospect.
Next, you must force Retrospect (on the new backup computer) to recognize the Catalog Files you just moved.
The easiest way to do this is to select all of the catalogs in the Windows Explorer, and drag them onto the Retrospect application icon. Retrospect opens a Backup Set configuration window for each Catalog, causing it to recognize the catalogs.
If you want to back up the old computer and/or the new backup computer, you must perform a few extra steps:
- If the new backup computer was previously backed up as a client, that is no longer necessary since its volumes are now local. Forget the client. Edit the sources in any Retrospect scripts which used client volumes from the new computer and add the volumes which are now local.
- If you still want to back up the old backup computer you must install Retrospect client software on that machine to access its volumes with Retrospect from the new backup computer. After installing and configuring the client, add its volumes to your scripts. Click Configure>Volumes and use the Forget command to remove the previously local volumes. Forgetting volumes removes them from the volumes database and any scripts which use them.
Catalog and Configuration Backups
Part of your backup strategy should be to back up the backup computer. The simplest way to do this is to include the computer in your backup scripts. The most important files to back up are Retrospect’s backup configuration file (configs.xml) and your Catalog Files (.rbc files).
You can use the Windows Explorer or Retrospect to back up these files. Periodically copy them to another volume, such as a removable disk or file server, to help you recover from a disaster more quickly. Or, set up a Retrospect duplicate script to automatically copy the files to a folder on another volume. Use the Retrospect Files selector to select appropriate files, and schedule the script to run daily, when your other backups are complete.
If you back up your backup computer to multiple Backup Sets, your catalogs and configuration are automatically covered in case of a disaster. Each Backup Set contains backups of the other Backup Sets’ catalogs. Alternatively, if you have several large catalogs, consider backing them up to their own dedicated Backup Set to help recover from a disaster or lost Catalog faster.
Catalog Backups
Catalog files are important adjuncts to Backup Sets, but face the same risks as your files since they often share the same hard disk. If you lose your Catalog Files, Retrospect cannot restore any files until the catalogs are recreated, which can be a lengthy process. For this reason, back up your Catalog Files as well as your regular files.
The default location that Catalog Files are saved is ..\My Documents\ Retrospect Catalog Files.
Create a separate Backup Set for just Catalog Files and back them up on a regular basis. This will save time when you need to restore files.
Configuration Backups
Retrospect’s configuration file contains your client database, scripts, schedules, preferences, custom selectors, and other important information. Retrospect uses the configuration file, named Config77.dat, located in the folder in which the Retrospect application resides or at the path:
_..\ProgramData\Retrospect\_
Each time you exit Retrospect, it automatically saves a backup copy of configs.xml in a file named configs.xml. You should back up this file regularly. If your active configuration file (Config77.dat) is ever lost or becomes corrupt, delete it then open Retrospect, which creates a new Config77.dat from the configs.xml.
Working with File Servers
Retrospect is compatible with Microsoft Windows Server and Apple’s Mac OS X servers. Retrospect can back up files from any server to which the backup computer has access via Windows Explorer.
Retrospect does not support clusters or SharePoints.
Backing Up a Server to Move its Contents
If you are going to back up a server to move its contents (for example, you have a more powerful computer to be the new server) you should make two separate verified backups. Through verification, which is on by default, ensures the integrity of the data; having two backups will not leave you stranded if one fails for some reason.
Backing Up DHCP Server and WINS Server Information
Retrospect does not back up certain active DHCP and WINS server files. However, the operating system can maintain its own backups, which you can back up from Retrospect.
The DHCP server copies its files to a folder named “backup” in the “dhcp” folder, once an hour. The WINS server, by default, does not make copies of its needed files, but you can make it do so.
If you need to back up a Windows server running WINS, take the steps described below to make these files available for Retrospect backups.
Backing Up the Configurations
It is important to make sure that your backups include the DHCP/WINS backup database paths (the backup and configbk folders).
The All Files and OS Folder selectors ensure the files will be included in backups.
Restoring the DHCP and WINS Databases
To restore the DHCP and WINS databases, follow the steps under Restoring from a Full Backup. After completing the steps, DHCP or WINS server information is restored.
Microsoft Exchange Server
The Retrospect Exchange Server Agent provides specialized support for optimally backing up Microsoft Exchange servers and mailboxes. It is an add-on product that must be purchased separately and requires a license code.
The Exchange Server Agent uses Microsoft APIs to effortlessly and automatically protect a Microsoft Exchange server that runs continuously and cannot be stopped for backups.
See Exchange Server Agent for more information.
Microsoft SQL Server
The Retrospect SQL Agent provides specialized support for optimally backing up Microsoft SQL servers. It is an add-on product that must be purchased separately and requires a license code.
The Retrospect SQL Agent uses Microsoft APIs to effortlessly and automatically protect a Microsoft SQL server that runs continuously and cannot be stopped for backups.
See SQL Server Agent for more information.
Backing Up Mac OS File Servers
This section describes how to use Retrospect to back up volumes shared by Mac OS file sharing. These operations require special procedures to ensure access privileges are intact after the volume is restored.
Restoring servers is described in Restoring Mac OS File Servers.
Shared volumes maintain access privileges that determine which users and groups of users can see and change files and folders. These privileges are active only when the server is running and the volume is shared.
To retain access privileges for a server, file sharing must be on during the backup. During a subsequent restore operation, Retrospect reassigns privileges to the same users and groups that were active during the backup. Otherwise, any privileges for the restored and retrieved folders revert to the volume owner or server administrator.
Working with Open Files
With Open File Backup, you can back up, duplicate, and archive files, even if they are in use. Open File Backup can protect multi-volume datasets, enabling you to copy related open files across multiple volumes.
Requirements for Open File Backup
- Retrospect Single Server (Disk-to-Disk), Single-Server, or Multi-Server
- License code for Open File Backup. Open File Backup must be purchased separately. Click Configure>Licenses to view your current licenses or purchase new ones.
- To back up open files on a Windows computer, it must have an NTFS volume.
- If the volume being backed up is a client, it must be running Retrospect Client 6.0 or greater.
- If you have Retrospect Desktop, you can use Open File Backup, as long as the backup computer is running Windows XP and it has an NTFS volume. You do not need a license code to use Open File Backup in this case.
Options
Retrospect has a number of options that are specific to Open File Backup. See Windows Open Files Options for more information.
Backing Up SQL and Exchange Servers
You can back up SQL and Exchange servers using Open File Backup, however, the Retrospect SQL Agent and Retrospect Exchange Agent provide specialized support for optimally backing up these servers. Retrospect recommends using the agents instead of Open File Backup for SQL and Exchange servers.
See SQL Server Agent and Exchange Server Agent for more information.
Open File Backup Tips
If you plan to use Open File Backup, Retrospect strongly recommends that you follow the tips below.
Perform thorough testing of Open File Backup before using it on production systems. Every environment is unique and it is important to ensure your data is backed up accurately and completely. Do a complete backup and restore of volumes containing open files. Check for data integrity and application functionality on the restored volume.
Optimize your environment, scheduling, and Open Files options to maximize disk inactivity. Open File backup requires a period of inactivity on the source volume’s disk (disk inactivity threshold) in order to accurately copy open files.
To avoid error messages:
- Schedule scripts that use Open File Backup during off-peak hours.
- Experiment with the Disk inactivity threshold and Retry timeout options to determine optimal values. A lower disk inactivity threshold increases the chances that it will be met, but also increases the possibility of data inconsistency. A higher disk inactivity threshold decreases the chances that it will be met, but also decreases the possibility of data inconsistency.
- During Open File Backup, disable or stop applications on the source volume’s disk that could increase disk activity, e.g. anti-virus software, disk defragmentation software, etc.
- If the Open File Backup operation includes multiple volumes, but none of the open file data spans multiple volumes, make sure the Protect Multi-Volume Datasets option is off.
- If you have other applications with open file backup capabilities, you may experience problems with Retrospect’s Open File Backup.
Best practices
Retrospect recommends that you perform a full backup of your line-of-business servers while all applications are closed before using Open File Backup for the first time. Although Open File Backup is designed to back up line-of-business servers while they are up and running, closing the servers down prior to performing the first backup adds an extra degree of safety. For the best results, schedule subsequent backups of live line-of-business servers for off-peak times.
Delays before copying
When using Open File Backup, you may notice a delay between when the backup is initiated and when copying begins. During this time, Retrospect is waiting for a “disk inactivity threshold” on the disk it is backing up. Retrospect tries to meet the disk inactivity threshold from the time Open File Backup is initiated, until the “Retry timeout” period elapses. Thus, the delay before copying could be as long as the Retry timeout (the default is ten minutes). See the Retrospect User's Guide for more information on specifying the Disk inactivity threshold and Retry timeout.
Multiple Volumes
For best performance, if an Open File Backup operation includes multiple volumes, but none of the open file data spans multiple volumes, make sure Retrospect's Protect Multi-Volume Datasets execution option is off to ensure the best performance.
Administrator privileges
If you are logged on to the backup computer and manually launch Retrospect, or if you are using the Retrospect Launcher service to automatically launch Retrospect for unattended operation, you must be logged on with administrator privileges in order to use Open File Backup to back up the local computer.
Windows error messages
Open File Backup requires a certain amount of free disk space on the disk that is being backed up. If you run Open File Backup in a low disk space environment, Windows may generate error messages, such as “The file system structure on the disk is corrupt and unusable” or “Delayed Write Errors.” If the error message includes the word “Snapshot,” this indicates that Open File Backup was unable to back up the requested volume.
In these cases, no data is lost and the disk is not corrupt; rather, the Open File Backup could not be completed. Freeing up disk space on the disk being backed up and rebooting the computer solves this problem. If you do not reboot, subsequent Open File Backups may also fail.
Virus scanning software
Retrospect recommends not running active virus scans during Open File Backup. Anti-virus software can be installed and enabled, as long as there are no active scans during the backup.
Errors backing up open encrypted files
If you try to back up encrypted files that are open using Open File Backup on a Windows computer, you may get error -1102. To ensure the files get backed up, close them and back up again.
Terminal Services and Remote Desktop
Microsoft Terminal Services allows a user to remotely control an application running on a remote server by transmitting only keyboard, mouse, and display information over the network. Each Terminal Services user connects to the server by establishing an individual session, which is managed by the server, independent of other user sessions. The following best practices describe how to use Terminal Services to administer Retrospect when it is running on a remote server.
Connecting to and Configuring the Server
The Windows server must be configured properly to ensure that Retrospect can run under the correct user account.
To connect to a Windows server via Remote Desktop (the Terminal Services client):
- Click Start, point to All Programs, point to Accessories, point to Communications, and then click Remote Desktop Connection.
- Type in the IP address of the server and click the Connect button.
To connect to a Windows Storage Server 2003–based server via a Web browser:
- Launch Internet Explorer.
- Type in the IP address of the server followed by :8098 to connect to the server.
For example: https://192.168.1.1:8098
- Click the Maintenance tab.
- Click the Remote Desktop icon.
Creating or Modifying a User Account to Run Retrospect
To separate your backup tasks from your default Administrator account, create a Backup Administrator account on the server and assign Administrator rights to the account.
To create a Backup Administrator account with Administrator rights:
- Right-click My Computer and choose Manage.
- In Computer Management, expand Local Users and Groups and select Users.
- In the Action menu, select New User…
- For the User name and Full name, type Backup Administrator.
- Choose a secure password.
- Uncheck User must change password at next login.
- Check Password never expires.
- Click the Create button.
- Double-click the newly created user to see its properties.
- Click the Member Of tab.
- Click the Add… button.
- In the Enter the object names to select: field, type Administrators, then click Check Names.
- Click the Sessions tab.
- Ensure that the End a disconnected session: option is set to Never.
- In the Properties window, click Apply and then click OK.
- If you want to use your Administrator account for backup administration, ensure that you set up your Administrator account with the options defined in the preceding procedure.
After you create a Backup Administrator account, close the remote window to disconnect from the current session or log off from the current account. Then log in using the Backup Administrator account in order to configure the Terminal Services connection properties.
To configure the Terminal Services connection properties:
- Open the Administrative Tools control panel folder.
- Launch the Terminal Services Configuration control panel.
- Highlight Connections in the navigation bar, right-click RDP-TCP and select Properties.
- Click the Sessions tab.
- Ensure the Override User Settings option is unchecked.
- Click Apply and then OK.
Installing and Setting Up Retrospect on the Remote Server
Perform the following procedures to install and set up Retrospect so that you can use it remotely via Terminal Services. Retrospect must always be run under the same specific account (usually the Backup Administrator account discussed in the preceding section) for you to successfully access it remotely. To ensure that Retrospect always launches under that specific account, you must modify Retrospect’s security preferences.
To install Retrospect:
- Connect to the server using Terminal Services or Remote Desktop.
- Copy the Retrospect installer to the server.
- Install Retrospect.
To set up Retrospect:
- Connect to the server using Terminal Services or Remote Desktop.
- Log on to the account you want Retrospect to run from.
- Launch Retrospect.
The first time you start Retrospect, the Getting Started Wizard runs.
- In the user account screen, select “Always run Retrospect as the specified user” and enter user, password and domain information. For Auto Launch support, see Auto Launching Retrospect for more information.
- A user must have Administrator privileges to all network resources and SQL/Exchange servers that the user plans to access.
- Click OK.
- Click Yes to run Retrospect in the Terminal Services session.
- Finish the Getting Started Wizard.
- Click Relaunch Now to quit and restart Retrospect.
- You can change Retrospect’s login and Terminal Services preferences later by choosing Configure>Preferences from the Retrospect navigation bar and clicking Security. See Security Preferences.
Keeping Retrospect Running
Logging off from the Terminal Services session causes all running applications to quit, including Retrospect. To ensure that Retrospect continues to run, do not use the log off option in the Start menu to log off from Terminal Services. Instead, simply close the Terminal Services window.
Closing the window disconnects you from the Terminal Services session, but leaves the session running. Retrospect remains unaffected, and the next time you connect to the remote server via Terminal Services, Retrospect will be running.