Retrospect has a number of features that go above and beyond the basics required for backup and restore operations. Your knowledge of these features is not essential to use Retrospect, but knowing them allows you to work with the program more quickly and more efficiently.
Working with Volumes
A volume is the operating system’s representation of a random-access storage device, such as a hard disk drive or partition, removable disk, or CD/DVD. It can also be a file server on the network. A volume is the basic storage unit containing files and folders. Retrospect uses volumes as sources for backups and other operations and helps keep track of files with volume Snapshots.
If the backup computer or a logged in client has Microsoft SQL Server or Exchange Server installed, they will also appear in Retrospect’s volume list windows. If Exchange Server is installed an additional container, Exchange Mailboxes, will also appear.
In order to back up and restore SQL and Exchange databases and mailboxes, you need Retrospect’s SQL Server Agent and Exchange Agent. See SQL Server Agent for more information on working with SQL servers. See Exchange Server Agent for more information on working with Exchange servers and mailboxes.
Volume List Windows
Retrospect has two volume list windows. Many Retrospect operations use a volume selection window for you to select one or more volumes for the operation at hand.
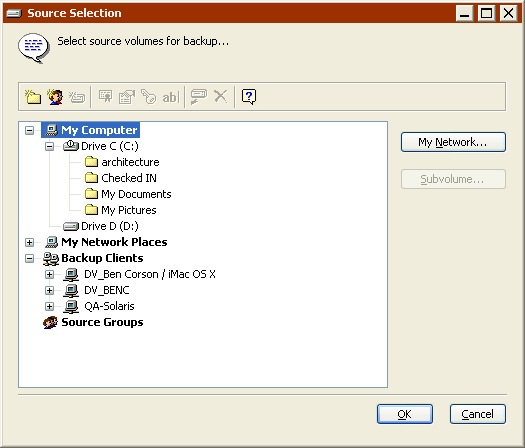
The volume selection window for an immediate backup.
A similar window, the Volumes Database window, can be used to manage volumes. The Volumes Database window has some additional features that are not available from the volume selection windows. For example, the Volumes Database window’s list is organized for and includes controls for more involved navigation and selection of the listed volumes.
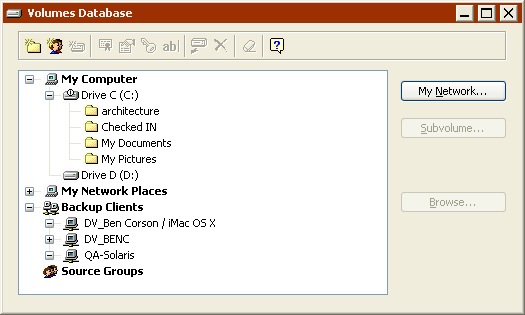
The volumes database window.
Using either window is fairly straightforward; you click on the volumes you want, then click a button or toolbar icon to proceed or act on the selected volume. (You can also right-click to use a contextual menu.)
To practice the techniques described here, open the Volumes Database window by clicking Configure>Volumes.
The volumes listed in the scroll box are organized in an outline format similar to that of Windows Explorer.
Displaying Volumes
In a volume list window, the + and – icons on the left work just like those in the Windows Explorer. Click on a + icon to show the contents of its container (see Containers) or folder (see Folders). Click on a – icon to hide the contents of its container or folder. A volume does not have this control unless it has one or more defined Subvolumes.
Selecting Volumes
In a volume list window, you click on a volume to select it. This deselects any other selected volumes.
Press and hold the Control key and click a volume to select it without deselecting any currently selected volumes. You can make a multiple non-contiguous or contiguous selection this way.
Press and hold the Shift key and click a volume to select all volumes listed from the current selection to the Shift-clicked volume. This is called a contiguous multiple selection.
Some operations do not allow multiple selections. (For example, you cannot restore to multiple volumes.)
Following are examples of these selection methods.
Original selection
| After clicking on Iago
|
After Control-clicking on Iago
| After Shift-clicking on Iago
|
These methods of making individual and multiple selections work throughout Retrospect, not just in the volume list.
Containers
In a volume list, volumes, clients, and groups are organized under the containers My Computer, My Network Places, Backup Clients, and Source Groups.

Selecting one of these top-level containers selects everything in that container. For example, you could back up every hard disk and removable disk attached to the backup computer, and every client logged into Retrospect, simply by selecting the My Computer and Backup Clients containers as sources.
My Computer
The My Computer container holds local drive volumes. This includes the internal hard disk, any inserted removable disk, and external drives. It does not include mapped network drives or network volumes. The My Computer container also includes local SQL and Exchange databases and Exchange mailboxes.
When you select the My Computer container itself, you are instructing Retrospect to select all volumes in that container on the backup computer, except for floppy disks and CD-ROM discs.
The following example of a My Computer container selection shows the volumes to which it resolves. (For example, if the selection were used in a backup operation, the resolved volumes would be backed up.)
Using this selection… | …resolves to these volumes |
|---|---|
| Capulet |
My Network Places
The My Network Places container holds only shared volumes you have added to it.
When you select the My Network Places container itself, you are instructing Retrospect to select all shared volumes contained within it.
To add a network volume to the volumes database:
- Choose Configure>Volumes from the navigation bar.
- Click the My Network button.
- Navigate through the network to the volume or folder you want to add.
- You can also click Advanced to specify a UNC path to the volume you want to add.
- Select it and click the Add button.
If the server requires it, enter a login and password and click OK.
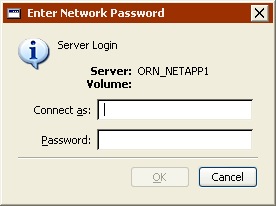
If you set Retrospect up to log in as a user with privileges to the network volume, you will not be prompted to log in again. See Security Preferences for more information.
Backup Clients
The Backup Clients container holds client computers that you have added to it by logging them in for use with Retrospect. Clients themselves contain one or more volumes, which are made available according to how they are configured with the Volumes tab of the client properties window. For details, see Networked Clients.
Retrospect Client for Windows computers that were automatically added to the Backup Clients Database using the public key/private key method are, by default, grouped in a folder called “Automatically Added Clients” in the Backup Clients container. See Adding Preferences for more information.
When you select the Backup Clients container itself, you are instructing Retrospect to select all clients contained within it.
If you have added SQL or Exchange servers as clients, they appear in the Backup Clients container. If you have an Exchange server client, the Exchange Mailboxes container also appears.
Source Groups
The Source Groups container holds volumes grouped together for better organization. Groups, which you define, do not contain the actual volumes themselves, but aliases which are shortcuts to actual volumes (which are in My Computer, My Network Places, or Backup Clients).
For example, you could make an Accounting group containing the volumes from the accounting department. Later when you are creating a backup script, instead of tediously selecting each individual accounting volume, you can just select the Accounting group and Retrospect knows you mean all of the volumes within that group.
Source Groups are not available in volume lists of duplicate and restore operations.
Creating Groups: To create a new group, choose Configure>Volumes from the navigation bar. In the Volumes Database window, click New Group from the toolbar. After you enter its name in the dialog, the new group appears under the Source Groups container. Any items that were highlighted when the group was created will belong to the new group.
Adding Volumes to Groups: You can drag any item from the My Computer, My Network Places, or the Backup Clients container into a group.
Since Source Groups contain shortcuts to volumes and not the volumes themselves, the same volume can be added to more than one group.
Arranging Group Items: You can drag any item out of one group and into another group. You can drag an item to a different location within its group to rearrange the order of the group.
Removing Groups: You can remove an unwanted group or item by selecting it and clicking Forget from the toolbar or pressing the Delete key.
Folders
You can create folders to help organize the information that appears in the volume list window. For example, while setting up a backup you can select a folder as a backup source and Retrospect will back up all the volumes in the folder.
These folders are specific to Retrospect and do not appear outside the program.
Retrospect Client for Windows computers that were automatically added to the Backup Clients Database using the public key/private key method are grouped in a folder called “Automatically Added Clients” in the Backup Clients container. See Adding Preferences for more information.
Creating Folders
To create a folder, click New Folder from the toolbar. Retrospect asks which type of folder you want. Your selection determines whether it is created in the My Computer container, the My Network Places container, or the Backup Clients container. After you make your choice and give it a name, the folder, identified by the  icon, appears with the volumes in the list. You can drag it to reposition it in the list.
Arranging Folders
You can drag any volume into or out of a folder to better organize the list of volumes.

Just like folders on a hard disk, folders are useful for hiding numerous items to avoid cluttering your work space. For example, if you are administering a large number of clients, you can arrange them in a logical order by placing the individual volumes into their respective department folders, such as Accounting, Engineering, and Manufacturing. You can then select a folder in a volume selection window and Retrospect selects all the volumes within the folder.
- Each volume can only be added to one folder. This is different from Source Groups where the same volume can be added to more than one group.
Removing Folders
You can remove an unused folder by selecting it and clicking Forget from the toolbar or pressing the Delete key. However, you must move the contents out of the folder before you forget it.
Subvolumes
A Subvolume is a folder on a volume you define to work like a volume for use within Retrospect. After a folder is designated as a Subvolume it can be specified as a source or destination for Retrospect operations. Subvolumes have no function outside Retrospect and their mere existence does not affect a volume’s files and folders in any way.
If you only want to back up files in a single folder, specifying a Subvolume (instead of specifying a volume and using a custom selector) reduces the file scanning time, minimizes the number of files displayed in a browser, and reduces the amount of memory needed.
Retrospect treats a Subvolume as another volume on your system. Once a folder has been defined as a Subvolume, do not remove or rename the folder. If you do, Retrospect will not be able to locate the Subvolume.
Subvolumes are considered part of their parent volume when performing multiple executions. For example, you cannot back up subvolumes belonging to the same volume concurrently. If you attempt to do so, Retrospect will back up the volumes consecutively.
Specifying Subvolumes
In a volume list, select a volume, then click Make Subvolume from the toolbar or click the Subvolume button in the window. A dialog appears, listing folders at the top level of the selected volume.
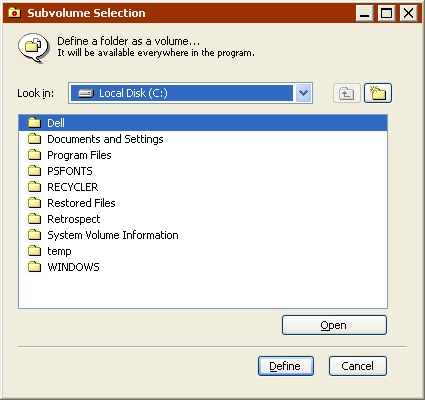
You can specify any folder on the selected volume as a Subvolume, including folders nested deep within the folder hierarchy. Select the folder you want to specify as a Subvolume and click Define. (To define the folder name currently displayed in the list box as a Subvolume, click Use.) The Subvolume folder, identified by the  icon, then appears with the volumes in the volume list.

If you specify both a Subvolume and its parent volume as Sources, they will be treated as separate objects. However, operations involving the parent volume will include the contents of the folder designated as a Subvolume.
To discard a defined Subvolume:
- Select the Subvolume from the Volumes Database window.
- Click Forget from the toolbar or press the Delete key.
Forgetting a Subvolume does not affect the contents of the original folder or any files you may have already backed up from it.
Volume Utilities
In the Volumes Database and volume selection windows, the toolbar has commands for defining and forgetting Subvolumes and for renaming, ejecting, erasing, and getting information about listed volumes.
Click the right mouse button in the volume list to pop up a menu of commands equivalent to the those on the toolbar.
Make Subvolume
To define a folder as Subvolume, select its parent volume and click the Make Subvolume icon or press Control+U. Use the dialog as described in Specifying Subvolumes.
Licensing
If you purchased Retrospect SQL Server Agent or Retrospect Exchange Server Agent licenses, you must apply a license to each server you want to back up. To apply a license code to a SQL or Exchange server, select the server, then click the License icon in the toolbar, or press Alt-L.
Local servers are listed in the My Computer container. Client servers are listed in the Backup Clients container.
Properties
To view a volume’s properties, select it, and click the Properties icon or press Alt-Enter. Properties include type, file system, total and available space on the volume, and location.
Login as
The best way to ensure that all operations involving network volumes and SQL and Exchange servers will be successful is to log in to Retrospect as a user that has permissions for these resources. See Security Preferences for more information.
See SQL Server Agent and Exchange Server Agent for more information about setting up login information for SQL and Exchange servers.
You can use the Login as button if you are logged into Retrospect as a user that does not have permissions to a network volume and you want to perform an immediate operation using the volume. Select the volume in the Volumes Database list, click the Login as icon in the toolbar, and enter a user name and password.
Automated operations using the volume may not work.
Rename
To change the name of a volume or Subvolume, select it and click the Rename icon or press Control-R. Enter a new name in the dialog that displays.
Eject
To eject removable media from a drive, select its volume name and click the Eject icon or press Control-J.
Forget
To remove a volume or Subvolume from the list, select it and click Forget from the toolbar, or click Delete. Currently active volumes, such as your hard disk or an inserted cartridge, may not be forgotten. Forgetting a server forgets its databases and defined Subvolumes.
Erase
To erase the contents of a volume, select it and click Erase or press Control-E. Be careful; this command permanently removes all files from the volume.
Browsing
The Volumes Database window has a Browse button. To view and work with the contents of a volume, select the volume and click the Browse button to open a browser. Browsing a volume is explained in detail in Browsing.
Windows Volume Mount Points (NTFS Mounted Drives)
Windows allow you designate an empty folder as a volume mount point, a kind of gateway for accessing a different drive. For an overview and configuration instructions, see the Windows help index under “mounted drives overview” and “mounting volumes as NTFS folders.”
Appearance and Organization
In the Windows Explorer a mount point appears with a drive icon and bears the name of the folder through which the drive is accessed. Hierarchically, the mount point appears as a drive within a drive, not on the same level as other drives under My Computer.

Parent volume C: in Windows Explorer
In Retrospect a mount point appears with a drive icon and bears the drive label. In Retrospect’s Volumes Database and volumes selection windows, the mounted drive appears at the same hierarchy level as other drives under the My Computer container.

Mounted volumes available to Retrospect
In Retrospect’s volume browser windows, browsing the parent volume of a mount point, the mount point appears merely as the empty folder it really is.

The mount point’s parent volume in a Retrospect browser
Logic and Functionality
Retrospect considers a mounted drive as a distinct volume, not as a folder or Subvolume of the parent NTFS volume. To back up a volume accessed through a mount point, you must select that mounted drive in Retrospect. It will not be backed up if you select the parent drive containing the mount point folder or if you select the folder itself.
When Retrospect backs up the parent volume of a folder used as a mount point, it includes the mount point folder in the Snapshot but does not include files and folders from the mounted volume.
When Retrospect restores from a Snapshot, it restores the mount point folder and the necessary information for Windows to access its volume through the mount path. (This is dependent upon the accessed drive being present in its original state; if not, the folder is restored but it is not made a mount point.) To restore files and folders to the mounted volume, you must restore it as you would restore any other drive with Retrospect, by selecting it as a distinct drive.
Browsing
Browsers are Retrospect’s powerful tools for viewing, selecting, and manipulating files and folders on your source and destination volumes. From within Retrospect, browser windows provide file management facilities similar to those in the Windows Explorer, and include other features not available in the Explorer.
Browsers “unfold” the contents of a volume so you can work with all of its contents all at once. This lets you easily select multiple files within different folders. You can also view browsers in a flat-file structure, without the folder hierarchy.
Browsers allow you to see the files chosen for backup, restore, duplicate, and copy operations. You can also use browsers in a “stand-alone” manner to view and manage the contents of volumes. In backup, restore, duplicate, and copy operations, browsers show you which files have been chosen by the selector you designated and allow you to mark and unmark files.
You can open any number of browser windows, including different browsers for the same volume. You can also leave browser windows open while performing other Retrospect operations and switch back and forth between browser windows and other Retrospect windows.
In each browser window, Retrospect has a toolbar. It has commands for finding, selecting, and managing folders and files in the browser listing. (You can also right-click to use a contextual menu.)
Viewing a Stand-alone Browser
To view a stand-alone browser of a volume, click Configure>Volumes. The Volumes Database window appears, listing the names of available volumes. Select a volume, then click Browse. Retrospect scans the selected volume, then displays a browser window listing all the folders and files contained in the selected volume.
To view a stand-alone browser of a Backup Set, see Viewing Session Contents. To view a stand-alone browser of a Snapshot, see The Snapshots tab.
Viewing a Browser from an Operation
To view a browser within an immediate backup, restore, duplicate, or copy operation, click the summary window button named either Files Chosen or Preview. Retrospect displays a browser window for each source.
Browsers and Scripts
You cannot use a browser within a script because scripts are meant for unattended execution at a later time. Using a browser would not be useful because a volume’s contents are likely to change between the time you edit the script and the time the script is executed.
About Browsers
A browser window displays a hierarchical file list of folders and files in the selected volume.
At the top of the list (and at the highest level of the hierarchy) is the name of the volume. Folders have + and – controls to their left; click + to show the contents of the folder. Click – to hide the contents of the folder. Open folders have different icons,  , than closed folders,
  .
.
Folder contents hidden (left) and exposed (right).
The scrolling folder index on the left of the window provides a thumbnail view of the folders on the volume. Click on the folder index to display the associated file list on the right side of the window. The pathname of the current selection is shown above the index. Index lines appear grey for unopened folders or black for open folders.
The upper right corner of the window indicates how many files are highlighted or marked and shows their total size.
Selecting Files and Folders
In a browser window, you select files and folders on which to perform operations. Select files by clicking on entries in the file list. Drag through the list or Shift-click to select a range of files or folders. Control-click to select or deselect non-contiguous items. Select all items by choosing Select All from the Edit menu. Double-clicking a file both selects (highlights) and marks it. Marking is described below, under “Marking Files and Folders.”
Getting Additional Information
Retrospect provides a Properties command you can use to view information about the selected files and folders.
To View Information About Files or Folders:
- From a browser, select the files or folders for which you want more information.
- Click Properties from the toolbar.
A properties window appears for each selected file or folder, displaying additional information.
Marking Files and Folders
A marked file or folder is one that is designated to be used in some way (for example, backed up, archived, duplicated, or restored). When performing operations, Retrospect marks files according to the rules of the selectors in the search criteria, but you have no way of knowing which files are marked unless you use browsers. In addition to simply viewing a list, you can manually mark and unmark files and folders within a browser.
Marked files indicate the files you want Retrospect to evaluate when performing an operation. Not all the marked files will be backed up (or duplicated, restored etc.). For example, during a backup using Retrospect’s default settings, only new and modified files will be backed up, regardless of which files you mark. Retrospect displays a diamond icon in the browser list next to source files that already exist on the destination. These files will not be copied to the destination again, saving time and media space.
You mark files and folders in a browser by selecting them and clicking the checkbox to the left of a file or folder. Click a checked checkbox to unmark the item. You can also mark and unmark files and folders by double-clicking them.
To mark or unmark an item without affecting the highlighting of other items, press and hold the Control key while clicking.
By marking or unmarking a folder you perform the same operations on all the files (and folders) contained within that folder. For example, to specify a single folder for backup, you would double-click on the volume name at the top of the file list to unmark all of the files, then scroll to the folder you want to back up and double-click the folder icon to mark it and its contents.
The browser window’s toolbar provides additional commands for highlighting and marking in the window.
Highlight Marks: highlights marked files. If you click or double-click an item without holding the Control key you may end up unhighlighting marked items. This command is useful for rehighlighting them.
Cross Reference: allows you to locate files in the same hard disk or session that are related to a specified file. Specifically, Cross Reference finds duplicate files, older versions of the same file, and even files that have been renamed but were originally from the same file. This command highlights, but does not mark, cross-referenced files.
Selecting View Formats
Click the Hierarchical/Sorted View button on a browser window’s toolbar command to change how Retrospect displays the contents of a volume.
The hierarchical format displays files and folders in the same hierarchical structure in which they are stored on the volume. This is the default layout that Retrospect uses when you first open a browser window.
The sorted files format displays all files stored in the selected volume as a single “flat file” list, discarding any folder designations.
For both types of browser layouts, the toolbar’s list box allows you to specify the type of file information displayed in the browser window. It always displays flags, name, and size. For the final piece of information you can choose modification date/time or attributes.
With the sorted files layout, you can choose the sort criterion of the list by clicking on a column heading. Clicking it a second time reverses the sort order. Retrospect normally sorts the files in ascending order. For example, if sorting by size is specified, the browser lists the smallest files at the top of the list and largest files at the bottom.
Finding Files
The Edit menu has a Find item that you can use to locate specific files or folders (but not empty folders) on the volume.
Restoring by searching uses the same window as the one described below.
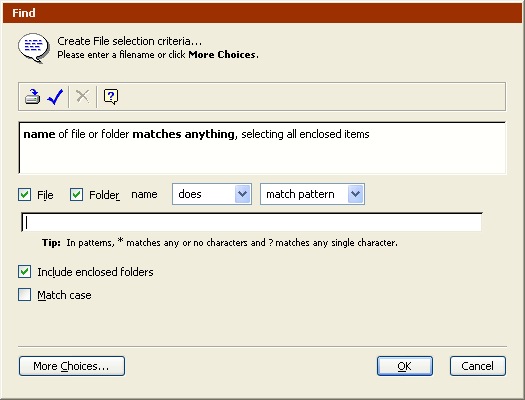
The Find window (showing fewer choices).
This basic find window considers a file or folder name as the primary search criterion. Click More Choices to build a custom selector to use other criteria. The window that appears is identical to the selector details window you use to build Retrospect selectors.
For more information on using the Find window to build search conditions, see Using Selectors.
In the text entry field, type the text to use in your criteria. It is not case-sensitive unless you click the Match case check box.
Use the File and Folder checkboxes to consider or disregard files and folders while searching. When you consider folders, check “Include enclosed folders” to select all enclosed items of found folders, including files nested in other folders.
Use the “does/does not” list box to control the search logic. “Does” is inclusive; “does not” is exclusive. For example, if you choose “does not,” and perform a search on file names, Retrospect selects all the files and folders whose names do not contain the search text.
Use the other list box to specify where the search text is positioned within the name. You can specify that the search text be located at the beginning (start with) or end (end with) of the name, or contained somewhere within a name (contain). You can specify that the name exactly match the search text and no additional text (match). Or you can specify that the name matches a pattern (match pattern) of the search text. When matching a pattern, you can use the wildcard character ? to match any single character, and use the wildcard character * to match multiple characters.
After you edit the search criteria in the find window and click OK, Retrospect highlights all files and folders that meet the search criteria. You can then mark the highlighted files for use in your operation.
Printing or Exporting a File List
Any time a browser window is active, you can print the contents of the file list or export it to a file. To print, choose Print from the File menu. If you use Page Setup to reduce the printing size, Retrospect will print a browser in more than one column to save pages. To export to a text file, choose Export from the File menu. Retrospect exports the fields in the following order, regardless of the view format: file name, size, create date, create time, modify date, modify time, backup date, backup time, Mac OS type, Mac OS creator, Backup Set (if any), and path.
Copying and Pasting Selections
You can copy selections between browser windows. When you copy a selection, only the file and pathname information is copied, not the files themselves. This feature is useful for copying selections from a stand-alone browser window into a browser window opened during a Retrospect operation such as restore.
You cannot paste a copied selection into any other applications or documents.
To Copy Selections Between Browser Windows:
- Make your file and folder selection then choose Copy from the Edit menu.
- Open (or bring to the front) the appropriate browser window for the same volume.
- Choose Paste from the Edit menu.
Retrospect pastes the selection into the new browser window, highlighting only the same files and folders (in the same folder hierarchy) that were selected and copied in the other browser window.
Saving Selections as a Selector
You can also save file and folder selections as a selector that you can use to reselect files for future Retrospect operations on the same volume, including backups and restores.
Before you save a selection as a selector, consider creating a custom selector as described in Using Selectors. You can easily review and modify custom selectors at any time. A selector created with a browser’s Save Highlights command is less flexible.
To Save Selections as a Selector:
- Select the files/folders you want to apply to a selector.
- Click Save Highlights from the toolbar.
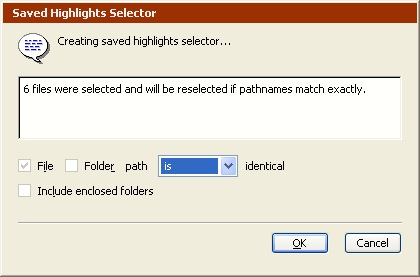
The window that appears tells you how many files were selected and will be selected by this selector if pathnames match exactly.
- Use the list box to control whether the saved selector is inclusive or exclusive.
This window also includes file and folder options similar to those in the find window, as described in Finding Files.
- Click OK then enter a selector name to save your new selector.
Rescanning a Volume
You can update the contents of the browser window by choosing Refresh from the File menu. This is useful, for example, if you make changes to the volume (for example, in the Windows Explorer or another browser window) while the volume’s browser window is open.
The Refresh item appears in the File menu only when Retrospect is working with a volume directly. For example, you can not rescan a volume when you are browsing a Backup Set.
Deleting Files
Retrospect browsers have a Delete command to remove files from a volume, which is like placing a file in the Windows desktop’s Recycle Bin and emptying it.
Retrospect does not allow you to delete files from a Backup Set.
To Delete Files:
- Select the file or files you want to delete in the file list.
- Click Delete from the toolbar.
A dialog appears, asking you to specify whether you want to remove the selected files only or remove the selected files and any empty folders that may result from the file deletions.
- Make your choice, then click OK.
Retrospect permanently deletes the selected files from the volume.
A delete command may not be undone with the Undo command, nor may a file be pulled from the Recycle Bin. When a file is deleted, it is gone.
The browser window toolbar has Delete enabled only when Retrospect is working with a volume directly. For example, you can not delete a file when you are browsing a Backup Set.
Using Selectors
You can use selectors with immediate and automated operations to specify the types of files and folders you want the operation to include. Using selectors to intelligently select certain files and folders you can limit the amount of time and media required for an operation.
Selectors let you choose files based on almost any criteria, including name, date, type, or size. Retrospect includes a number of built-in selectors, and you can also create custom selectors. For example, you can create a selector that will choose all text documents modified after October 15.
A file that is marked by a selector will not necessarily be copied to the destination. All copying operations (such as backups) using selectors are “smart,” or progressive, because of Retrospect’s matching feature. For each selector, there is the implied meaning of “select this file, but do not copy it if it already exists in the destination.”
Retrospect’s selectors do not select empty folders.
The Selectors Window
You create and modify selectors through Retrospect’s selectors window.
To display the selectors window, click Configure>Selectors. The selectors window lists all of the built-in and custom selectors.
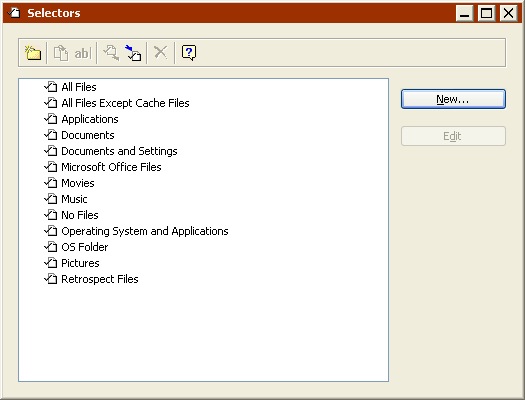
The selectors window has two buttons for working with the selectors.
New creates a new selector.
Edit allows you to add new conditions or modify existing conditions for a selector.
The selectors window includes a toolbar with the following commands:
New Folder makes a folder container for organizing selectors.
Duplicate makes a copy of the currently highlighted selector.
Rename lets you change the name of the currently highlighted selector.
Export lets you export selectors to a file. For example, you can create a custom selector for use with Retrospect on one backup computer, then export the selector for use with another copy of Retrospect running on a second backup computer.
Import lets you import selectors from a file.
Delete removes the currently highlighted selector.
Click the right mouse button in the selectors list to pop up a menu of commands equivalent to the those on the toolbar and the buttons in the window.
Built-in Selectors
Retrospect includes a number of built-in selectors, with predefined conditions for selecting files.
Some selectors and selector conditions function differently with Windows, Mac OS, and Linux volumes. The descriptions below focus on how the built-in selectors interact with Windows volumes. To determine how the selectors work with other operating systems, double-click on a selector to view its details, or check the selector on a non-Windows volume. See Selector Toolbar for more information on checking selectors.
Retrospect’s built-in selectors are:
All Files marks all files on the source, including the operating system folder. This is the default selector.
All Files Except Cache Files marks all files on the source, except cache files used by certain applications, such as web browsers. These cache files, which are often large, are not needed for restoring.
Applications marks only executable applications (.exe) and code libraries (.dll), except those that reside in the system folder.
Block Level Filter controls how a file is backed up, i.e. whether it is backed up in full or incrementally
Documents marks files that are not executable applications (.exe) or code libraries (.dll), and which do not reside in the Program Files folder or in the operating system folder, except for files within the Desktop and Favorites folders.
Documents and Settings marks files in the Documents and Settings folder, which contains every user’s folders including My Documents, Favorites, Application Data, and Desktop.
For Windows 9x systems, the “Documents and Settings” selector marks the Profiles folder.
For Mac OS X, this selector marks the Users and Library/Preferences folders.
Movies marks files with common movie file extensions (.mov, for example) anywhere on the source, except the Windows and Program Files folders. It also marks all files in the My Documents\My Videos and Movies folders for all users.
Music marks all files in the My Documents\My Music folder for all users. It also marks files with common music file extensions (.mp3, for example) anywhere on the source, except the Windows and Program Files folders. This selector also marks the Music folder for all users on Mac OS X and Windows computers (if the folder exists).
No Files does not mark any files.
Office Documents marks Microsoft Office Documents, Microsoft Outlook data, and Adobe PDF files anywhere on the source, except the Windows and Program Files folders.
Operating System and Applications marks system files, including the Windows folder and the System State. Also marks application files, including everything in the Program Files folder, as well as files with known application extensions (like .exe and .dll) anywhere on the source.
OS Folder marks files within the operating system folder. For UNIX, this selector marks no files.
Pictures marks all files in the My Documents\My Pictures folder for all users. It also marks files with common picture file extensions (.jpg, for example) anywhere on the source, except the Windows and Program Files folders. This selector also marks the Pictures folder for all users on Mac OS X and Windows computers (if the folder exists).
Restore System and Applications marks system and application files.
Retrospect Files marks catalogs, logs, configurations, and other documents related to Retrospect. For UNIX, this selector marks no files.
All Files is the default selector used for immediate operations and scripts. You should use this selector to ensure complete backups.
To view details about a selector, click on it to select it in the Selectors window and click Edit (or just double-click the selector), which brings up a window with the selector’s conditions.
See Selector Conditions for help understanding the conditions that make up a selector.
Selector Conditions
A selector is made up of a combinations of conditions that include or exclude files and folders that meet certain criteria. Retrospect includes many detailed conditions that allow you to create sophisticated selectors.
To view or modify selector conditions, select a selector from the Selectors window, then click Edit. The selector details window appears. It includes one section for adding conditions to include certain files and folders and another section for adding conditions to exclude certain file files and folders.
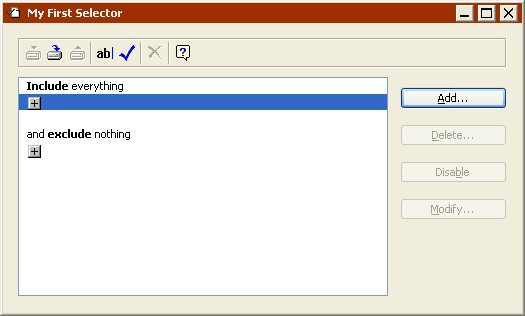
Click the + button underneath the Include or Exclude heading to display the Condition window.
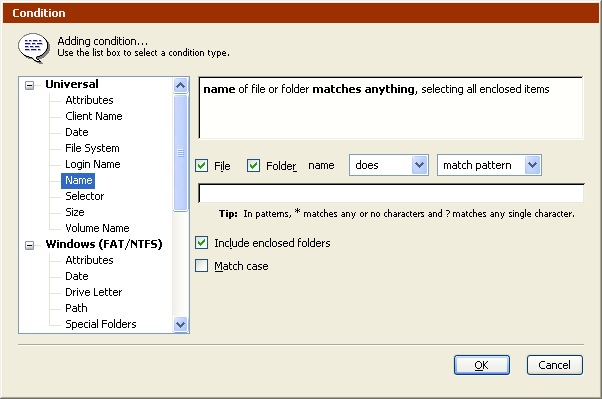
Along the left of the Condition window, Retrospect lists the categories of conditions available:
- Universal Selector Conditions
- Windows Selector Conditions
- Mac OS Selector Conditions
- UNIX Selector Conditions
- Mailbox Selector Conditions
Universal Selector Conditions
Universal conditions work with all supported file systems. You can build your own selectors using the following conditions.
Attributes (Universal) uses read-only and hidden attributes, in addition to Retrospect’s marked and matched attributes.
Client Name (Universal) uses the name from Retrospect’s client database as the condition.
Date (Universal) uses creation, modification, or backup dates as conditions.
File System (Universal) uses the source volume’s file system as the condition.
Login Name (Universal) uses file sharing owner, group or login names as the condition.
Name (Universal) uses the name of the file or folder as the condition.
Selector (Universal) uses another selector as the condition.
Size (Universal) lets you specify file or folder size as the condition.
Volume Name (Universal) uses the name of the volume as the condition. For Windows volumes, this is the volume label shown in its properties, not the drive letter.
Windows Selector Conditions
Windows conditions work with FAT and NTFS file systems. You can build your own selectors using the following conditions.
Attributes (Windows) uses archive, system, encrypted, and offline flags as conditions.
Date (Windows) uses Windows-specific date attributes as conditions.
Drive Letter (Windows) uses the source volume drive letter as the condition.
Path (Windows) uses the path to the file or folder as the condition. Folder hierarchy is delineated by the “\” character.
Special Folders (Windows) uses certain system-defined folders, such as Volume Root and Documents and Settings, as conditions.
Mac OS Selector Conditions
Mac OS conditions work with HFS and HFS+ file systems. You can build your own selectors using the following conditions.
Attributes (Mac OS) uses file attributes (file busy, alias, name locked, stationery, or custom icon) as the conditions.
File Kind (Mac OS) uses file creator and type as conditions.
Label, Icon Color (Mac OS) uses a file or folder’s label as a condition. The Label menu or submenu in the Finder contains seven labels (and colors, if your monitor displays colors or shades of gray) and the “None” option. Each checkbox in this window corresponds to a specific item position in the Label menu and not to the actual color or label name.
Path (Mac OS) uses the path to the file or folder as the condition. Use a colon (:) as the separator in path names for Mac OS X. Path names must include the volume.
Permissions (Mac OS): Read, write, and execute permissions for user, group, and other. Mac OS X file/folder permission much match the condition exactly (with * used as a wildcard). For example, to select all files that can be written to by either user, group, or other, you would need to create three separate “or” conditions: w, w, and w.
UNIX Selector Conditions
UNIX OS conditions work with UNIX file systems. You can build your own selectors using the following conditions.
Attributes (Unix OS) uses file attributes (symbolic link flag settings) as the conditions.
Date (Unix OS): UNIX-specific date attributes
Path (Unix OS): Path to the file or folder. Folder hierarchy is delineated by the “/” character.
Permissions (Unix OS): Read, write, and execute permissions for user, group, and other. UNIX file/folder permission much match the condition exactly (with * used as a wildcard). For example, to select all files that can be written to by either user, group, or other, you would need to create three separate “or” conditions: w, w, and w.
Mailbox Selector Conditions
Mailbox conditions can be used when backing up or restoring Exchange mailboxes.
Sender uses the sender of the message as the condition.
Working with Conditions
Each condition type has its own controls for entering and specifying details for the condition.
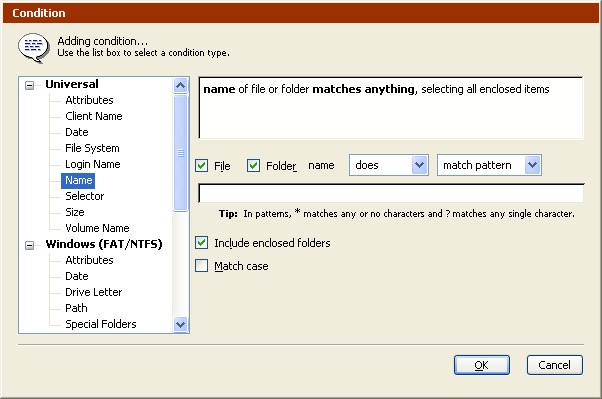
When you add or change a condition it appears in the selector detail window.
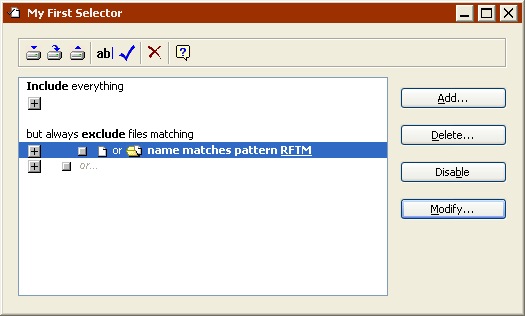
You can add multiple conditions to a selector by clicking the + conditions buttons. The location of the + button determines the relationship between the conditions; it may add a condition with the And operator or may add a condition with the Or operator. When you click a + button to open a condition window, the window shows its operator type so you know whether you are And-ing or Or-ing a new condition.

The And operator allows you to combine conditions so that a file or folder must meet the combined conditions before it is selected. Each condition uses an And operator, except each final condition of the Include and Exclude areas.

The Or operator allows you to build conditions where a file or folder must meet at least one condition—but not necessarily all conditions—before it is selected. The last condition under each Include and Exclude area always uses an Or operator.
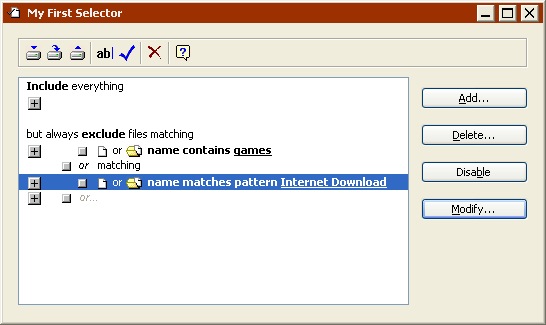
To gain a better understanding of how this works, see Creating a Custom Selector and experiment with conditions on your own.
Condition Examples
The table below shows an example of a custom selector and its effect when applied to some files.

Condition Rules
Exclude statements always take precedence over Include statements when Retrospect applies the selector. For example, if a selector has a statement which includes the Profiles folder and a statement which excludes the OS Folder, the files in the Profiles folder will not be marked.
Creating a Custom Selector
Retrospect allows you to quickly build selectors that can perform sophisticated file and folder selection. The best way to learn about custom selectors is to create one. In the following example, you create a custom selector that excludes certain applications and a folder called “Games” from backup.
Creating a New Selector
From the navigation bar, click Configure> Selectors button, then click New. Retrospect prompts you to name the new selector. This example uses “Unwanted games and apps” but you can enter a name of your own.
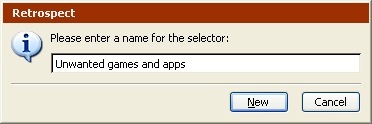
After typing the name, click New. Retrospect displays a selector details window for the new selector. Notice the window name is the selector name.
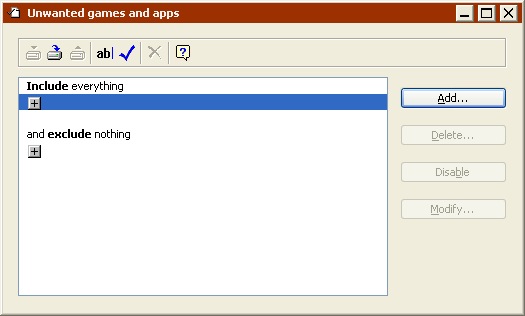
By default, new selectors include everything and exclude nothing, until you add conditions.
Excluding Files
Click the + button beneath the exclude heading to add a condition. In the condition window that appears, select the Windows Special Folders condition to specify a folder type to exclude.
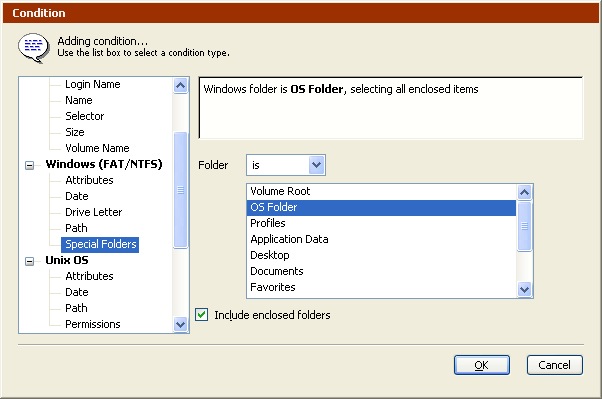
Select Application Data and click OK. The selector details window now reflects our new condition.
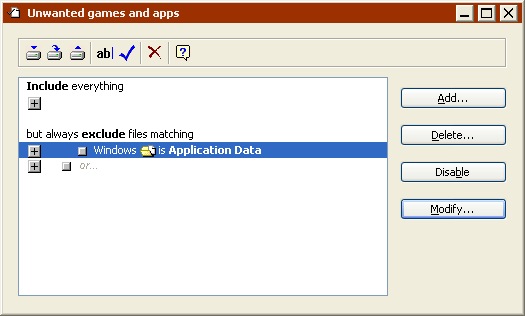
At this point, the selector excludes the application data folder on Windows volumes. You are now ready to add a second condition.
Click the second + button below the exclude heading, which has the word “or” next to its  handle icon. In the condition window that appears, select the Mac OS File Kind condition.
This window lets you specify a file type and/or creator as a condition. The default file kind is a generic application with the type “APPL.” Since this is the condition we would like to use in this example, click OK. The selector details window now reflects our new condition.
Because we added this condition from the lowest + button, Retrospect added the condition to the selector with the Or operator. Or and And operators are explained in Working with Conditions.
We are ready to add a third condition. Click the lowest + button beneath the exclude heading, then select the Universal Name condition in the condition window.
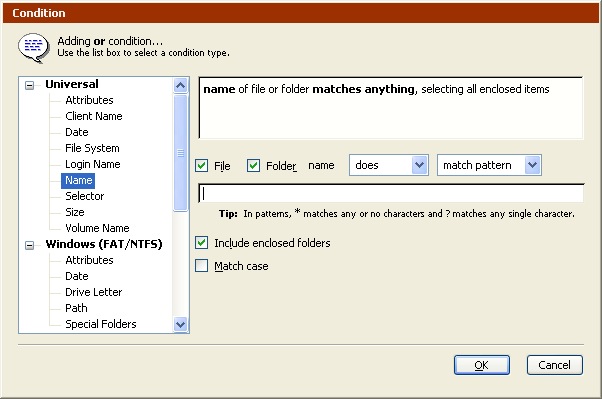
Choose contain for the text matching action and enter “games” in the text box. Leave the other controls as they are. Click OK to return to the selector details window.
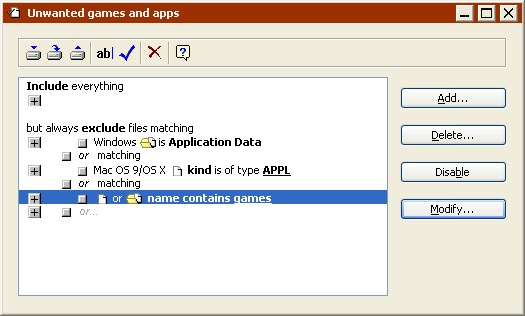
At this point, the selector excludes the contents of the Windows application data folder, all Mac OS applications, and any folder containing the word “games.”
You can save this selector and use it in scripts, immediate operations, and browsers.
Selector Toolbar
The selector details window includes a toolbar with the following commands.
Save: This saves the selector using its current name, replacing what was last saved.
Save As: This lets you save the selector using a different name. Enter the new name in the dialog which follows, then click Save. The original selector remains as it was when it was last saved.
Revert: This lets you discard your current changes to a selector and revert it back to its last saved state.
Rename: This lets you change the name of the selector. Enter the new name in the dialog, then click Rename.
Check Selector: This lets you test your selector by applying it to a volume. Retrospect asks you to select a volume for browsing with your selector. Do so and it opens a browser window with the files that match the selector criteria marked with checks. The marked files are the ones Retrospect would back up when using this selector.
If the correct files are marked, the selector is working properly and you can begin using it for immediate operations or in scripts.
If the files that are marked are not the correct ones, you need to modify your selector and check it again. You may need to add conditions, delete conditions, or modify the conditions. Pay close attention to the And and Or operators which affect the results of your selector. When you have finished modifying your selector, save it and check it again to see if the correct files are now marked. Repeat this process as needed until your selector is working correctly.
Delete: This lets you delete the selected condition from the selector.
Printing a Selector
You can print the contents of selector details windows to keep for reference. To print a selector window, edit the selector and choose Print from the File menu.
Modifying a Selector
Any condition that appears in a selector details window can be modified. After you modify a condition, Retrospect returns to the selector details window, where you can add new conditions or modify existing conditions.
To open a selector from the selectors window, click on the selector you want to modify then click Edit (or just double-click the selector). Retrospect opens the details window for the selector.
To edit a selector’s existing condition, select it and click Modify, or just double-click the condition line (except on the + and  icons). In the condition window, you can modify its options and controls. Click OK to accept the changes to the condition.
To add a new condition, click a + icon. (Remember, the + next to the  handle with the grayed-out “or…” adds an “Or” condition, while the other + icons add an “And” condition.) A condition window appears, providing options and controls for the type of condition you chose. Make the appropriate choices and settings in the window then click OK to add it to the selector. The condition window closes and the selector window now displays the new condition.
Disabling Conditions
At any time, you can disable a condition within a selector. When a condition is disabled, it has no effect on file selection and will remain inactive until it is enabled. This feature is useful when a selector becomes very complex and you want to resolve problems by testing parts of it.
To disable a condition, first open a selector and select the condition you want to disable. Click Disable and Retrospect disables the selected condition, displaying it in grayed out text to identify it as inactive.
You can restore a disabled condition by selecting the condition and clicking Enable.
Moving Conditions
Within a selector details window, you can move a condition by dragging the  handle next to the condition description and dropping it at a new location within the window’s scroll box.
You can drag any condition to a new location, either in the same group or another group or heading. For example, if you added a name condition under the Include heading, you can change the same condition to an exclusionary condition by dragging it beneath the Exclude heading.
When you move a condition, its outline follows the hand cursor, indicating the new location for the condition. Release the mouse button when a new outline appears in your desired destination. After you drop it, Retrospect moves the condition to the new location, inserting it before the outlined destination condition.
To copy the condition, press and hold the Shift key while dragging. Dragging an “or matching” heading moves the entire group. Shift-dragging an “or matching” heading copies the group.
Be careful to pay attention to the operator type (And or Or) of what you are dragging; moving it may change the operator.
Removing Conditions
At any time, you can remove a condition from within a selector.
To delete a condition, first open a selector and select the condition you want to remove. Click Delete and confirm to remove the selected condition from the window.
Deleting a Selector
If you no longer need a selector you can delete it through the selectors window.
To delete a selector, click on the selector to select it, then click Delete from the toolbar or press the Delete key. A dialog appears asking you to confirm the deletion. Click OK. Retrospect deletes the selector.
Duplicating a Selector
Sometimes, you will want to duplicate a selector so that you can make slight modifications to fit your needs. For example, you may want to modify a copy of one of Retrospect’s built-in selectors but leave the original untouched. You can make a duplicate through the selectors window.
To duplicate a selector, click on the selector to select it, then click Duplicate from the toolbar. A dialog appears providing a field for entering a new selector name. Type a new name and click New. Retrospect creates an exact copy of the selector, using the name you provided in the dialog.
Selector Examples
Following are some examples of selectors and detailed explanations of each.
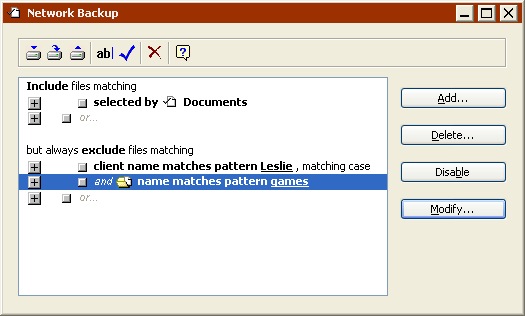
Network Backup Selector
This selector marks all documents to be backed up, except for files in a folder named “Games” on Leslie’s client computer. In this example, the backup administrator knows that Leslie has a large folder with games that do not need to be backed up.
Restore Searching Selector
This selector uses a date condition to search for an Acrobat PDF document file that was modified on or after October 17 at 5:04 p.m. It uses a name condition to find it on a Windows volume and uses a file kind condition to find it on a Macintosh volume. This selector is a good example of how, during an immediate restore operation, you could have Retrospect find a file when you forgot its name. Even though you do not know the exact file name, you know the file was last saved after a certain date and time.
Client Restore Searching Selector
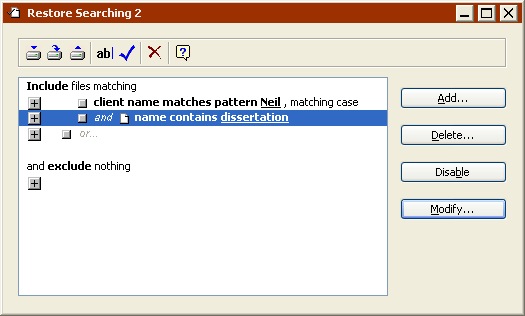
This selector searches for a named file that was created on a particular client user’s computer. In this case, the name of the file is “Dissertation” and client’s name is “Neil.” This selector could be used during an immediate restore operation.
Maintenance and Repair
This section provides instructions for maintaining and repairing catalogs and media by performing the following tasks:
- Updating catalogs that are out-of-date or “out of sync”.
- Recreating catalogs that are missing or damaged. (If it produces “chunk checksum” errors, it is damaged.)
- Repairing damaged file Backup Sets.
- Verifying Backup Set media integrity to confirm that all files are readable.
To perform these tasks, first click Tools from the navigation bar.
Updating a Catalog
You should update a Backup Set’s Catalog when Retrospect reports a “catalog out of sync” error while operating with the Backup Set. You must update the Catalog to synchronize it with the media or you will be unable to use the Backup Set.
A “catalog out of sync” error indicates Retrospect was unable to update the Catalog the last time it copied data to this Backup Set—possibly because of a crash or power failure. This error may also be caused by a full disk or by a lack of memory.
If, after updating a Catalog, you continue to get “out of sync” errors when using the Backup Set, do not attempt to repair the Catalog again. You must skip to new media, reset with a full or new backup, or create a new Backup Set. See Catalog out of sync for more information on the error message.
To Update a Catalog:
- Click Tools>Repair Catalog from the navigation bar.
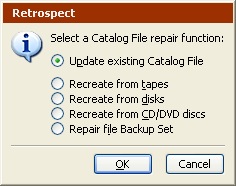
- Select Update existing Catalog File then click OK.
- Select the Backup Set to update and click OK.
- If Retrospect cannot find the most recent member, it displays a media request window.
Insert the requested media.
- Retrospect displays a dialog asking if there are any other members in the Backup Set.
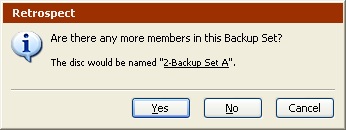
If there are no more members, click No to begin recataloging.
If there are more members in the Backup Set, click Yes. Retrospect continues to ask you for additional Backup Set members until you click No or Done.
- Retrospect recatalogs the Backup Set, informing you of its progress in the Activity Monitor.
- Click the History tab in the Activity Monitor for details on whether the update was successful.
If the operation was not successful, click the Log button for additional information.
Recreating a Catalog
You cannot use a Backup Set unless it has a Catalog File, so you should recreate the Catalog whenever the original Catalog File is lost or damaged. Retrospect can recreate a Catalog by reading the Backup Set media. Recreating may take a long time, depending on the amount of data in the Backup Set.
The procedure for recreating a Catalog for a disk Backup Set is different from the procedure for tape and CD/DVD Backup Sets.
Recreating a CD/DVD or Tape Catalog
Before you begin make sure to load the most recent Backup Set member for the Catalog you are recreating into the backup device.
To recreate a CD/DVD or Tape Catalog:
- Click Tools>Repair Catalog from the navigation bar.
- Select Recreate from tapes or Recreate from CD/DVD discs and click OK.
The Media Selection window displays.
- In the Media Selection window, click the Status tab, then select the most recent member of the Backup Set.
- For a Backup Set created with Retrospect 5.0 or 5.1, it requests the first member of the set.
If you do not have the most recent medium, insert the most recent available member of the Backup Set to be recataloged.
- Click OK.
If you are recreating a Catalog for a Backup Set that is still known by Retrospect, it asks whether you want it to recognize the recreated Backup Set instead of the known Backup Set. Click OK to replace the known Backup Set.
- If the Backup Set is encrypted, Retrospect asks for its password. Enter the password and click OK.
- Specify a location to save the recreated Catalog File and click Save.
Retrospect recatalogs the Backup Set, informing you of its progress in the Activity Monitor. When Retrospect finishes recataloging a particular member of a Backup Set it asks if there are any more members to recatalog.
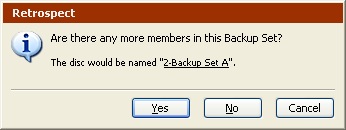
- If there are no more members because you have already given Retrospect the final medium in the Backup Set, click No to complete the recataloging.
If there are more members in the Backup Set, even if one or more members are lost or damaged, click Yes.
- Insert the requested member of the Backup Set, or if you do not have it, click Choices.
A dialog asks what happened to the member.
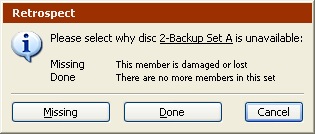
If you have already given Retrospect the final medium in the Backup Set, click Done. If you do not have the requested Backup Set member, or if it is damaged, click Missing.
- Retrospect continues to ask you for additional Backup Set members until you click No or Done.
Click the History tab in the Activity Monitor for details on whether the recatalog was successful. If the operation was not successful, click the Log button for additional information.
After Retrospect informs you the recataloging was successful, you should edit the scripts that used the Backup Set and add the newly-recognized, recreated Backup Set to each script.
Recreating a Disk Catalog
If you are recreating a Catalog from removable disks, make sure to load the most recent Backup Set member for the Catalog you are recreating into the backup device before you begin.
To recreate a Disk Catalog:
- Click Tools>Repair Catalog from the navigation bar.
- Select Recreate from disks and click OK.
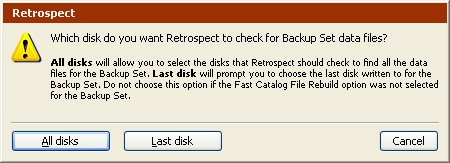
- If you know which disk was most recently used to store the Backup Set data, click Last disk. If you are not sure, click All disks.
- Do not select Last disk if this Backup Set’s Fast Catalog File rebuild option was turned off.
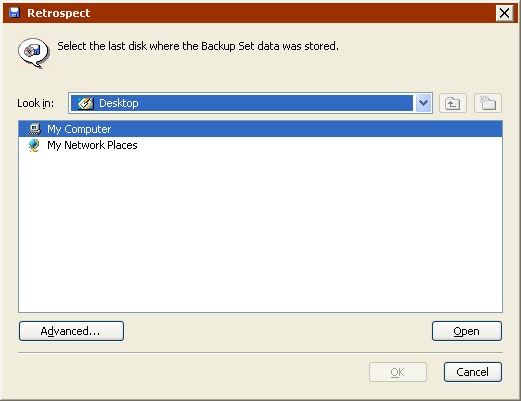
- Browse to the location of the disk, select it, and click OK.
Retrospect displays a list of the Backup Sets on the disk.
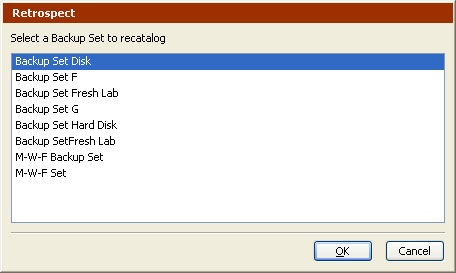
- Select the Backup Set to recatalog and click OK.
If you selected All disks, Retrospect asks if there are any more disks in the Backup Set. If there are, click Yes and select another disk. Retrospect continues to ask you for additional disks until you click No.
- If you are recreating a Catalog File for a Backup Set that is still known by Retrospect, it asks whether you want it to recognize the recreated Backup Set instead of the known Backup Set. Click OK to forget the known Backup Set.
- If the Backup Set is encrypted, Retrospect asks for its password. Enter the password and click OK.
- Specify a location to save the recreated Catalog File and click Save.
Retrospect recatalogs the Backup Set, informing you of its progress in the Activity Monitor window. When Retrospect finishes, click the History tab in the Activity Monitor for details on whether the recatalog was successful. If the operation was not successful, click the Log button for additional information.
After Retrospect informs you the recataloging was successful, you should edit the scripts that used the old Backup Set and add the newly-recognized, recreated Backup Set to each script.
Repairing a File Backup Set
The Catalog File for a file Backup Set is stored in the same file as the Backup Set data. In order to repair a file Backup Set Catalog, you must have access to the Backup Set.
To repair a file Backup Set:
- Click Tools>Repair Catalog from the navigation bar.
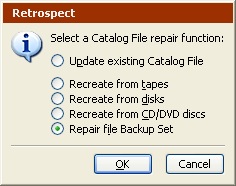
- Select Repair file Backup Set and click OK.
Retrospect displays the Backup Set selection window.
- Locate the file Backup Set that needs repair, select it, and click Open.
A message asks you to confirm the repair.
- Click Yes to repair the Backup Set.
- If the Backup Set is encrypted, Retrospect asks for its password. Enter the password and click OK.
Retrospect recatalogs the Backup Set, informing you of its progress in the Activity Monitor window. When Retrospect finishes, click the History tab in the Activity Monitor for details on whether the recatalog was successful. If the operation was not successful, click the Log button for additional information.
Incomplete Catalog Repair
When you stop a cataloging operation, the following dialog may appear.

Revert stops recataloging and allows you to continue updating the Catalog from the current medium later. (To continue later, use the Update existing Catalog File function.)
Save should be used when you do not wish to try to catalog any more data from the current medium. All data cataloged so far should be retrievable. (To continue later, use the Update existing Catalog File function.) Recataloging will resume with the next medium, if there is one. If you back up more data to the Backup Set after using this option, Retrospect will ask for a new medium, treating this one as full.
Verifying Backup Set Media
If you want to manually verify your Backup Set media, choose Tools>Verify Media from Retrospect’s navigation bar. Verify Media is useful for performing offline verification of your Backup Set media after an immediate backup (or archive) that did not use verification.
You should use verification scripts to schedule offline verification if you want to maximize your backup window by running scripted backups (or archives) without verification. See Scripted Verification for more information.
Whenever possible, Verify Media verifies data on Backup Set media by comparing the files in the selected Backup Set to MD5 digests generated during the backup. This means that Retrospect does not need to access the backed up source volumes, which prevents slowdowns on those volumes.
In certain circumstances, Retrospect does not have access to MD5 digests generated during backup. This is true for all backups created using versions of Retrospect prior to Retrospect 7.7, as well as backups that took place when Retrospect’s “Generate MD5 digests during backup operations” preference was disabled. See Verification Preferences for more information.
In these cases, Retrospect still checks all files on the Backup Set media to make sure that they are readable.
- Verify Media does require you to reinsert media when verifying backups that span media.
To verify media integrity:
- Click Tools>Verify Media.
Retrospect displays the Backup Set selection window.
- Select the Backup Set to verify, and click OK.
Retrospect verifies the Backup Set media, informing you of its progress in the Activity Monitor window.
If the Backup Set uses CD/DVDs, removables disks, or tapes, Retrospect asks you to insert each Backup Set member as it is needed.
If you do not have the requested Backup Set member, but have other members of the Backup Set to verify, click Choices, then OK, and insert the next requested piece of media.
- When Retrospect finishes, click the History tab in the Activity Monitor for details on whether the recatalog was successful.If the operation was not successful, click the Log button for additional information.
- Consider backing up unverified files to a new Backup Set.
- Click Done.
External Scripting
Retrospect events can be handled by external scripts, which you can author in any scripting language that can create executable files. You can attach a single executable script to Retrospect or to a Retrospect client to act upon the events.
This section assumes knowledge of Windows scripting. Retrospect’s external scripting functionality is only for experienced script authors who wish to further automate Retrospect with external scripts. If you want to learn Windows scripting, start with Microsoft’s web-based documentation for developers.
Due to the complex nature of Windows scripting, Retrospect offers only minimal support for these features.
Installing Windows Scripting Support Files for Retrospect
The External Scripts folder is installed by the Retrospect setup program in default (“Recommended”) installations. You can add it to your Retrospect folder by using the setup program to modify the existing installation.
When you install Retrospect, the External Scripts folder, by default, is installed here:
_..\Program Files\Retrospect\Retrospect +++19.2+++\External Scripts_
Windows Script Host must be installed on your system to use scripts created with VBScript or other scripting languages not directly supported by the operating system. Windows Script Host is available free from Microsoft.
Retrospect Events
Retrospect has fifteen events that can be handled by scripts. Retrospect client software has two of these events. Below are the event names and descriptions of when they are triggered.
StartApp occurs when Retrospect is opening, including when it is autolaunching.
EndApp occurs when Retrospect quits.
StartBackupServer occurs when ProactiveAI Backup is about to start.
StopBackupServer occurs when ProactiveAI Backup is stopped.
StartScript occurs when a script is about to start.
EndScript occurs when a script is finished.
StartSource occurs when a source is about to be accessed for the first time. This event is present in both the Retrospect application and Retrospect client software.
EndSource occurs when a source has finished being accessed. This event is present in both the Retrospect application and Retrospect client software.
MediaRequest occurs when Retrospect is about to request media, and again every five minutes while the media request window is open.
TimedOutMediaRequest occurs when Retrospect has requested media and it has waited longer than the time specified in the preferences.
ScriptCheckFailed occurs when Retrospect quits after running a script and there is a scheduled script set to run outside the look ahead time and the script check fails.
NextExec occurs when Retrospect quits after running a script and there is a scheduled script set to run outside the look ahead time and the script check passes.
SchedStop occurs when a script is running and about to stop because its allowed time of execution has expired.
PasswordEntry occurs after someone enters a password.
FatalBackupError occurs when a fatal backup error occurs.
Implementing a Script with Retrospect
Copy your external script file to the Retrospect program folder (the default path is ..\Program Files\Retrospect\Retrospect 19.2) and rename your script RetroEventHandler. Add the filename extension that matches your script type, such as .BAT, .EXE, .VBS, or any other supported by Windows Scripting Host.
If more than one RetroEventHandler file is present, only one will be used. If you want to take multiple actions with multiple events, you must write a single script to do it.
Implementing a Script with a Retrospect Client for Windows
To use external scripting with a Retrospect client, copy your script file to the Retrospect Client program folder (the default path is ..\Program Files\Retrospect\Retrospect Client ) and rename it as detailed in Implementing a Script with Retrospect.
Executing an External Script
When an event occurs, Retrospect notifies the external script and waits for a response from the script before continuing. After five seconds, Retrospect displays a status window to indicate it is executing a script.
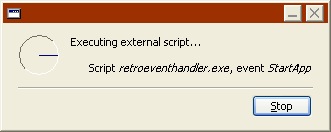
When the script finishes, Retrospect continues.
Sample Scripts
The External Scripts folder includes sample scripts written in four script languages (batch files, Visual Basic, VBScript, and C). You can study the source code of an example in a given language to learn how to write your own script to handle Retrospect events. They demonstrate how you might use the information sent for each event and provide examples of the acceptable values returned.
To use an example script with Retrospect, copy it from its sample folder to the Retrospect program folder.
- The .BAT batch example script uses the batch command extension ask.exe, installed in the Retrospect program folder.
The example scripts display a window as each event occurs, naming the event and listing the event’s information. For example, opening Retrospect triggers the StartApp event.
You must respond in each window to allow Retrospect to continue. You must do something else to trigger another event that will be handled by the example script.
After sampling an example script, remove it from the Retrospect program folder so it doesn’t interfere with your backups or other scheduled Retrospect scripts.


