Retrospect Backup is trusted worldwide for its powerful, easy-to-manage data protection. And Linux can provide an optimal platform for deploying the headless Retrospect Engine, which can be managed by Retrospect Console running on macOS.
Retrospect Engine Installation on Linux
On a supported Linux system, open these ports:
TCP and UDP port 497 for connecting to Retrospect Clients
TCP port 22024 for connecting to Retrospect Console for Mac
After downloading Retrospect Engine for Linux, as the root user, extract the files from the downloaded .tgz file to /usr/local/retrospect/engine:
mkdir -p /usr/local/retrospect/engine
cd /usr/local/retrospect/engine
tar xzvf <path of the downloaded tgz>
Running Retrospect Engine as root
sudo su
export LD_LIBRARY_PATH=$LD_LIBRARY_PATH:/usr/local/retrospect/engine
/usr/local/retrospect/engine/retroengine
If retroengine fails to run with the error "libretroapi.so: cannot open shared object file: No such file or directory", check if the root user's environment variable LD_LIBRARY_PATH is set as specified above using:
echo $LD_LIBRARY_PATHOn first launch, Retrospect Engine creates the folder /etc/Retrospect where these files will reside:
Config80.dat and configs.xml
retro.ini
Catalogs folder
operations_log.utx and assert_log.utx
pubkey.dat and privkey.dat (if applicable)
The /etc/Retrospect folder is equivalent to C:\ProgramData\Retrospect on Windows and “/Library/Application Support/Retrospect” on macOS.
You can use your preferred method to automatically run Linux Engine as root on Linux boot. Here is an example using systemd:
Create /usr/local/retrospect/engine/run.sh containing:
#!/bin/bash
RETRO_ENGINE_PATH=/usr/local/retrospect/engine
if [[ $LD_LIBRARY_PATH != *"$RETRO_ENGINE_PATH"* ]]; then
  export LD_LIBRARY_PATH=$LD_LIBRARY_PATH:$RETRO_ENGINE_PATH
  echo "setting library path: $LD_LIBRARY_PATH"
fi
$RETRO_ENGINE_PATH/retroengine
chmod a+x /usr/local/retrospect/engine/run.sh
Create systemd service file: sudo nano /etc/systemd/system/retroengine.service containing:
[Unit]
Description=retroengine
After=network.target

[Service]
ExecStart=/usr/local/retrospect/engine/run.sh
Type=simple
Restart=no

[Install]
WantedBy=multi-user.target
Enable the service to run at boot:
sudo systemctl daemon-reload
sudo systemctl enable retroengine.service
Test the service:
sudo systemctl start retroengine.service
sudo journalctl -u retroengine.service
Stopping Retrospect Engine
When requested to gracefully stop, Retrospect Engine will wait for important ongoing activities (such as backup) to complete. Using Retrospect Console to stop such activities lets Retrospect Engine terminate promptly. It may also take some time for Retrospect Engine to update more complicated activity schedules when there are many scripts with schedules set or there are ProactiveAI scripts with many sources. In that case, it can help to use such script’s Schedule tab to disable all schedules for that script.
If Retrospect Engine was run by systemd as shown in example above, it can be gracefully stopped using:
sudo systemctl stop retroengine.serviceWhen gracefully stopping, Retrospect Engine quickly updates its state information (such as configurations and log) on disk.
Managing Retrospect Engine using Retrospect Console for Mac
After downloading Retrospect Console for Mac, drag it into macOS’ Applications folder and run it.
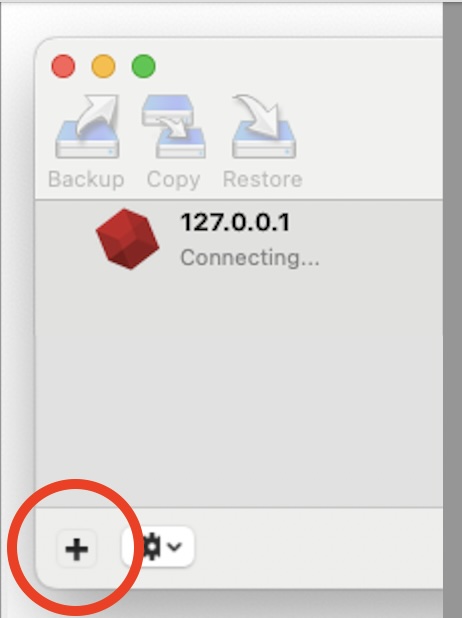
In Retrospect Console for Mac, click the + button at the bottom left corner to add a Retrospect server. Enter the Retrospect Engine system's IP address while leaving Password and Verification Code empty. When prompted, enter your Retrospect for Linux license code.
When creating backup/media set, change the Catalog location to /etc/Retrospect/Catalogs or a folder that you have created on the Engine system.
For more information on Retrospect, refer to the User's Guide.