To successfully recover a computer that won’t boot, it is first necessary to have a complete Retrospect backup of that computer’s boot volume, as well as any other disks that you want to restore. In addition, you will need to have access to the Backup Set storage media containing the backup, as well as the Catalog file that matches the Backup Set. A comprehensive backup strategy should include making copies of Retrospect’s Catalog files onto separate media, such as a network volume or another computer.
If your system does not boot, you will need to boot the computer from a Retrospect Emergency Recovery Disc and perform a complete restore.
Please note that with modern Windows operating system versions, live restores are not a valid restore option for full system recovery.
For information about disaster recovery with Retrospect Solo, see Disaster Recovery with Retrospect Solo.
Creating a Retrospect Emergency Recovery Disc
The Disaster Recovery wizard will help you create an ISO image that can be burned onto a disc and used to boot your computer and restore it to a previous state in the event of a disaster, such as a hardware (e.g. hard drive) failure. In order to fully protect your system and the programs and data that reside on it, it is strongly recommended that you follow the steps below to create a bootable disc as soon as possible.
Before you create an ISO image, make sure you have the following items:
The Microsoft Windows Assessment and Deployment Kit (Windows ADK) installed on the computer where you will be running the Disaster Recovery wizard. Retrospect will give you the option to download the Windows ADK during the process.
Any drivers or packages (i.e. package.cab) that you would like to add to the ISO image should be placed in the following directory before creating the ISO image.
<path to retrospect application>/drsupp/drivers
A blank optical disc
To create a bootable disc:
From the Retrospect navigation bar, go to Backup > Disaster Recovery.
Click Next.
Click Download the Microsoft Windows ADK image link, or click Browse… if you have already downloaded and installed the software.
To locate the installed Windows ADK software, browse to the appropriate folder, then click Open. For the current Windows 10 ADK. the path needed by Retrospect is "Program Files (x86)\Windows Kits\10\Assessment and Deployment Kit\Windows Preinstallation Environment". Navigating to the parent folder ("Assessment and Deployment Kit") and selecting "Windows Preinstallation Environment" to open fails with an error saying the copype.cmd file isn’t there.
Confirm the default location by clicking Next, or click Browse… to specify an alternate location or select the USB option.
Burn the ISO image file onto an optical disc, and store it in a safe place. Or use the USB drive created.
Note: If you received any errors during the creation of the Disaster Recovery image (e.g. not enough disk space for the image), click Open Log to view the Retrospect Operations log file.
USB Note: WinPE supports USB media from 4GB to 32GB. If your USB storage is larger than that, please format it into multiple partitions, so that you can select one within the correct range. Moreover, Retrospect Support has found USB media is not always consistent in working, as price and parts vary widely. If a USB drive fails, you should try a different one. WinPE will reformat the USB media as FAT32.
Using the Retrospect Emergency Recovery Disc
Once a Windows computer has been booted from the Retrospect Emergency Recovery Disc, its hard disk drives can be partitioned and formatted, and it can be restored either locally, by using the Retrospect application with connected storage media containing the backup, or from a Retrospect server on the network via the Retrospect Client software.
Note: The Retrospect Emergency Restore Disc and the Retrospect restore process are designed to restore to hardware similar to that from which the backup was made, such as when a hard disk drive is replaced, not when the destination computer is completely different from the source computer.
Planning ahead
To successfully recover a computer that won’t boot, it is first necessary to have a complete Retrospect backup of that computer’s boot volume, as well as any other disks that you want to restore. In addition, you will need to have access to the Backup Set storage media containing the backup, as well as the Catalog file that matches the Backup Set. A comprehensive backup strategy should include making copies of Retrospect’s Catalog files onto separate media, such as a network volume or another computer.
Note: If you do not have a copy of the Backup Set’s Catalog file, it can be recreated from the media, though this will increase the length of time required to complete the restore.
Note: The physical target hard disk drive must be the same size or larger than the physical drive being replaced. This is necessary to ensure the proper restoration of the necessary hidden partitions, such as a Recovery Partition and the EFI System Partition, that were present on the source disk.
Getting started
If the computer you are recovering from a non-bootable state is the same computer that runs Retrospect, then you will be restoring locally, using the Retrospect application. If the computer you are recovering is normally backed up as a client to another computer on the network running the Retrospect application, then you will be restoring using the Retrospect Client method.
Insert the Retrospect Emergency Recovery Disc in the optical drive of the computer to be restored, power it on and boot from the disc.
Note: You may need to adjust the boot order in your computer’s BIOS settings to boot from a disc. Refer to the documentation for your specific computer model for instructions on how to change the BIOS settings during the boot process.
Once you’ve booted from the Retrospect Emergency Recovery Disc and agreed to the legal notifications, you will be presented with the home screen of the Emergency Recovery wizard.
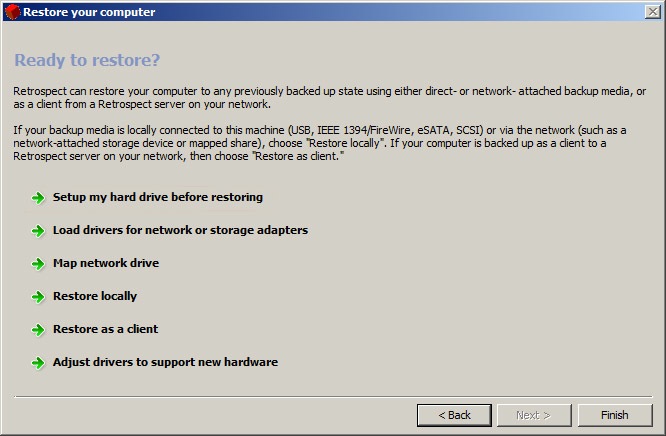
This screen provides access to all the tools needed to recover your computer. From here, you can partition and format your hard disk drive, install drivers for components required to access the network or storage devices, and map a network drive. Once the environment is configured with the aforementioned tools, you can choose to restore locally using the Retrospect application or as a client from a Retrospect server on the network.
Setting up your hard disk drive for recovery
Retrospect Disaster Recovery is intended for Windows-based computers and is restricted to OSes and file systems supported by Windows ADK. Refer to the following table for further examples of what is supported:
Action | Supported in this version? |
|---|---|
Basic partitioning | Yes |
Dynamic partitioning | No |
Creating GUID partitions | No |
Creating and deleting partitions | Yes |
Resizing partitions | No |
To partition and format a hard disk drive:
Click Setup my hard drive before restoring from the home screen of the Emergency Recovery wizard.
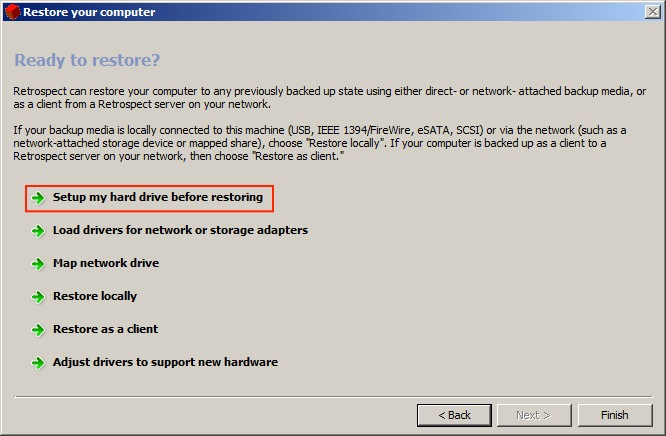
Note: A drive must have at least one active partition before recovery can take place.
The main hard drive setup screen appears.
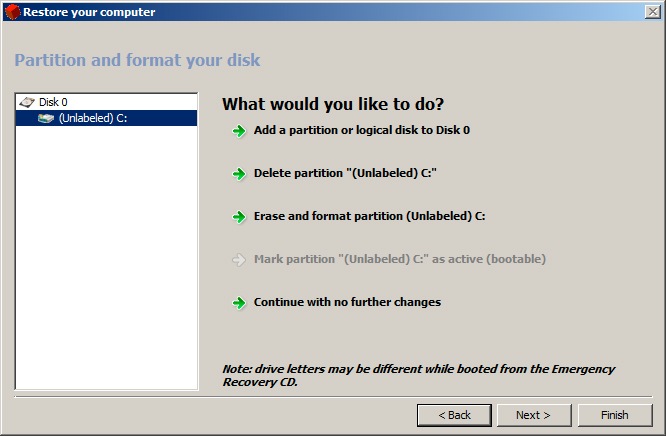
Select a disk or partition from the list on the left hand side of the dialog, and make your selection from the options on the right.
The options to the right will change depending on which disk or partition you have selected on the left hand side of the dialog.
Warning: Partitioning or formatting a hard disk destroys data stored on the disk. Proceed only if you are certain that the data on the drive has been properly backed up.
Warning: If the drive that are restoring had a hidden Recovery Partition, the Retrospect Emergency Recovery process will recreate the exact partitioning scheme that was present when the backup being restored was originally created. This process will destroy all data present on the drive.
Loading drivers
If the computer being recovered has a network adapter or storage host bus adapter that isn’t recognized by the Retrospect Emergency Recovery system and that must be used in order to perform the recovery, it may be necessary to load a Windows driver for that adapter.
To install a driver:
Make sure that the driver is stored on media that is accessible by this computer.
Click on Load drivers for network or storage adapters from the home screen of the Emergency Recovery wizard.
Browse to the location of the .inf file, then install.
Mapping a network drive
If you need to access a network share to complete the recovery process, a wizard will allow you to type a path and drive letter to map the volume to.
To map a network drive:
Click Map network drive from the home screen of the Emergency Recovery wizard.
Type the UNC path to the share, assign a drive letter, and enter the proper login credentials in the spaces provided.
Restoring locally
If the computer being recovered was the Retrospect backup computer, you will be using the Retrospect application on this computer to restore from a Backup Set stored on either a locally-attached device, such as a USB hard disk drive or SCSI tape drive, or on a network volume.
To restore locally:
Click Restore locally from the home screen of the Emergency Recovery wizard, and use Retrospect to restore the computer as described in the Restore section of Chapter 4, “Immediate Operations,” in the Retrospect User’s Guide.
Restoring as a client
If the computer being recovered was being backed up as a client to a Retrospect server on the network, you will be restoring as a client.
To restore as a client:
Click Restore as a client from the home screen of the Emergency Recovery Wizard to initiate Retrospect Client mode.
Once you have logged in this computer as a client to the Retrospect server, proceed to restore the computer as described in the Restore section of Chapter 4, “Immediate Operations,” in the Retrospect User’s Guide, selecting the client’s volumes as the destinations for the restore.
Note: When restoring the boot volume, make sure that you select a restore option that includes the registry and System State information, otherwise, the computer may not start up, and the Retrospect Emergency Recovery process will need to be repeated.
Final steps
When the restore is complete, exit Retrospect (if restoring locally), eject the Retrospect Emergency Recovery Disc, and click the Finish button in the Retrospect Emergency Recovery wizard to reboot the computer. In some cases a second reboot may be required.
If a hidden Recovery Partition was present when it was previously backed up, then the Retrospect Emergency Recovery process will automatically re-partition the startup disk to match the original partition layout during the restore. This step is necessary for the computer to be able to start up properly following the restore.
If a hidden Recovery Partition was present and restored by Retrospect, you may need to adjust the hard disk partition sizes after the computer starts up normally. The most common need for this step is when a higher-capacity hard disk drive is used to replace full or failed lower-capacity hard drive. Because Retrospect must recreate the same partitioning scheme on the new drive, the extra capacity of the new drive will not be available for use until you extend an existing partition or create a new partition. Both of these tasks can be accomplished using Disk Management tool.